A Cement Stucco Study
Three or two coat cement stucco is often misunderstood, mistreated and frequently maligned.

Three or two coat cement stucco is often misunderstood, mistreated and frequently maligned. The specifications written for Portland cement plaster, in Specification Section 09220, can vary from region to region as no exterior cladding has more options from the blending on site of basic materials to completed installation. Cement stucco is very simple, yet extremely complex, making it and the contractors who install it easy to attack, and a favorite for construction defect litigation.
No one involved with cement stucco is immune to the attacks-not the architect, general contractor or plastering contractor. Architects need to protect themselves from a poor specification, outlandish design concepts and following established standards is a good start. It should go without saying that ASTM C-1063 and ASTM C-926, and local building codes, must be in the reference section of your specification. Before going into what should be there, some items should not be there.

Control joint lay-out should not be per “industry/ASTM standard” or left to the contractor to decide. He has no idea of your aesthetic desire or where the stress points are on the building. You must draw them on the elevation or have a pre-installation meeting with the contractor to discuss options. It may even be possible you desire no control joints; that is your right as the designer.
It is strongly recommended that you start with a standard stucco specification from your local plaster trade bureau. Remember, architects have to know a little about a lot; but the technical people at bureaus know a lot about plaster, so take advantage of it. They are the experts and know the local products and practices that will work on your project. I further recommend you do not alter or amend the bureau specification, unless you speak to the bureau who published that specification. And maybe most importantly, do not allow the general contractor to simply take the cheapest bid.

1. The contractor shall apply two layers of water resistant barriers over all types of sheathing. Laps (vertical and horizontal) shall exceed code minimums, and be installed and integrated with flashings in a “weatherboard” or “shingle-fashion.” Do not proceed to apply plaster until it is verified there are no reverse laps.
Two layers of WRBs on all sheathing may exceed the code but it is good insurance. The three methods of applying two layers, the double layer, the separate layer and the “50 percent” method are all acceptable.
The vast majority of all water intrusion problems that are related to stucco assemblies are due primarily to a failure of installing the WRB in a “shingle-fashion.” It is not staples or fasteners penetrating through the WRB that is the problem. This tip can save you: Even if your detail shows a reverse lap, it can protect you.
2. Cement plaster over concrete or masonry substrates requiring a lath, the lath shall NOT have a paper-backing.
Building paper, housewraps and felts can act as bond breakers and due to the only feasible method of attachment, they can have the exact opposite effect you desire-decrease in water resistance. Weather resistive barriers applied over concrete or masonry can also increase the likelihood of cracking. It is not, nor has it ever been, an industry recommendation to install these WRBs over concrete/masonry.
 3. Control joints: The contractor shall install single-piece control joints per
the drawings. If framing does not support secure attachment of lath
terminations, contractor shall apply the control joint over continuous
(unbroken) lath.
3. Control joints: The contractor shall install single-piece control joints per
the drawings. If framing does not support secure attachment of lath
terminations, contractor shall apply the control joint over continuous
(unbroken) lath.
ASTM calls for lath to be discontinuous; however, in some instances, that can create major problems. Control joints over continuous lath is common in many areas of the country/all weather regions and is considered an acceptable industry practice. For example, Arizona and Alaska both have great success with single-piece control joints over continuous lath in cement plaster projects. Cutting the lath without proper framing can be problematic.
4. Walls subject to wind-driven rain shall have all terminations and intersections of control joints set in a daub of sealant to prevent water entry.
This is subjective and certainly not mandatory in all regions of the country. For example, it may not be an issue in Nevada, but is critical in Seattle. Water runs along control joints like a gutter and if there are large openings at the ends, it can be a source of water entry. Cement stucco over framing is anticipating small amounts of moisture, not water pouring in. Setting the ends in daubs of sealant provides an effective back seal to allow for anticipated movement and keep the seal in place. Some consideration should be given as to where to “effectively” place sealant.
 5. The contractor shall provide a square foot or yard price for a lamina coat over
the brown coat. A lamina coat shall be a fiberglass mesh embedded in a skim
coat of polymer-enriched cement compatible with the finish coat. The contractor
may be directed to provide the lamina in specific areas prior to applying the
finish coat.
5. The contractor shall provide a square foot or yard price for a lamina coat over
the brown coat. A lamina coat shall be a fiberglass mesh embedded in a skim
coat of polymer-enriched cement compatible with the finish coat. The contractor
may be directed to provide the lamina in specific areas prior to applying the
finish coat.
This is a “just-in-case” clause. The lamina provides a highly crack-resistant and vapor-permeable membrane over the brown coat. This has been proven to work very well, but comes at a cost. For example, if the owner determines the entryway walls cannot have cracks in the stucco at any cost, this clause and preset price can help you. Plus, it has the added bonus of letting the plastering contractor know what works and is fair. Fair and forward thinking specifications tend to alleviate potential problems, weed out unqualified contractors and result in long term better pricing for you.
6. Lath shall lap the solid flanges of trim accessories by more than 50 percent.
The solid flange of any accessory can expand, contract or move and result in a plaster crack along the outer edge of the accessory. Covering the flange with lath provides additional strength in the plaster to resist the stress and minimize this type of cracking. Good lathers know this and don’t need to be told, but some do not have a clue.
 7. Corner reinforcement: Corners shall be a product with a PVC (plastic nose) when
an acrylic finish is used or a primer applied over a metal nose. Corners to
receive cement finish shall have a galvanized wire nose.
7. Corner reinforcement: Corners shall be a product with a PVC (plastic nose) when
an acrylic finish is used or a primer applied over a metal nose. Corners to
receive cement finish shall have a galvanized wire nose.
Applying an acrylic finish over a standard galvanized corner can lead to rusting when exposed to moisture. A PVC nose solves that issue; an alternate is a primer coat over a metal nose. However, cement finish may stick to the PVC but will not permanently bond. Cement finish is thin and brittle and tends to pop off the PVC nose.
8. Contractor in an attempt to minimize cracking at windows and doors shall use option a) or b):
a.) Use furring nails around the openings: This will only be possible with weld or woven wire laths and is not practical with steel framing.
b.) Apply lath (metal or wire) strips (“butterflies”) in the soft scratch coat:
This will make your plastering contractor think, and he should be impressed. Lath installers tend to over-nail around door and window openings-you can’t really blame them, they want to keep the lath from popping out. But this is similar to pushing the re-enforcing steel mesh in a concrete slab down into the soft sand; it will defeat the intent of the lath “swimming” in the plaster coat. Note: Apply butterflies in the soft scratch coat, as this is far more effective than nailing lath on lath and then a thin cement top coat.
 9. The brown coat shall be “hard” floated. Hard floating means using a neoprene,
cork or wood float. Soft sponge floats will not compact the cement and will
increase the likelihood of cracks. Hard floating is a timing issue and with
light pressure, but will increase water and crack resistance.
9. The brown coat shall be “hard” floated. Hard floating means using a neoprene,
cork or wood float. Soft sponge floats will not compact the cement and will
increase the likelihood of cracks. Hard floating is a timing issue and with
light pressure, but will increase water and crack resistance.
10. The plaster shall be flat and in plane with no “eye catching” imperfections. The out of plane tolerance shall not exceed 1/4 inch in 10 feet.
I know you want to have a tighter tolerance but no industry expert or standard is going to support that position. You want a good, high-quality stucco project and you want it to be reasonably priced. This tolerance is practical, achievable and not noticeable to the naked eye. A tighter tolerance is not practical, but possible; plan to pay a substantial premium for it. In the event of a dispute, this tolerance rarely holds up in litigation and you will develop a reputation as unreasonable and your project prices for stucco soon will reflect that attitude.

Unfortunately, even if the consultant is experienced in cement stucco, they cannot be on every wall at all times. Things get covered up and will slip by the inspector; this is just a fact. Thus, the journeymen on the project ultimately determine the success or failure of the plaster assembly. The answer to universal success in exterior cement stucco assemblies is a qualified apprenticeship program that trains all lathers and plasterers in the proper and best industry practices. Don’t go by price alone.

This demonstrates the importance of trained and quality tradesmen doing the work. You know the mock-up was closely supervised and inspected thoroughly. The inspectors probably had no more than two or three installers to watch, and in a small confined area, but it still failed. Not blaming the inspector-he cannot watch every move workers make-it is just not realistic. What will happen when they hit the big walls and the inspector/consultant has to watch up to ten installers at various locations? Without trained journeymen installing these panels and relying solely on inspection for water-tightness? Good luck with that one. You cannot underestimate the value of apprenticeships and skilled labor.
Cement stucco is the best cladding you can get when installed by professionally trained journeymen. Cement stucco is the worst cladding you can get when installed by poor craftsmen, regardless of the inspections.
Three or two coat cement stucco is often misunderstood, mistreated and frequently maligned. The specifications written for Portland cement plaster, in Specification Section 09220, can vary from region to region as no exterior cladding has more options from the blending on site of basic materials to completed installation. Cement stucco is very simple, yet extremely complex, making it and the contractors who install it easy to attack, and a favorite for construction defect litigation.
No one involved with cement stucco is immune to the attacks-not the architect, general contractor or plastering contractor. Architects need to protect themselves from a poor specification, outlandish design concepts and following established standards is a good start. It should go without saying that ASTM C-1063 and ASTM C-926, and local building codes, must be in the reference section of your specification. Before going into what should be there, some items should not be there.
Backing
sealing trim accessories with a daub of sealant can prevent water entry and
extend the life of a cement plaster wall.
The Do Nots
Cement stucco is generic. This means specifying that a contractor use “same source” materials from a single manufacturer is not possible. You will have to clearly state in the specifications what products are allowed or desired.Control joint lay-out should not be per “industry/ASTM standard” or left to the contractor to decide. He has no idea of your aesthetic desire or where the stress points are on the building. You must draw them on the elevation or have a pre-installation meeting with the contractor to discuss options. It may even be possible you desire no control joints; that is your right as the designer.
It is strongly recommended that you start with a standard stucco specification from your local plaster trade bureau. Remember, architects have to know a little about a lot; but the technical people at bureaus know a lot about plaster, so take advantage of it. They are the experts and know the local products and practices that will work on your project. I further recommend you do not alter or amend the bureau specification, unless you speak to the bureau who published that specification. And maybe most importantly, do not allow the general contractor to simply take the cheapest bid.
A
lamina over the plaster basecoat is an option that can eliminate cracking, but
comes at a cost; get that square foot price as an option.
The Solid Ten Specs
The following 10 items should be somewhere in your specification for generic cement stucco. They are there to protect you and the architect, and provide a better cement stucco job.1. The contractor shall apply two layers of water resistant barriers over all types of sheathing. Laps (vertical and horizontal) shall exceed code minimums, and be installed and integrated with flashings in a “weatherboard” or “shingle-fashion.” Do not proceed to apply plaster until it is verified there are no reverse laps.
Two layers of WRBs on all sheathing may exceed the code but it is good insurance. The three methods of applying two layers, the double layer, the separate layer and the “50 percent” method are all acceptable.
The vast majority of all water intrusion problems that are related to stucco assemblies are due primarily to a failure of installing the WRB in a “shingle-fashion.” It is not staples or fasteners penetrating through the WRB that is the problem. This tip can save you: Even if your detail shows a reverse lap, it can protect you.
2. Cement plaster over concrete or masonry substrates requiring a lath, the lath shall NOT have a paper-backing.
Building paper, housewraps and felts can act as bond breakers and due to the only feasible method of attachment, they can have the exact opposite effect you desire-decrease in water resistance. Weather resistive barriers applied over concrete or masonry can also increase the likelihood of cracking. It is not, nor has it ever been, an industry recommendation to install these WRBs over concrete/masonry.
Applying
the secondary WRB and integrating in “shingle fashion” is key to a successful
plaster job over framing.
ASTM calls for lath to be discontinuous; however, in some instances, that can create major problems. Control joints over continuous lath is common in many areas of the country/all weather regions and is considered an acceptable industry practice. For example, Arizona and Alaska both have great success with single-piece control joints over continuous lath in cement plaster projects. Cutting the lath without proper framing can be problematic.
4. Walls subject to wind-driven rain shall have all terminations and intersections of control joints set in a daub of sealant to prevent water entry.
This is subjective and certainly not mandatory in all regions of the country. For example, it may not be an issue in Nevada, but is critical in Seattle. Water runs along control joints like a gutter and if there are large openings at the ends, it can be a source of water entry. Cement stucco over framing is anticipating small amounts of moisture, not water pouring in. Setting the ends in daubs of sealant provides an effective back seal to allow for anticipated movement and keep the seal in place. Some consideration should be given as to where to “effectively” place sealant.
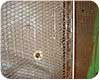
Cement
plaster over concrete/masonry is best with no bond breaker (a sheet
water-resistant barrier) under the lath. Also note the lath covers the
attachment flanges of the trims by more than 50 percent.
This is a “just-in-case” clause. The lamina provides a highly crack-resistant and vapor-permeable membrane over the brown coat. This has been proven to work very well, but comes at a cost. For example, if the owner determines the entryway walls cannot have cracks in the stucco at any cost, this clause and preset price can help you. Plus, it has the added bonus of letting the plastering contractor know what works and is fair. Fair and forward thinking specifications tend to alleviate potential problems, weed out unqualified contractors and result in long term better pricing for you.
6. Lath shall lap the solid flanges of trim accessories by more than 50 percent.
The solid flange of any accessory can expand, contract or move and result in a plaster crack along the outer edge of the accessory. Covering the flange with lath provides additional strength in the plaster to resist the stress and minimize this type of cracking. Good lathers know this and don’t need to be told, but some do not have a clue.
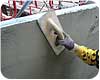
A
hard float will properly densify or consolidate the basecoat increasing crack
and water resistance. The applied
pressure required is rather light, timing is the key.
Applying an acrylic finish over a standard galvanized corner can lead to rusting when exposed to moisture. A PVC nose solves that issue; an alternate is a primer coat over a metal nose. However, cement finish may stick to the PVC but will not permanently bond. Cement finish is thin and brittle and tends to pop off the PVC nose.
8. Contractor in an attempt to minimize cracking at windows and doors shall use option a) or b):
a.) Use furring nails around the openings: This will only be possible with weld or woven wire laths and is not practical with steel framing.
b.) Apply lath (metal or wire) strips (“butterflies”) in the soft scratch coat:
This will make your plastering contractor think, and he should be impressed. Lath installers tend to over-nail around door and window openings-you can’t really blame them, they want to keep the lath from popping out. But this is similar to pushing the re-enforcing steel mesh in a concrete slab down into the soft sand; it will defeat the intent of the lath “swimming” in the plaster coat. Note: Apply butterflies in the soft scratch coat, as this is far more effective than nailing lath on lath and then a thin cement top coat.
A
PVC nose cornerbead is preferred for cement plaster to receive an acrylic
finish. Use a metal nose for brittle cement finish coats.
10. The plaster shall be flat and in plane with no “eye catching” imperfections. The out of plane tolerance shall not exceed 1/4 inch in 10 feet.
I know you want to have a tighter tolerance but no industry expert or standard is going to support that position. You want a good, high-quality stucco project and you want it to be reasonably priced. This tolerance is practical, achievable and not noticeable to the naked eye. A tighter tolerance is not practical, but possible; plan to pay a substantial premium for it. In the event of a dispute, this tolerance rarely holds up in litigation and you will develop a reputation as unreasonable and your project prices for stucco soon will reflect that attitude.
Portland
cement plastering (stucco) is simple, and complicated.
Selecting a Plastering Contractor
Beware the low bid-all contractors are not created equal. The success of a stucco assembly is largely dependent on the applicators. Verify they have an approved apprenticeship program are knowledgeable and skilled. The low bidder may not know, care or be capable to see the many pitfalls plastering installers face on a daily basis. Some believe that hiring a consultant to inspect the work is the perfect answer to a cheap bid.Unfortunately, even if the consultant is experienced in cement stucco, they cannot be on every wall at all times. Things get covered up and will slip by the inspector; this is just a fact. Thus, the journeymen on the project ultimately determine the success or failure of the plaster assembly. The answer to universal success in exterior cement stucco assemblies is a qualified apprenticeship program that trains all lathers and plasterers in the proper and best industry practices. Don’t go by price alone.
Conclusion
A good, fair specification with qualified applicators produces a traditional cement stucco assembly that is reasonable in cost and will service the structure for several decades. A generic two or three coat Portland cement plaster (stucco) works. Expensive add-ons or elaborate designs are not required for successful projects in all regions of the country. The building code and ASTM standards confirm and defend this statement, especially in the courtroom.While
possible to specify cement plaster to
a more stringent “in plane” tolerance, it is
not recommended.
Succeed or Fail
The disbelief that an expert inspection can ensure a quality installation and allow you to save money on the installer might best be illustrated in the recent media coverage about Capital Gate Tower, in Abu Dhabi. The building is a leaning tower of glass with a somewhat complex skin of glass panels. The designers created a system to install the curved glass panels and ensure the building would be water tight. A mock-up was built and tested. To the dismay of the owner and designers, the mock-up failed to keep water out. The designers went back to the drawing board, scratching their heads as to what went wrong. As the failed mock-up was dismantled, it was discovered a single panel was inadvertently installed backwards making the seals useless; this was what caused the leaks and not the design.This demonstrates the importance of trained and quality tradesmen doing the work. You know the mock-up was closely supervised and inspected thoroughly. The inspectors probably had no more than two or three installers to watch, and in a small confined area, but it still failed. Not blaming the inspector-he cannot watch every move workers make-it is just not realistic. What will happen when they hit the big walls and the inspector/consultant has to watch up to ten installers at various locations? Without trained journeymen installing these panels and relying solely on inspection for water-tightness? Good luck with that one. You cannot underestimate the value of apprenticeships and skilled labor.
Cement stucco is the best cladding you can get when installed by professionally trained journeymen. Cement stucco is the worst cladding you can get when installed by poor craftsmen, regardless of the inspections.
Looking for a reprint of this article?
From high-res PDFs to custom plaques, order your copy today!


