Trowel Talk: Let's Talk About Trowels
.jpg)
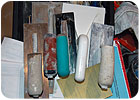
I was 14 years old and the tool I held uncomfortably in my hand had long ago been relegated to the bottom of a pick-up truck tool box; the dark and dusty graveyard where old trowels with rusted blades and popped rivets go to die. You see plasterers very rarely throw away their old trowels; they just put them out to pasture. A quality built trowel will serve its purpose for many years, even decades if cared for properly.
But sometimes a trowel accidentally gets knocked off the scaffolding or someone neglectfully lays a mud board or a piece of scaffolding down on a trowel inadvertently left in the back of a truck. Even these “walking wounded” will generally make their way to some useful purpose, (i.e. scraping floors, cut into midget trowels) and some will even fall into the hands of young bucks who think they want to make their living in this physically demanding trade.
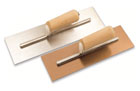
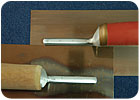
Golden
stainless steel
Trowel Anatomy 101
There are four basic components to a well-made trowel:
- Blade
- Shank
- Handle
- Rivet

Stainless
steel
The drawback to stainless steel is that it is a little heavier and less flexible. Golden stainless steel is easily recognized by the coppery-golden color, a byproduct from heat-treating ordinary stainless steel. The tempering or “annealing” process is used to harden the steel, improve its abrasive resistance and fortify its strength after its been subjected to the drilling and stamping of the manufacturing process. The advantages of a golden stainless are the same as a normal stainless steel blade but due to the strengthening benefits of heat-treating, a thinner blade can be used which reduces weight and increases flexibility.
High
carbon steel trowel blades
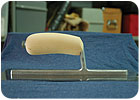
“Camel-Back”
or aka “California-Style”
wood handle.
A) They like the smooth feel of wood over some of the soft-grip handles that have a seam or joint in them. This preference is probably driven more in plastering over the other trades because of the unique manipulation of the trowel turning in the plasterers hand as he changes direction and from application on the wall to loading his hawk.
B) One hundred percent of those I surveyed said that they always customize their handle as soon as they get it, using a rasp, file and sand paper. I guess if it worked for grandpa, as smart and hard as he worked, it will work for me.
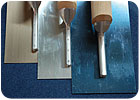
Top:
Rivets pass through the spine of the
shank, larger rivet at “toe.” Bottom: Rivets
do not pass all the way through but are wider as is shank spine.
Rivet
heads and face of trowel blade ground flush.
Breaking in a new trowel is a periodic requirement for all good plasterers. Most will begin by using the trowel to spread the scratch and brown-coats of plaster, which really don’t require a trowel blade that has been worn to the “sweet-spot.” This allows them to fine tune the shaping of the handle and break in the blade, and to see how the components, especially the rivets, hold up. Once the trowel feels comfortable to the hand and the blade begins taking on a good “set,” a natural and very slight concaved curve, it is only then considered a very valuable tool.
Most plasterers will have several trowels of the same size all in various stages of the break-in process; some they use for scratch and browning, and others they use for interior or exterior finish work. Some of these that have been taken care of and used daily will wear down by 10 to 20 percent of their original width over a lifetime of use.
Unless a trowel is damaged by abuse or neglect, it is the rivets that will give out long before the blade, shank or handle will wear out. You can extend the life of a trowel by only using it as it was intended and refrain from using it as a scraper and pulling the blade backwards, as this causes undue stress on the rivet connections.
Interior finish plastering requires a perfectly smooth edge; some say a “razors-edge.” If you think a box cutter is sharp, try (carefully) feeling the edge of a plasterer’s finish trowel sometime. As the trowel is used to spread and polish the wall surface, the metal eventually will begin to wear. The square cut edge will give way to a beveled knife-edge, and eventually the metal will become thin and easily nicked. Once the edge has been worn to the sweet-spot, you want to try and keep it there and not allow it to become too thin. The prudent use of a fine metal file, held perpendicular with the blade edge, and run down the edge like a carpenter planing the edge of a door, and a couple of careful swipes with some fine emery cloth, will ensure the edge of the blade remains straight and nick-free.

An
unclean trowel equals unnecessary extra weight, sore elbows and wrists.
If you educate yourself about the options, you can keep a quality product clean and well maintained. The trowel you buy today will not only serve you well each and every day, but it may very well find its way into the hand of some young buck yet to be born. W&C
I wish to thank the following for their contributions to this topic.
- Steve Cook, Kraft Tools www.krafttool.com
- Tim Brennecke, Marshalltown Co. www.marshalltown.com
- OPCMIA Plastering Instructors: Sam Prince (Wash.), Kevin Gordo (Pa.), Wimlish Owens (Ga.), Marty O’Brien (Mass.), Tim Nelson (Calif.), Fred Gallimore (Okla.), Rick DalPazzo (Mo.), Raul Montoya (Ariz.), Maybell Hartness (Idaho), Jimmy Obergon (Nev.), Kyle Sparkman (Ohio), Dan Jackson (Va.), David Woods (Calif.), Laura Johnson (Ore.), Jerry Shelton (Calif.), Nicho Garcia (Texas), Gene Neville (Ohio), and Sammy Stuart (Ark.).
Looking for a reprint of this article?
From high-res PDFs to custom plaques, order your copy today!


