Young Minds, Old Values

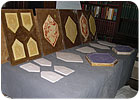
Restored
originals, molds, and reproductions.
Fortunately, the damage was primarily one room but this area, which was approximately 350 square feet, happened to have a very subtle yet decorative ceiling which dated to the home’s original construction at the turn of the century. The original owner and designer was a well-known University of Michigan Professor of Pharmacy/Botany named Julius Otto Schlotterbeck.
The pool of plasterers in the Ann Arbor area is quite small. Although a handful of very qualified contractors turned up to bid on the job, several walked away citing it was beyond their scope. Three actually entered competitive bidding for the job. Jim Conklin, owner of JPC Plaster & Drywall, won the bid. Located in nearby Dexter, Mich., JPC specializes in historic restoration, cornices and trim, decorative rings and Venetian plaster.
Conklin knew the project would take time. The leak had happened in the fall and he was awarded the project this past winter. Yet he is grateful to the fraternity for delaying the replacement of the bathtub. This gave him time to properly research and experiment with developing a formulation of modern materials.
Conklin, who did not come from a multi-generational family of plasterers to pass on the secrets of the trade, instead turned to the fine arts community, finding synergy within both parties in the mold and decorative process.
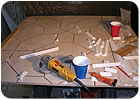
Layout
for cutting miter joints in the battens.
Conklin collaborated on this project with Blackthorne Design’s Susan Robinson-Heaslip, an Ann Arbor paint color and design consultant who has a background in sculpture, and has a network of resources within historic preservation and renovation parties. Together, they spent a lot of time researching early 1900s techniques in plaster mold-making and what type of materials were used.
“We spent about six hours of research on the Internet and were able to access information from a research library at the University of Michigan,” says Robinson-Heaslip. “Some research has been done on similar types of ceilings made in the Lincruta and Anaglypta style. But the pressed fiberous plaster in this house is of Victorian origin and pre-dates these methods. Some materials that were used in 1899 are available today, while others have passed into obscurity. Substitutions and experimentation resulted in the same look with better strength.”
“They hired me just to do the restoration on the plaster work,” says Conklin. “There had been a leak on an improperly installed bathtub above the ceiling and this ceiling was 100 percent destroyed over about 15 percent of the room. I immediately recognized it was going to be some extremely detailed work with the design pattern in each of the geometric figures. There is a low relief design and then there’s trim work between each of the geometric shapes. Finally, at the edges, the cornice has about 12 different steps in its profile. It’s a very complicated cornice and ceiling.”

Original
and reproduction come together in a seamless blend, ready for paint.
“The way these are actually run [the cornices] is to make a metal plate in the shape of the cornice and then we mount that on a wooden box, pour the plaster onto a table in front of it and slide the assembly so that it cuts the plaster down into the shape. In the first couple times over it will be rough and by the time you have done it five or six times with repeated layers of plaster, you begin to get the final detail,” says Conklin about the cornice-making process.
“Basically what we’re doing is putting that lump of plaster in front of a knife cut to fit the original cornice, sliding right along and cutting the shape basically the same way a machine would extrude through a template. That can be done on a bench or right on the wall, but when you’re doing it on a bench, gravity is in your favor with the wet plaster. It’s a little easier to do it on the bench,” he says.

Susan
Robinson-Heaslip and James Conklin spent several months researching plaster
techniques and products for the job.
Robinson-Heaslip and Conklin spent several months researching plaster techniques and products for the job. These pieces are very thin, about 1/8 to 1/4 inch thick. “We’re using USG plasters but we’re mixing a couple of different plasters to get a combination of quick set and an initial hard set so we can lift it out of the mold and still maintain some flexibility so we can move it around without it cracking,” says Conklin. “There’s a tough call between hardness and flexibility.”
The materials for this job were from Commercial Building Supply, a supplier in Ann Arbor as well. USG No. 1 molding plaster was used, as well as fortifiers and fibers for added strength: bonding agents would not be appropriate as the plaster would stick to the mold when being taken out.
When W&C visited the job site in June, the job was roughly 80 percent complete. The next step is for the painting contractor to come and finish the project.
Conklin’s future plan is to open a plastering school within one to two years. He views himself as a continuing student in plastering yet wants to share his knowledge on everything from basic repair of historic plaster to decorative work. He welcomes all that are interested. Plaster on. W&C
Looking for a reprint of this article?
From high-res PDFs to custom plaques, order your copy today!


