
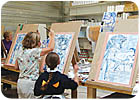
This past October, I joined a group of artisans for an annual round of advanced fresco classes and to help in the restoration of a church in a tiny village in the French mountains.
This year, there were seven of us who met in Montpellier with our French host and instructor, Pierre Ricard, owner of Chauxbusiness, of Laroque, France. "Chaux" is the French word for lime plaster and Pierre's company is the supplier of lime plasters, pigments and other products available in the United States through Dimensions International, of Palm Beach Gardens, Fla. Nina Zubkova, president of the company, organized the trip that was not only a valuable learning experience for us but afforded us a wonderful working vacation in a beautiful part of France. Dimensions offers classes that teach artisans techniques to apply these plasters that have been used since the Romans and this trip was open only for advanced applicators who had years of experience.
All of us were looking forward to learning a fresco technique that can be done off site and a technique to duplicate the beautiful Delft and other antique hand-painted tiles all using lime plasters and earth pigments. We also experimented with a plaster and clay product, and produced a cracked texture that was then colorwashed and painted.
Surface creators
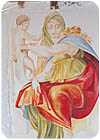
Pierre had arranged for a wonderful French artist, Oswald Olivato, to be our instructor. Oswald is a "creator of surfaces," a master at Italian plasters,fresque, trompe l'oeil, decorative painting and restoration. He brought his colleague Danielle Doumaux, a talented artist and watercolor instructor, to assist him. We would paintfresque à temperausing the earth pigments and egg yolk (described later in this article).The image of the Delphic Sybil as painted by Michaelangelo on the Sistine Chapel was the inspiration for our fresco. Oswald showed us how to paint the voluminous folds of fabric using color, light and shadow and demonstrated how to paint the face and figure using the earth pigments. The first day of class, we prepped our mesh screen for the fresco. Pierre had installed large laminated surfaces to the walls of his studio. We first taped heavy plastic to the surface, overlayed and taped a sheet of spun fiberglass as a liner to keep the plaster intact after troweling. Next, we taped a 3/16-inch nylon mesh over the liner. (Due to the corrosive nature of lime plaster, metal mesh was not used.) The dimensions of each "sandwiched" piece was 28 inches by 39 inches.
Pierre named the product we would use called "Flexicoat," a lime plaster with a resin in it that allows it to flex but keeps the integrity of the plaster so we could layer it, sand it, paint it and wax it as we would a typical fresco. Being able to paint frescoes off site and then install them in a niche or other area-not to mention shipping to the client-opens up a new dimension for us in technique and marketing.
Pierre had enlarged the image of the Delphic Sybil and had it printed on vellum sheets so we each had one to use. We rubbed the backs of the vellum with a water-based wax crayon or chalk, depending on our preference, and then transferred the design to the dried Flexicoat using a pencil. Now we were ready for Oswald's direction.
We prepared our paint using the earth pigments, alum, white vinegar, distilled water and egg yolks from fresh eggs. With a small brush, we used yellow oxide with a bit of the tempera mixture and thinly outlined the figure using our tracings as a guide. Oswald gave us guidelines to follow:
- Always use more than one pigment at a time creating the greatest contrast and blending at the end
- Paint from light to dark
- Blend with water
- Finish one section then the next, light and dark, then blend, always using the tempera
He demonstrated the technique and amazed us as we watched him create the figure with such depth and richness of color. "Dare to put some light into the shadows," as he says. Painting with such bold strokes and bright colors took a bit of getting used to but we watched how he worked the colors with his brush and finally grasped the technique.
Less is more
Oswald also taught us to use a minimum number of pigments when we painted. It was amazing to see the range of colors and dimensions we could achieve with his technique.The Flexicoat gave us more time to work the pigments while painting the fresco than other products would. We could wipe off color with a damp sponge or cloth to highlight areas that were too dark or overworked. Once dry, the piece could be rolled or bent so the plaster would crack, then sanded and waxed to age it. The mesh screen and liner keeps the plaster intact, as the piece can then be cut to size and installed in a niche or panel in a home using a heavy wallpaper paste. It can then be removed at a later date should the client redecorate or move and want to take the painting with them.
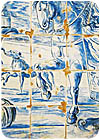
The second technique Oswald taught was how to paint on lime plaster designs and images found on Delft and antique tiles from Spain, Portugal, Italy, France and other Mediterranean countries. The boards, approximately 20 inches by 24 inches, were primed with Minerale. After drying for roughly an hour or two, we troweled on a skimcoat of Travertino fine-tinted terra cotta. When it was dry, we took kitchen string, pulling it taut and taping it to the back of the boards in 6-inch intervals, to make the tile pattern.
With a small putty knife, we then troweled white Travertino F gently over the string, pressing firmly to make certain it adhered to the terra cotta. We then troweled over where the strings intersected, but left some areas exposed for aging and cracking. The rest of the board was then covered, again leaving areas open. When the first layer was dry, we tinted the Travertino F with a bit of grey and troweled on again. The next layer was white Marmarino, layering with the knife, leaving some areas exposed, and then going over with an ivory tinted Marmarino, blending in for an aged look. With a pavan, we smoothed the surface for an authentic antique tile look and let the boards dry. If we chose, we could take a sharp blade and carve a fine crack on the surface of the drying plaster to age it even further. Finally, we removed the string, leaving uneven grout lines and a very antique look to the tiles.
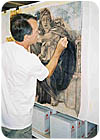
We then started on a third sample board, primed with Primer Minerale, and randomly brushed on a special size that was allowed to dry. This board would be the base of a cracked plaster with the Pompeii magician painted on it. After the size was dry, it was skimcoated with a product called Stucco Terra, a lime plaster with clay added to it, tinted Pompeii red (a combination of red oxide and brown). The Stucco Terra started cracking immediately. The thicker the plaster, the larger the cracks. After the first coat was set, a second coat was troweled on, backfilling the board. Once dry, we sanded it to smooth the surface a bit and then brushed on a thin coat of Veilcalce, a pure lime product, to enhance the color of the board, using orange, red and red oxide to tint it. A soft damp sponge was used to remove the brush strokes.
Oswald then transferred the design of the magician and started painting it using a fine brush and the tempera technique. The design was delicate and organic, and once we completed our paintings, we sanded and waxed them to give them the look of antiquity that is so impressive.
Trade communicating
We came to understand Oswald's helpful comments through the universal language of gesture and inflection since he spoke no English and we couldn't speak French.After four days of class time, Pierre took our group on a day of sightseeing that took in both natural and manmade wonders, including the Millau Viaduct (the world's highest bridge).
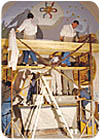
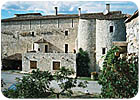
Saturday, we drove to Saint-André de Majencoules, a tiny terraced village atop a mountain in southern France. The village church needs a great deal of restorative work as the years have taken their toll on the plaster interior, particularly in the area of the main alter and side altars. Last spring, the main altar was repainted and stenciled and our project was to design and paint the niche of the altar of St. Joseph. While the group was priming and plastering the walls, Pierre and I drove to the neighboring village and copied some of the period designs to use in our project.
There were two paintings on canvas that were in place on the wall behind the statue of St. Joseph and we worked out the design around them. While the rest of the group blocked off the areas for the designs, I enlarged the drawings and prepared them for transferring to the walls. Once that was complete, the group divided the painting among them.
The trip ended too soon. However, we were all excited to get back home and use our enhanced expertise in projects for clients. One of the advantages of using natural plasters and pigments is that they are easy to apply and last a long time.
It was a beautiful and humbling experience to do something we love to do and help a tiny village regain a part of its lost heritage. To use materials that came from the earth and create a wondrous piece of art for people thousands of miles away is deeply rewarding in both a humanitarian and spiritual way.
Photos taken by Linda Marsteller.
If you read this article, please circle number 350.

Report Abusive Comment