I am splitting the information on finishes into a three-part series. There is so much to cover and what makes it tough is that we have only so much room for pictures. And yet, pictures are crucial on this subject, for to talk about finishes without visual references would leave a gap that words alone cannot begin to fill.
Here's a heads up on what we are going to cover.
Part One:
o Smooth coat: how it's mixed and used for repair work; and used as a one-coat system
o Two-coat smooth systems
Part Two:
o Set up and mixing techniques
o Sand finish application techniques
o Texturing techniques
Part Three:
o Ten popular texturing styles and the secrets of how they're applied
Smooth on old
Let's start with repairs to existing walls and ceilings that have a smooth finish. When doing repairs to these old surfaces, the material that's used is usually mixed by hand. Inphotos #1and#2, you'll see a very traditional way of blending a lime and molding mixture. The lime is first mixed into a putty in a 5-gallon bucket. The amount needed for a particular repair is measured out and the lime is spread into a ring. Water is added to the center and then the molding plaster is added until the right amount and the right mix consistency is attained. Another approach is to dry mix the lime and molding together in a bucket. Start with some water in a bucket and then add the ready-mixed powder in until you reach the consistency you like.Keep in mind that what I've personally experienced is that this dry mix keeps the best if sealed tightly with a lid when stored. It's also a good idea to use it within a six-month period. I've used some a few years old, but the older it gets the more likely it will start to get grainy. This will work against trying to get the finish perfectly smooth.
One more tip before mixing or using anything: Check the molding for rocks! Nothing is worse than having molding plaster that's somehow gotten wet and formed rocks in the bag. I usually dump the bag of molding into a 5- or 10-gallon bucket and then simply run my hand down through it. It only takes a second and can save you many a frustrating experience!
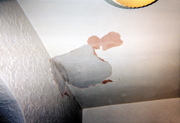
So, the smooth repair material has been mixed. Photos #3, #4 and #5 show some basic ways of getting a smooth surface back to its original state. Photo #3 shows cracks that are more than 1/4-inch wide. I like to prefill the cracks and then embed fiberglass mesh tape right into the wet plaster. The reason for this is that if I flat tape the wider cracks--which means put the mesh over the cracks first and then run the plaster over them--I could have a problem. The mesh may be very tight knit and won't allow a lot of material to get through. If I flat-tape it, there's a danger the crack won't be filled properly, leaving a thin, weak repair that won't be as strong as one that is prefilled and finished off properly. I then follow this with a wider coat of material and finish it out smooth with a sponge.
In photo #4, I'm simply flat-taping hairline cracks. This technique replaces the older method of scraping or cutting out the cracks in a "V" formation with a margin trowel or other tool. It used to be that one couldn't get plaster outside the area repairing. That's why older repairs done to cracks and the plaster is just within the crack itself; and often the plaster has cracked again. But today, there are some neat bonding agents that can be applied over the surrounding areas of the cracks to be repaired, and this gives a repair person a lot of advantages. It seals the cracks well so they don't pull the moisture out of the plaster as fast--and they provide a way to feather the repairs out to where they will not be seen. This type of bonder can be used, as we've discussed before, for an entire wall or room. Before this product was available, the options were to either take down the wall or ceiling, re-hang it with new board, or cover the old surface with chicken wire or metal lath. Now one can simply roll on bonder and do the repairs or re-surfacing work.
One other reminder: There are going to be times when the self-adhesive mesh tape will not stick to the surface before applying the plaster. There are just some situations and surfaces that make it almost impossible to lay the mesh out ahead of yourself. When that happens, I spread a thin layer of plaster over the cracks and embed the mesh into it. Then I repair them as usual. Be careful not to rub the areas with the sponge too quickly or with too much pressure. It can cause the mesh tape to slide on you.
Photo #5 is an example of where your material can be used both to fill in the ceiling area shown (which is a smooth finish), as well as the side wall area. For this type of smooth coat application, bonder is applied first to the area on the wall and ceiling, about 8 inches out around the areas to be repaired. For the ceiling, the area is filled in flush with the surface and then finished smooth. For the ceiling, the area is filled at or near flush with the wall surface, depending on how deep the texture is. The texture should match, and sometimes if the area is filled out completely, flush with the wall, then when the re-texturing is done, the repair will appear to stick out or hang over the original wall texture. If the texturing has deep areas, match this by leaving deep areas in the original repair, as well.
One-coat smooth
We've talked quite a bit about doing plaster repairs, so let's go on to another type of smooth finish: a one-coat plaster system. USG makes one of the most popular types that's available in most parts of the country. It's called Diamond One Coat and is designed to go directly over gypsum board.In photos #6 and #7, you'll see a column project I worked on last year. They had a blown-on popcorn-type finish on this column and decided they wanted to change over to a smooth look. We used plastic bullnose corner beads to soften the edges and Diamond. A self-adhesive fiberglass mesh was applied to all seams before plastering.
There are two ways to apply this type of one-coat system: The first way is illustrated in photos #6 and #7. A small batch was mixed up to pre-fill the beads and to apply over the seams. This was allowed to set up and then I applied a coat over the entire surface of the column. I doubled back with another thin coat over the entire area and then used a spray bottle for the water trowelling. This was then smoothed out with a felt mop and a firm trowelling.
The second approach in using this product is to pre-fill the beads and seams and immediately double back over the entire area with two quick coats, all from the same batch. It's very important to complete this application before the plaster begins to set. A wet trowelling and mopping would then follow to bring the surface up to the level where it was ready to prime and paint.
Watch for shadowing of the seams, where the seams show after using this one-coat system. Pre-filling will help avoid this problem. You just want to make sure that you get this material mixed up quickly and get it on fast. With this type of one-coat system, it is very important to get the smooth coat in good shape early. Start working it as soon as you get it on. I don't relax until I have all the "cat faces" out of the surface and after I've water trowelled it at least once. You might run into some blisters that can form at times in the material. Don't worry about these as much, you want to get the deeper imperfections trowelled out of the surface first. As the material starts to set, the blisters can be trowelled out with some pressure applied and with the use of the felt mop (blister brush). I just want to emphasize that you need to get this type of product to the almost-finished stage before it starts to go. There's not a lot of time between starting to set and done! Once you get the feel for it though, it really works well.
Two-coat smooth
Take a look atphotos #8and#9. These two shots show smooth coat being applied over a basecoat (Jordan Sale, my nephew, is working the bottom half of the walls, while Jeremy Newman, my brother-in-law, is working the tops. They're part of the Newman Plastering crew). Three walls are being worked at once in a kitchen. This is an example of new construction work. The basecoat was applied in the morning and a smooth-coat finish is used to complete the walls so they're ready to paint or wallpaper.The basecoat on this particular project is Kal-Kote (pre-mixed in a 79.9-pound bag), from National Gypsum, and the smooth-coat finish is Kal-Kote smooth (pre-mix in a 49.9-pound bag). This batch, they're working two bags of Kal smooth at once. The pictures will help in showing the techniques used to apply and finish this type of smooth coat. The wall is first skimmed with a coat of finish.
This coat is just to initially build up the finish over the basecoat. When the area to be finished has this initial coat on it, the plasterers drop back and begin running a second coat. You can see Jordan in photo #8 laying this second coat on. As he goes along, he tries to fill in any imperfections and get the wall as smooth as possible. Meanwhile, you can see that Jeremy, as the top man, already starting to water trowel the top half of the wall. Usually, the top of the wall will begin to firm up quicker than the bottom half. This water trowelling is done to compress the plaster and at the same time to get it closer to the finished product.
Another technique Jeremy is demonstrating in photo #8 is trowel cutting the top angle. He uses the top edge of the trowel to create a clean angle between ceiling and wall. He starts in the angle with a clean trowel and keeps the trowel close to parallel with the wall. He pushes the trowel to the left and at the same time brings it down the wall. Adding some water with the brush helps the trowel slide and avoids any tearing of the finish because it being too dry. It's at this point that a small wet angle brush can be used to finish the angle. After the water trowelling is complete, this crew will light check the walls, holding the lights close to the surface to make sure all "cat faces" are gone. The next step will be using a mop to mop trowel it.
Photo #9 shows one of the best techniques for working the bottom half of a wall. Bending at the waist and reaching down is easier physically than constantly kneeling down. I mention this because a few weeks ago, I saw an episode of a home improvement show on television and the host was trying his hand at plastering. He went up and down like a yo-yo with every trowel full, and with that amount of movement he would wear out in a few hours. Jordan has water trowelled the wall once and has gone back over it with a felt mop.
This mop is used wet to smooth out any minute imperfections that may be left on the wall. Another check will be made with the light and this will complete the smooth coating of these walls.
Diamond Smooth Coat can also be used over basecoat to get a smooth finish. And some crews prefer the mixture of lime and slow set gauging for their finish coat (a 50/50 ratio), as this makes one of the hardest surfaces that is available for a smooth surface. If you have any questions about smooth coat plastering, or have a comment, be sure and write me in care of this magazine, or visit me at plasterzone.com. I always appreciate hearing from you. Until next time, keep up the good work!


Report Abusive Comment