
Patching
Throughout the life of any stucco or EIFS clad building, invariably some damage will occur to the cladding. The damage might require a small patch or it can be more severe and require removal and replacement of the entire cladding. No matter what the damage, the resulting appearance of the repaired areas can be either be a work of art with little to no aesthetic difference or it can go really bad and appear as an eyesore drawing unwanted attention.
|
Cladding. No matter what the damage, the resulting appearance of the repaired areas can be either be a work of art with little to no aesthetic difference or it can go really bad and appear as an eyesore drawing unwanted attention.
During my freshman years in the plastering trades, I was placed on a patch crew on a new apartment complex. We were to patch all of the other trade damage and other mishap areas as they were noted on a punch list. On the first day, I was assigned to a journeyman plaster to learn patching. His first words of wisdom were, “Kid, there’s one thing you gotta know about patches: they always look like patches. A patch is a patch—heck look at your own skin. When you get a cut, it leaves a scar. Well, patches are scars on a building.”
Off I went, filling holes with mud, patching away. The next day the superintendent took me aside and asked what the expletive I was doing with all of these patches? He asked me if I had been drinking while I was patching. I told him of my newfound wisdom about how a patch is a patch. He explained that was complete nonsense (with another expletive) and told me to go back and make my patches look better. This time he sent along a guy about my age who came from a long line of plasterers and had patched a lot for his family as a young kid. He had a more holistic approach to patching, one that compared it to fine artwork. “You have to blend the patch to match everything else, don’t just slap mud into the hole, think of the layers and re-create the process.” The following is what I learned.
STUCCO
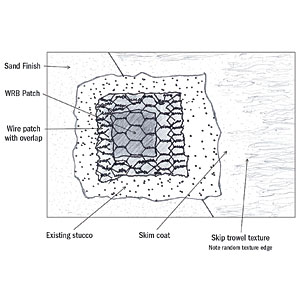
A good rule of thumb is to use a layering back of at least two inches per layer. This will require making the patch slightly bigger. Start with a lath axe or hammer and remove the damaged stucco to a point about two inches bigger than the damage. Try not to damage the lath with big manly “Alley Oop” swings, remember we are artists. Removing of the stucco will expose the lath more so you can have a better tie in later. Starting with the water-resistive barrier layer, cut a new piece making sure you have at least two inches of overlap around the damaged WRB. Slip it under the existing lath making sure it is flat and not bunched up at the edges. You may have to cut away some of the existing lath to achieve this. If the damage has really disfigured the existing lath, be sure to cut that part away. Next, cut out a new piece of lath, of the same type used originally, to about the size of the perimeter of the existing stucco you banged away. It should overlap the existing lath all the way around, by at least 2 inches and lay on the existing lath without bending or bunching at the perimeter. When you attach the lath, be sure to hit the studs with your fasteners. If there are no studs, then you will have to wire tie it to the existing lath. (Do not just put fasteners anywhere to hold down the lath, as this can create holes in the WRB).
Now you can apply the mud. A little trick I learned: to mitigate the possibility of a crack at the joint is to slightly moisten the existing stucco edge and I mean moisten, not soak. Then using your trowel, squeeze the mud directly into the existing stucco edge. After you have gone around the edge, you can fill in the rest. On three-coat assemblies you will have to scratch first and then brown. Be sure to use the “edge squeeze” step with each layer. After the mud has properly hydrated, you can scrape and float it flush with the existing brown coat. Do not leave the brown coat to the same level of the finish coat, as this will leave a hump in the final product. Another little trick is during the floating process, slightly wet the joint with a damp brush and immediately follow it with the float. This helps to give a good blend at the edges. If your lath was flat, and your brown blended good at the edges, you are going to have a better chance of an artful patch when you apply the finish.
The type of finish originally used will determine the next process and final outcome of the patch. If the original finish was a smooth trowel or Santa Barbara type, then it will appear as a patch. It will be flat and probably look like the original but the perimeter will show. Unless you re-spread the wall entirely, it is just going to show no matter how artistic you are. And while we are talking about re-spreading the whole wall, if it is a smooth troweled cement finish you will have to rough up the surface before applying the new finish coat. Re-spreading over smooth cement finishes is a bit risky so unless the patch is just completely unacceptable to the building owners, don’t try to re-spread the whole wall—leave it as a “scar on the building.”
For sand finishes, make sure to keep the new finish within the confines of the existing finish—in other words, don’t spread the new finish onto the existing one; rather, go right up to it. A little trick here is to put tape right at the edge of the existing so when you are spreading it won’t lap onto the existing and make a hump. Float it to match the existing, then pull the tape. Again with a damp brush wet the perimeter and blend the joint with the float (don’t use a lot of water). This method also works for the acrylic finishes really well. For the swirled acrylic finishes, you can use a nail to blend the swirls at the edges. Skip trowel texture is probably the easiest to match.
Skip trowel type textures usually containing two layers: a skim and a texture layer. For this heavier type of texture you should chip back the texture only, in a random fashion, beyond the perimeter of the skim layer. Now you can apply the skim layer like you did if it was a sand finish, not going over the edges. (Side note: remember when you were taught not to color outside of the lines, and you thought, what’s the big deal when will this ever be practical in my life? Well, here it is, your practical moment in life.) Once the skim layer is dry, you can apply the texture coat. Having chipped back the texture randomly, when you re-apply the texture, the unevenness at the edges hides the patch much better.
A little caveat here: If the stucco was saw cut to put in a door or window, then you should create a jagged edge instead of patching to the saw cut. Patching to a straight line, like a saw cut, will crack the stucco at the joint, always. Get out the lath axe or hammer and bang away at the edge and expose the lath, enough to tie in new lath properly, then patch away.
EIFS
Just like the rule of thumb in stucco, EIFS patching should be done in layers with each layer about 2½ inches away from the next. With EIFS though you don’t need a hammer, you can use a saw or knife. Step one is to cut away the damaged area and remove the foam from the substrate. Make sure to scrape off any adhesive that may have remained on the substrate. If there is a liquid-applied WRB, use caution to avoid damaging it with the scraping devise. If it gets damaged, then it too must be patched. Next cut back the basecoat, mesh and finish (lamina) to expose a minimum 2½ inch area of foam outside of the area you removed the foam from. Then grind or scrape the finish (only) to expose a 2½ inch swatch of basecoat beyond that edge. Now you can cut a piece of foam to fit tightly into the area. There should be no gaps between the new and existing foam. Apply adhesive to the substrate side only of the foam piece, and stick it to the substrate. Do not apply adhesive to the edges of the foam, as this will lead to cracking. Let it dry completely, then rasp the foam piece to the same level of the existing adjacent foam. Next, cut a piece of mesh big enough to overlap the existing basecoat layer a minimum of 2½ inches. Spread the basecoat and embed the mesh. Use a damp brush to wet the perimeter edges and trowel the surface, and blend the edges. Allow the basecoat to dry completely and then apply the finish using the same techniques I outlined before. For patches on edges be sure to backwrap.
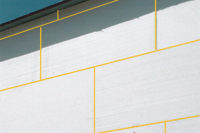
A word to the wise: with EIFS, when a long vertical patch is necessary you should also stagger the foam. An example would be when a window is cut into a wall with an EIFS cladding. The foam will be cut back further than the opening of the window. On the vertical edges only, you should remove the existing foam in a staggered fashion. Each of those 24 inch end pieces should be staggered back from the adjacent piece by at least 6 inches. That way when you put in the new foam to fill the area, you will not have a long vertical board joint (longer than 24 inches) where the possibility of a crack would be more likely.
There are a lot of little tricks and procedures used to make a successful patch. Like my first tutor who explained to me the “expectation” of a patch, many who do stucco and EIFS patches also expect it to look like a patch. A good patch should never stand out and slap you in the face. It is the artisan, the true mechanic, who can make a patch appear seamless or non-existent. Please understand though that even when a patch is done close to perfection, under intense scrutiny patches are visible. One should expect that a good patch is one that doesn’t draw your eye to it. As a building owner or design professional, your expectations should be in consideration of these conditions. You can consult your technical bureaus for more in-depth procedures to patching processes and expectations. When using acrylic finishes, be sure to understand the manufacturer’s specific procedures and uses of their products before attempting any patching procedures. This author does not endorse the use of chewing tobacco. W&C


Report Abusive Comment