The Octagon House
Recruited by the Friends of the Octagon House to begin the restoration of the walls and ceilings is Robin Raymer, familiar to W&C readers as the Plaster Man.
Working within the Friends of the Octagon House budget, Raymer and his crew are committed to completing the restoration of one second-floor room, and the walls and ceiling surrounding the central winding staircase and panoramic third-story cupula.
A new surface
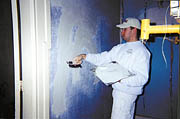
The second-floor rooms of the house are in far worse shape than the first. The walls and ceilings are cracked, peeling, missing plaster in some places and generally not fit for residency. Basically, new surfaces are needed. How is it done? Raymer points out that it’s only sometimes necessary to knock out the existing walls. Whenever possible, use what is there and resurface it. Although not pretty, the existing walls and ceiling in this second-floor room are still completely sound. Therefore, the job at hand was to resurface and not replace.“Our first step is to remove any wallpaper or loose plaster,” says Jeremy Newman, part of Raymer’s restoration team. “After that, bonder is applied to ensure that the new surface will stick to the old.”
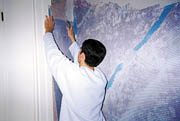
Once the bonder coat is applied, the surface is ready for the basecoat of plaster. This is accomplished in two steps. First, a mesh is attached to the surface, helping to even it out. Also, mesh flat tape is put on any cracks, like an adhesive bandage over a seam.
Next, the basecoat of plaster is troweled on. Several trowelfulls of plaster are spread on the wall or ceiling area first, with the mesh then embedded into this wet plaster. Then the plaster is spread evenly over the area until it is relatively flat. This basecoat is allowed to set for a few hours. When the basecoat has completely set, a finish coat is applied. For this particular project, the basecoat was applied and allowed to set overnight, with the finish coat applied the next day.
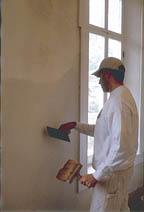
The finish coat consists of spreading the plaster onto the surface and continuously working it until it is flat. It is not unlike mudding drywall in the sense that the surface is troweled, excess plaster is removed, and it is troweled some more, until the surface is flat.
The basecoat ingredients consist of gypsum and river sand. This coat was put on at about a 1/4-inch thickness over the entire wall and ceiling area in the room. The finish coat can either be lime and gauging plaster, or a premixed smooth finish-coat mixture. A bagged finish-coat was used on this particular project.
Troweling of the finish coat compacts the material and also allows for the surface to become smoother and smoother with each troweling. A final smoothing of the surface is done by running a felt mop over it. This ensures that any final trowel marks or imperfections in the surface are smoothed away, leaving the surface ready to paint in about a week or so.
Cosmetic surgery
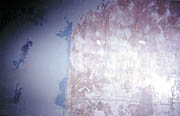
Meanwhile, the Plaster Man himself addressed the task of repairing another area of the house. One of the Octagon House’s most unique characteristics is its central winding staircase, possibly the only one of its type in existence. Since the house is an octagon or basically, a circle, there are no halls, just doorways leading from one room to the next on both the first and second floors. Shooting straight up the middle of the house is a winding staircase that ends past the second floor at what is called a “cupula,” a 360-degree room with windows all around. It reminds one of a lighthouse.Although the surfaces of the walls and ceiling of the staircase and cupula had been repaired before, unfortunately, most of the repair didn’t “take.” Areas were chipping and peeling and this had to be corrected and patched.
“This failure was caused directly by applying plaster over the surface without the use of bonder,” Raymer explains. “The individual who did the previous repairs mistakenly thought one could apply plaster over a surface in a similar way to joint compound. It might go on nicely and also look OK for some time afterward. But as in this case, it is going to come off eventually, without a bonding agent to stick to.
“Basically, what we want to do is check these cracked and chipped areas,” continues Raymer. “We have to tap on the perimeter of the areas to be patched and make sure we extend the damaged area’s perimeter all the way until we reach plaster that is solid and sound.”
Raymer chipped the damaged sections wider until no more of the plaster could be chipped away. Now, the area is ready to be patched. Raymer made sure the edges around the area to be repaired were secured with screws and adhesive where needed.
“Again, you can leave the wood lath, you can leave the basecoat,” Raymer adds. “You don’t have to tear it out and put in a completely new wall. This preserves the historicity of the structure.”
Once the areas to be repaired are established, they are sealed with a bonder that is applied with a roller. This liquid bonder is used to seal the damaged area, and is spread about a foot around the area to be repaired, allowing the repair to be faded and matched into the area around it. This ensures the repair is not visible after completion.
Next, the plaster is patched, again, not unlike patching drywall. The difference is in setting. Plaster chemically sets. In other words, as soon as it is mixed, it begins to set, while drywall mud has to dry. The patch coat (finish-coat plaster is used) is applied over the damaged area with a trowel and continuously smoothed until the surface is relatively flat. Even as it is continuously worked, it is setting to a harder and harder consistency. The final step is to take a wet sponge and smooth the area into the existing area around it.
“The patching does not require a basecoat because what you’re doing here is putting back what was missing, which was your finish coat,” Raymer says. “This house had very good, old, solid walls. You’re dealing with settling and vibration and this is what is causing the cracks.”

Don't forget to stabilize!
Often, the spreading of the plaster gets the attention in repair stories. However, before anything is spread anywhere, stabilizing the wall or ceiling area to be repaired is vital for a successful patch.There are two things done in repairing plaster: Either you are "filling in" an area or you are "going over" an area—it’s that simple.
Going over an area is simply replacing the finish coat. Filling in an area requires that that area be solid and sound. The area must be filled first with board or filled deep with plaster. The board is screwed and/or glued into the area to be repaired. Then mesh is put around the area being repaired. This bridges the area between old and new, the old wall or ceiling around the repair, and the new material. If the patch is solid and the area around it—the perimeter—is soft or unstable in some way, the area around the repair can loosen further and come off or cause cracks around the repaired area. This is why stabilizing the area around the area to be repaired ensures it is solid and sound.
Looking for a reprint of this article?
From high-res PDFs to custom plaques, order your copy today!


