Get Hip to Butts

Drywall covers up to 80 percent of the visible interior of a building while only contributing 3 to 4 percent of the total cost. So it's worth a little extra time and a few extra dollars to get a better, longer-lasting job.
One item in our business that is worth the extra time is the butted seam. It always causes grief to the hanger, taper and owner but, as far as I am concerned, one can ignore a butted seam for only so long.

Booth and board banter
I was at the AWCI show in Nashville this spring and I spent one afternoon hanging around a booth rented by two friends of mine, Will and Derrick Trout. Their booth was for the Butthanger, a device that offers a solution to problems associated with butted seams on drywall. It was very interesting to hear the many comments from people about how they handled butt joints or problems they have had with them. I gathered more comments by asking questions about butt joints on the bulletin board of Walls & Ceilings' Web site.Every one of us knows what a butted seam is. However, I thought it would be helpful to go over it and to point out some of the problems as I go.
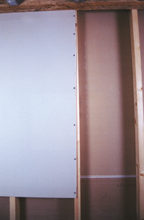
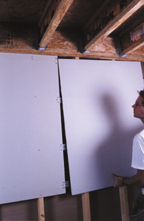
A butted seam is created when two un-tapered ends of a drywall panel are butted together. "Un-tapered" is the important word here, meaning no recess for mud and tape like the tapered edge of the drywall panel.
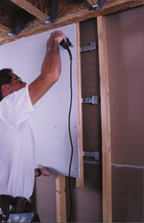
The butted panels are attached to a single ceiling joist or wall stud. The fastening surface is usually about 1 5/8 inches wide. The first problem is that the framing member that the seam is attached to may be ridged out, which could make concealing the seam even more difficult. The second problem is by attaching to a single framing member even a slight twist or movement of the joist or stud can cause the seam to crack or ridge.
The third problem is that the joist or stud is stationary, so if one panel is cut a little too long or short, that panel or the abutting panel will be poorly attached. The screws will have to be toe-nailed or placed too close to the edge, which will create a poor attachment. If the drywall expands or if the structure moves, the drywall will crack or ridge at this weak point first.
I know sometimes the joist runs off on an angle, so on one end of the seam, the length is good and on the other it is 1/2 inch off. What to do then? I usually look for something like a scrap piece of lumber to nail along the edge for a wider fastening surface.
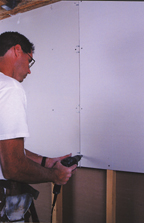
Let's say everything goes fine. The joist or stud is straight and flat and the measurement is perfect, landing exactly on center, and is fastened with screws every 6 inches with minimal damage to the drywall core. You still don't have a factory bevel, so the butt joint has to be coated out very wide in an attempt to make the joint less noticeable. No matter how good of a job you do, the finished seam may still be noticeable under certain lighting conditions, after structural movement, or after a heating season when the materials have dried.
What's going on?
One contractor said that he always carries a straight edge and if where he wants to break the seam rocks because of being down or out, he uses a 3 1/2-inch plainer until it is back about 1/8 to 1/4 inch.A contractor from Kansas buys cardboard shims about 3/32-inch thick that are sold for this purpose. He checks the framing with a straight edge and shims the framing member on each side of the butt joint or just one side if it needs it (he always has his subs shim both sides even though they don't check with a straight edge).
Another contractor says that butt joint concealment is not really a science, it's an illusion. He first embeds the tape with all-purpose compound (pre-filling gaps with a setting compound). Then he lays the compound out flat approximately 12 inches wide on each side of the tape, being careful not to build up compound on the tape.
The next day he skim coats the middle with a 14-inch flat knife, widens out the edges and then pulls a 24-inch broad knife over the wet compound. When it's dry he checks it with a straight edge and fills if necessary. The finished seam is 26 inches to 30 inches wide.
Some contractors check the joists and studs for crowns during installation and will avoid or fix as necessary. Others cut a V-groove in all the butt joints and prefill them with a setting compound before taping. They say this method reduces the ridging problems.
About five years ago, I actually tried drywall that had tapered ends, as well as edges, and it worked great as long as I didn't have to cut a panel to land on a joist or stud. I've even heard of drywallers' peeling off the face paper and rasping a little along the seam in an attempt to create a recess, or doing the same to the backside prior to hanging.
I've always believed in making the butt joints as strong as possible. For added strength, I always use paper tape embedded in a setting compound and fasten the drywall with adhesive and screws. I've seen people just slide a scrap piece of plywood along the backside of a panel that falls a few inches short or long of a framing member and screw the panels to the scrap piece of plywood.
Back-blocking
I've always considered myself very good at concealing butted seams. I think I have tried every method listed and have gotten good results, but what I am really looking for are excellent results that stay that way. It is not only the high-end jobs that require excellent long-lasting results; every job should be treated the same.A few years back, I hung and taped a cathedral ceiling for a contractor who was very particular, so a Level 5 finish was required on all ceilings. I really took my time and did an excellent job on the cathedral ceiling. I taped the house in the winter and that summer attended an open house. The only thing I noticed was that I could see every butted seam on that ceiling. The butted seams had ridged slightly, hardly noticeable, but enough to make me feel sick and even embarrassed.
I'm sure the contractor could see them, but he didn't say anything because it has become an acceptable problem that is often just tolerated. The responsibility usually falls on the builder to explain to the owner that this bump is somewhat acceptable and there's not much that can be done about it except have the drywall contractor come back and work over the new carpet and furniture and make the joint even wider.
Well, I could not accept it so I decided to try the back-blocking method described in the USG handbook. The back-blocking system floats the butt joint between the framing. It is a complicated method that took me about a half hour to accomplish for each joint. With some experience I got it down to approximately 15 minutes. My hangers refused to take the time and I quickly abandoned the practice although it did provide me with excellent results.
Let's face it: Most people want dead-flat walls and ceilings with no telltale bulges caused by blended-in bumps. Even butt joints that are expertly concealed may show when indirect lighting hits the surface or when a cove molding or chair rail is installed. The bump becomes obvious when a counter top is put into place and the wall has to be notched or the countertop scribed.
I believe that the idea of floating the butt joint between the framing is a good idea, and if you follow USG's back-blocking methods the seam is also recessed so it is easy to conceal.
Must go on
All this brings me back to the booth at the trade show. The Butthanger seems to offer a solution to the problems of the butt joint. The seam is not attached to the framing, but rather is fastened to a solid surface that is floating. It is almost like using one extra long piece of drywall. Plus, the seam is recessed (and as easy to conceal as a tapered-edge seam).For a few years, I have been experimenting with ideas of my own on how to eliminate problems with butt joints. I met the guys from Flast Fast Inc. who invented the Butthanger and I have been using the device ever since, with excellent results and no callbacks.
I hung and taped a garage last fall under much-less-than-ideal conditions, but it was one of those jobs that have to be done right away. I told them I could do it, however, I could not guarantee how it would hold up. In the spring, I received a call informing me the seams were cracked. I had to fix approximately 80 feet of tapered-edge seam while all of the 16 butt joints were still flat and un-cracked. I left the job happy, knowing that I wouldn't have to worry about butt seams anymore.
Yes, it does cost me a few extra dollars, but they are offset with the time and materials saved. In addition, I will usually get a job even if I am a few dollars more than other bidders after I explain what I am doing to reduce the problem associated with butted joints.
In researching for this article I found a company called Prest-On that makes a device called an Insta-Back fastener. The drywall is floated between the framing and the clip-type fastener holds the seams together as it creates a slight recess. I have seen the same type of clip for sale in USG repair kits.
Looking for a reprint of this article?
From high-res PDFs to custom plaques, order your copy today!


