Plaster Man
Inside, Outside and Your Letters
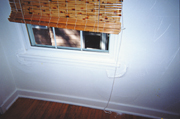

In picture #1 you'll see some water intrusion damage that occurred around a window. Removing this is and repairing it is not as challenging as re-texturing it to match. I have come across quite a few repairs lately that were done either by the homeowner or a professional who did not know how to complete the final step properly. Of course this is what shows in the end, so we want to be able to do as good a job on it as possible.
The trick comes in matching the river sand floated finish. The sand was rather rough and contained small pebbles at times. Often a scratch coat was applied to the wall and then the brown coat was floated smooth with a wood float, leaving no particular pattern to the wall surface. The difficulty in matching this in is that the re-texturing is done after the damaged plaster is removed and the repair is brought up flush with the wall surface. If a rough sand or perlited gypsum is used to run over this, the challenge is to blend the edges so that it fades and leaves no repair mark around the area patched in.
I've mentioned Spraytex products briefly before and I've been experimenting quite a bit lately with them. I use its "orange peel" spray in a can and the results have been very impressive. It mimics the bumpy, non-patterned surface very well, and after priming and painting the repaired area blends in without a trace. I hope this will help many of you who have written and called me who have been pulling your hair out over getting the repaired areas to look just right.

Inside and outside
In picture #2 I wanted to point out a few things worth noting. First, it's a veneer coat plastered ceiling. Basically we're looking at 5/8-inch blue board with 1/8-inch basecoat over it and then the sand finish that is pretty thin, troweled on tightly and then floated to achieve the patter swirl. Unfortunately for the homeowner, the roofers had the roof off when a sudden downpour came through and soaked the ceiling.Here's what happened: Water came pouring through the light fixtures and the seams in the ceiling. Since mesh tape was used, this allowed the water to escape down and through the ceiling. I inspected the ceiling and found it was sound and only sustained staining damage. There was no finish-coat separation, which probably would have occurred had the water come through over an extended period. Where the Zipwall is in the background, a new ceiling is being added in the addition area. The solution here is going to require a bonding agent be rolled on the ceiling and then a basecoat put on over the entire ceiling. A sand finish will then be put over it and swirled.
I've used two staining methods with good results. A primer sealer can be applied over all stained areas first, then the ceiling can be bonded and plastered. This is the way to handle it if the desire is for an unpainted, pure plaster finish. Some people are really into this type of finish. If painting is going to be done, then skip the priming and bond and plaster it. The priming and painting can then be done afterward to seal out the stains and produce a nice finished ceiling in the end.
One side point: I was called into a similar situation mentioned in
picture #2. The homeowner was not happy with the claim adjuster's estimation and prognosis of the problem. The insurance company rejected coverage of the claim, as the claim adjuster said it was a problem that occurred over several months' time. The homeowner knew this was not the case, as it was caused by ice damming, something sudden and accidental. He did not know the procedure to follow and ended up canceling his insurance with that company and going with State Farm. I got on the phone with his present agent and got some very helpful information. First of all I agreed with the homeowner in this instance: the damage was caused by water that came in quickly and suddenly. The damage caused by this water was not evident for several months, as the keys in the plaster had broken and the weight of the plaster on the ceiling took a while to work its way down and loose. But this is what it did, and once it started coming down, it looked very bad in a short time.
The homeowner had several steps he could follow: The first was to take my estimate and go back to his original insurance company. The technical term was something like "filing a continuation" to a prior claim. He could ask for another claim adjuster to come out and view the damage and then make an assessment. He was not in any way bound to sticking with the first adjuster, with whom he didn't really hit it off with. This is a right for any homeowner and can help out immensely with these types of situations. If the insurance company does not respond or feel it should cover the claim, his next step is to take it to his present agent who would help him contact the board of insurance that would help straighten the matter out. The point I want to make is that there are good, effective ways of handling situations that might at first appear hopeless.
Let's switch gears now and go outside for a field trip. I usually deal with inside work, but lately I've been looking at products that are being used outside on stucco projects. In pictures #3 and #4 you will see a cistern that I recently re-plastered. I have only done a handful of these projects over my career, but I like the variety it brings to the mix. This cistern is the only source of water on this property. Some cisterns collect rainwater and this is used by the family, but in this case the owner had water trucked in and stored in this one. It was 10 feet across and 12 feet high and held over 3,000 gallons. The problem he had was that when he had water delivered, in about three days the water had leaked out. On inspection there were only some very tiny holes and a few cracks that were close to the bottom.
I bonded the inside of the cistern and let it sit overnight. The next morning we mixed up a scratch coat for the walls and completed the work in two mixes.
We let it sit overnight and the next day I went over it with a brown coat. I started at the top, working off of a ladder that was lowered into the cistern. I used sponges to smooth the brown coat down as I went along. I'd do about 4 feet down and then go back and float it out. What really helped for the trowel work is a pool trowel, one with rounded edges. The top gradually curved up and this curved surface was not a problem with this type of trowel. The trick in getting the ladder out without hurting the finish was accomplished by accelerating a square area on the floor when I first started the browning process. I then placed a board on top of the finished brown coat and set the ladder on top of this. By the time I reached the bottom of the cistern and completed the floor, I just worked my way to the ladder and then we lifted it out and the job was done.

Time to open the letters
Now for your letters:"I recently purchased an old brick farmhouse that has plaster applied to the brick walls (interior and exterior walls are brick approximately 12 inches thick). Some walls had had wood paneling glued to the plaster with liquid nails. Some paneling is removed. I am specifically interested in finding do-it-yourself materials for repairing/restoring the plaster.
"I have been able to locate a local building supplier that carries lime and plaster. For a basecoat they sell Structo-Lite. Is Structo-Lite suitable to use as a basecoat for repairing my plastering covered brick walls? What is the difference between 'molding' and 'gauging' plaster?"
Mr. Mogren
Yes, Structo-Lite can be used as a basecoat for repairing the brick walls. Mr. Mogren mentioned to me in a phone discussion that he had some deep holes that needed to be filled in, as well. The thing that I recommend with Structo-Lite or any perlite gypsum is that an accelerator be used along with it. This type of plaster takes a while to set and needs the set quickly, especially when going over brick.
As far as molding and gauging are concerned, the biggest difference is in the working time. With molding, you have about five to 15 minutes to work with it, whereas with gauging plaster you have about an hour before it sets up. Gauging is traditionally used with lime as a smooth finish coat that is rock hard when set. Molding is traditionally used for doing repair work.
Over and over, I have mentioned in this column and in speaking to groups that one of the big gaps still in this industry is getting materials to the public, both homeowners and professionals, in a user-friendly size. Eighty- and 100-pound bags just don?t cut it.
Attention suppliers and/or distributors: I would like to talk with me about setting up a "Plaster Pipeline." it's something that is sorely needed.
I get letters every week for information on where to get materials and these are frustrated people. They want to get their hands on the materials that professionals use! The potential is huge and I continue to work on bridging this gap. I can provide information on how to do repairs and what to get, but it does no good if people can't get the materials. Is there someone out there who is willing to take this project on?
One last letter. This one I don't have an answer to, but maybe you have some ideas.
"I live in a condominium in Toronto, Canada, that was built around 1970. The problem I'm going to describe is throughout the building. Air pockets have formed in several rooms, not from moisture?the concrete is bone dry. I've recently had a repair man in to fix the holes that were caused by this problem. Let's just say he didn't do a good job, as 60 to 70 percent of the holes have come back--I'm sure partially because of the original problem, as well as his poor workmanship. Apparently there was something wrong with the cement mixture in this area in 1970 and 30,000 units have been affected by the same or similar problems. I guess I'm wondering if you've heard of this and what would be the best approach to fix the problem."
Mr. Paisley
Sounds like a lot of repair work to be done in Toronto! If you have any ideas for this problem, let me know. It would be appreciated! Thanks again for your letters, and keep them coming!
Looking for a reprint of this article?
From high-res PDFs to custom plaques, order your copy today!


