The Merchant of Venice
Many names have been used to describe this Old World plaster finish: Venetian plaster, Italian finishes or faux finish plaster, just to name a few. No matter what you call it, the end result is still the same when the work is performed by a skilled craftsman or craftswoman: a spectacular finish that can have a multitude of effects and colors ranging from soft suedes to high-polished marble or rustic stone.
This plaster finish has its roots in ancient Rome, where Roman aristocrats would plaster their walls with colorful finishes and textures. The name that is most commonly used today, Venetian plaster, was derived from the use of this plaster finish in the palaces of Venice in the 15th century. In the days of the guilds during the Renaissance Era, the formulas for these materials were well-kept secrets that were passed down from generation to generation and from artisan to artisan. Today in Italy, these finishes are more commonly called decorative stuccos, and can be used for interior and exterior applications.
That's Venetian!
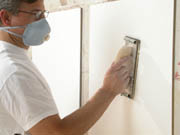
The components of these plasters are either lime based, which is hydrated lime blended with marble powder and organic substances. Depending on the size of the marble powder, different effects in the plaster finish will be attained. Cement-based plasters are very similar to lime-based plasters as far as the size of the marble powder that can be used, but are more suitable for structures in direct sunlight and where weather is a factor. Synthetic plasters also use marble powder, but use resins to bind the product giving an overall higher durability than lime- or cement-based plasters. Pigments are then added to the plaster bases. These pigments can vary from a manufacturer's stock color to a designer's custom color.The first and one of the most important steps that is often overlooked in creating a stunning Venetian plaster finish is the substrate preparation. The substrate in most cases will be drywall, and must be free of all imperfections. If the substrate is not free of these imperfections, they will show through the finish and could ruin the look. Make sure drywall joints are not visible and feather out any drywall joints that are visible with joint compound. Be careful when sanding these areas because scratches can bleed through the finish. The use of fine sandpaper on the final stages of sanding is recommended. Visible nails or screws need to be below the finish surface, and any wall scars need to be repaired and sanded.
A Level 5 finish will be specified in almost all Venetian plaster applications. The prepared substrate should have two coats of primer paint. This primer helps in keeping the imperfections mentioned above from bleeding through the finish, kills the suction of the joint compound and helps in the bonding of many of the synthetic-based Venetian plasters. Remember to follow all of the manufacturer and architect specifications when preparing the substrate.
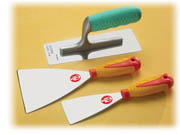
With substrate preparation complete, it is time to talk about tools. Depending on the look of the finish plaster that one is trying to attain, the tool or tools that are used will help to attain that look. Using a stainless steel trowel is imperative when working with these products. This will keep the finish free of rust marks, dark patches, burns and other imperfections that can occur when using a carbon steel trowel.
A skilled plasterer will always prefer to use a hawk and trowel as his or her tools of choice. However, it is important to keep an open mind to using many different types of stainless steel blades or spatulas to achieve a variety of looks and textures. The look will be directly affected by the type and size of tool, length of strokes taken and amount of pressure used when applying plaster. For example, a 6-inch stainless steel trowel can give the wall more movement than a 9-inch trowel, and so on. Using different sized spatulas will give a different look than using the same sized spatula throughout an application. Knowing the desired finish you want to achieve and following the manufacturers' specifications will help in choosing the proper tool for the job.
Wax on
Knowing the Venetian plaster for the project has been specified, the manufacturers' and architects' specifications reviewed, samples accepted (in writing) by the owner, the substrate has a level five finish and has been primed to specifications, the basecoat of Venetian plaster can now be applied. It is recommended that you start in the top corner in the angle of the wall. Keep strokes with the trowel short and in different directions. This will help in the appearance of the wall to create a natural look. Apply the basecoat with a uniform thickness. The size of the aggregate is usually the benchmark for the thickness of your application.Try to keep joints alive, as cold joints can show through the finish. It may be necessary to have someone work with you to keep joints from drying out. Avoid any large or long trowel ridges, go over these ridges and smooth them out before the basecoat has set. Completely finish the wall, leaving no bare spots in the basecoat. If using a blade or spatula, spot the wall with material as if spotting a nail or screw hole. You may want to leave some open space between applied materials for a later application with a smaller blade or spatula to achieve desired look.
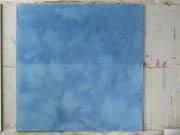
The finish coat or final coat of Venetian plaster could be applied in the same way as the basecoat, depending on the material being used and desired finish you are trying to achieve. It is at this stage that hard work pays off. You have applied the finish coat to the entire wall, you have kept your joint wet and moving. The strokes are broken up and the wall turning from a wet look to a matte look.
Now, start to polish the wall. It is imperative to use a clean and dry trowel over the entire wall, breaking up the strokes. Water can never touch the plaster on the wall because it will cause streaks and discolorations in the final product. This process will produce the shine and depth of the product and give the specific characteristics found in Venetian plasters. Keep the trowel clean at all times. After washing it off with water, have a clean dry towel to dry off the trowel before touching the wall again. Look at the wall from the side and look for any dull sections on the wall. If dull spots are present, don't panic. Continue to trowel these areas until the desired look is achieved. Be careful to trowel the wall evenly, otherwise a darkening or over burnishing can happen in that area.
Seal the wall with a manufacturer's specified sealer. Using a different sealer could cause color variation or not allow the wall to breathe. Sealing will help to protect the finish from stains and burns. Follow all of the manufacturer's specifications when applying the sealer. Doing so will ensure the wall will be free from problems down the road.
Waxing the product after sealing can also be done. Once again, follow the manufacturer's specifications when using wax. Waxing can give the Venetian plaster even more depth and bring out certain characteristics not achieved by troweling alone. A little bit of wax goes a long way. Trowel the wax on with one stroke and trowel it off with the next. Allowing the wax to sit too long on one spot can cause a darkening of the wall from the wax. Once waxed, the wall can be buffed with an electric buffer to finish the process.
The job is now complete, and a spectacular one-of-a-kind Old World plaster finish that is nothing less than a work of art has been achieved. The art, history and craftsmanship of the Renaissance Era are alive today. All across the country Joint Labor/Management Apprenticeship Training programs of the Operative Plasters' and Cement Masons International Association are taking advantage of today's technology to train a whole new generation of craftsmen and women to carry on traditions of ancient artisans for years to come.
For more information about contractors and employees who can perform this level of work: www.opcmia.org or www.opcmiajobcorps.org W&C
The authors are both journeyman plasterers and veteran plastering instructors in the San Francisco Bay Area. Robert Noto is the apprenticeship coordinator for OPCMIA Local 66 in San Francisco and Jeff Crothers is an instructor for the OPCMIA Job Corps Training Program at the Treasure Island Job Corps Center. Between them, they offer more than 50 years of plastering experience on some of the most elaborate and decorative plaster work in the United States.
For more information, visit www.oleaspecialtyproducts.com
Looking for a reprint of this article?
From high-res PDFs to custom plaques, order your copy today!


