Seal The Deal
"Window openings are extremely vulnerable," counsels Sylvio Plescia, chief project scientist for Canada's national housing agency. "One can have the best windows in the world but water eventually gets behind any wall cladding and finds its way to the windows. If the window isn't flashed well, that water can easily work its way into the wall cavity."
According to Plescia, leaks around windows are a leading cause of builder callbacks and lawsuits across North America. Problems can be as minor as water spotting and paint damage, or as severe as rot and mold growth-but the solution is always straightforward: Install a watertight membrane behind the cladding and trim, and provide a way for any water that does penetrate the outer skin to get back out.
Wrap walls
Waterproofing a house exterior begins with a layer of asphalt building paper or plastic housewrap-materials that shed water but still allow vapor to pass through them. The first course of any wrap should be installed at the bottom of the wall, and successive courses lapped shingle-style up the wall. Upper courses wrap should lap over lower courses at least 6 inches; vertical seams should overlap 8 to 12 inches.
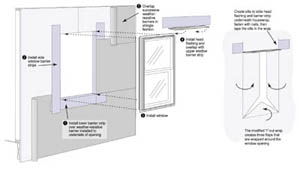
Housewrap is typically installed over window rough openings then cut out afterwards. Do not cut the housewrap diagonally across the rough opening (X-cut), and fold the triangular flaps around the wall framing. Instead, use a modified I-cut, as shown in the right of the graph below. After cutting the "I" in the plastic housewrap, fold in the flaps, staple every 6 inches and trim off the excess. The critical detail here is the straight cut across the top of the window, which will prevent water from following the housewrap inside the wall.
Flash Windows
A wide selection of peel-and-stick flashing tapes has been introduced in recent years to greatly simplify window sealing. These materials range in width from 4 to 12 inches, and are made from either a modified bitumen or butyl rubber. Tim Cross, owner of Merrick Construction, in Monmouth, N.J., reports that butyl-rubber tapes, while more expensive, can be repositioned, which takes some of the frustration out of using these sticky membranes."Regardless of the material," Cross says, "the combination of flashing and housewrap must always be layered properly, so water working its way down a wall always drains toward the exterior."
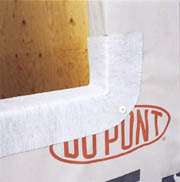
Sill pan. To flash a window, begin with a pan flashing on the sill of the rough opening made in the field from flexible flashing tapes. Tyvek FlexWrap, a butyl-based flashing tape from Dupont, has a wrinkled facing that allows it to be molded easily to create a pan flashing without any cutting and folding at the corners.
"While this material is more expensive than most other flexible flashings, the labor savings make up for the higher material cost," says Cross.
Window unit. Next, slit the housewrap vertically at the two top corners, creating a flap under which a head flashing can be placed after the window unit is installed. Fold this flap up and temporarily tape it out of the way when setting the window unit in the rough opening.
Quit leaking
All vinyl windows come with a nailing flange, which not only helps secure the window in the opening, but also creates a weather-tight seal around the window. This flange can be bedded in caulk along the top and down both sides, but never caulk the bottom flange."Any horizontal caulk bead creates a dam that can prevent water from draining out," explains Patty McDaniel, owner of Boardwalk Builders, of Rehoboth Beach, Del. To facilitate drainage, McDaniel recommends leaving out the caulk, and placing the window unit on shims to create a gap that will promote drying of any water that gets inside.
The window unit should be centered in the opening over the pan flashing, leaving a 1/4-inch gap between the window frame and the side of the rough opening. Later, this gap should be sealed from the inside with spray foam, such as Dow's Great Stuff, which remains flexible and won't cause a window to jam as wall materials expand with climate changes. Air sealing the window is important not only to reduce heat loss but to prevent pressure differentials between the outside and inside from sucking moisture into the wall cavity.
Side flashing. After the window flange is secured, install flashing tape over the window flanges on each side. These side strips should extend at least 6 inches above and below the window. When installing the strips, be careful to leave 1/2 to 1/4 inch of the window flange exposed towards the window (inside edge of the flange) so the flashing won't show when the siding or trim is installed. Trim or siding should never butt tight to the window to allow for expansion of window and cladding materials.
Head flashings. The final step in flashing a window is to install a length of flexible flashing under the flap of housewrap. If the window is trimmed with a wood casing, use a metal or PVC drip cap on top of the head casing. Seal the top leg of this drip cap with a second strip of peel-and-stick flashing tape.
As a final measure, double check to make certain that all flashing and sheathing wrap details conduct water away from the structure and over the layer below. Overlapping flashing materials shingle-style so they direct water towards the exterior is critical for success. This way, even if an adhesive bond fails over time, the flashing will still shed water.
Looking for a reprint of this article?
From high-res PDFs to custom plaques, order your copy today!


