Basecoat and Resurfacing
This time around, I wanted to talk a little more about resurfacing and the use of basecoat. There are two major advantages to the latter: First is that it sets up in a relatively short amount of time, and second is that a very thick application can be put on. This gives the user the upper hand when it comes to smoothing and putting back into shape walls or ceilings that have been hit hard with an ugly stick. Another nice thing about basecoat is that it can be mixed up in one large batch, and then accelerator can be added to a hawk full at a time. Let’s take a look at some pictures that give examples of this and other ways basecoat is used.

Thrown in the mix
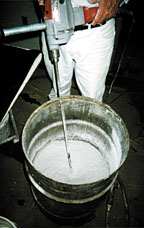
In picture #1 you will see a 33-gallon drum being used to mix a two-bag of diamond basecoat. That’s about 160 pounds of dry mix, plus nearly two 5-gallon buckets full of water, so it’s quite a hefty amount of material being mixed up at one time. Three-baggers are also common, especially when new homes are being veneer-coat plastered. Depending on the surface and the thickness being applied, the basecoat can be mixed either thin or very thick.Picture #2 shows a project I was called into that had paneling removed from one wall. This situation can be the source of much frustration and a lot of extra work on the homeowners’ part. But knowing the ways basecoat can be used helps alleviate a lot of headaches!
For this particular job, I left the hardened glue right where it was. Any loose pieces that would come off with a light scraping were removed. Next, I applied a bonder. In the corners and top angle, I used a small paintbrush to apply the bonder and a roller to apply it to the rest of the wall. This is allowed to dry about an hour and then I followed with a layer of basecoat thick enough to completely cover the glue, which was sticking out a good 1/4 inch or more in spots. After this set, I followed up with a sand-finish mixture and hand swirled it to a nice finish that matched the existing walls in the room. If this wall had any cracks showing, I would embed some fiber glass mesh into the wet basecoat to add strength to that area.
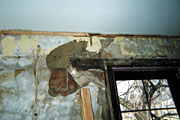
Picture #3 shows some damage caused by a water leak. I’m often asked when to patch and when to resurface a wall or ceiling. Of course each job is different, but I like to use the rule of thumb that if the damage covers more than one-third of the wall or ceiling, then I will lean more toward resurfacing the entire surface. This is also the case when two or three areas need repair on one wall or ceiling area.
To me, it’s just easier and a far superior method to resurface in such cases. By the time I set up several areas to patch and take the time to blend them in and make sure they match the existing area around each one, this sometimes can take more time than just applying a coat over the entire area. It also seems to have a good effect on the homeowner, as well. A homeowner seems to be more satisfied when the ceiling is brought back to a newer-looking condition all the way around.
Picture #4 is a good example of how water from outside can affect the plaster inside. And this is also a great way to illustrate what can be done to remedy the situation with basecoat. When the water problem was solved, this area needed to be plastered again. I made sure the loose plaster was removed and then bonded it. You can see that the areas where the brick blocks are exposed are pretty deep, about 1/2-inch deep. Here is where mixing up the batch and then “spiking” (adding accelerator to) a hawkful of basecoat works well. The spiked mixture is then applied over the deeper area and allowed to begin setting. A coat is then run over the entire wall, with mesh being applied over the entire wall area. As you can see, there are cracks running every which way. This was then followed up on the same day with a smooth-coat finish. Even with this deep fill the wall was completely dry after just four days’ time.
Finally, a look at picture #5 shows an example of where major water leakage caused a total failure to a large part of this ceiling. The area here was about 5 feet by 5 feet total. The ceiling was probably 15 feet by 15 feet, so it was right on the edge of where I would repair the area affected and when I would choose to resurface. It’s sometimes just a judgment call by the one doing the work.
There are always possibilities
Another point to keep in mind that can help determine which way to go on a repair in terms of whether or not to resurface is giving the homeowner and insurance companies options. Some homeowners want things just right, put back exactly as they were before the damage occurred. Others are not too picky and will do just fine with a repair done to the corner of a ceiling or part of a wall. So in proposing a solution, it’s nice to be able to outline two different scenarios for them—two options. This also allows two pricing levels to be established. It takes the pressure off the homeowner, who may not want to go with a complete resurface, and allows you a better chance to land the project by giving options.First, you outline the absolute minimum that has to be done in order to have the area put back in order. This is your lower number and describes what a repair will accomplish. The second is the resurfacing of the entire surface, whether that is wall, ceiling or both, as in picture #3. When I proposed the two options to the insurance company covering this water damage claim, they opted with the more expensive resurfacing of both the wall and ceiling. They were more concerned with satisfying the customer than in saving money. However, they were also very impressed with my method of giving them the choice of two options. It just makes good business sense.
We’ll look at them closely, examining amounts of materials used, what was done to put the area back together, and most importantly, what kinds of prices were charged for the work done. It seems that several of you whom I’ve been talking to online at www.wconline.com on the bulletin board area are very interested in knowing the pricing behind some of the projects that I describe. I will be happy to include this as well. If you have any questions, feel free to send them to the magazine and they will be happy to forward them to me. Or check out the Web site and we can have a lively discussion on your question, problem or project. Thanks again!
Looking for a reprint of this article?
From high-res PDFs to custom plaques, order your copy today!


