Plaster Man
School Review
SCHOOL DAYS
As many of you know, I learned plastering in New York City. That was around 1980, when metal lath and three-coat plastering was still done on commercial buildings. When I moved back to Illinois in 1984, I was introduced to plaster repair. It just so happened that the projects we were working on were high schools and colleges. I learned very quickly that even though much is said about schools and the lack of funding, there is still this thing called maintenance that needs to be done. And this includes plaster repair.
Since that time, it seems the public has become more and more aware of the dangers of mold and mildew. This in turn has made them more sensitive and conscious of the bubbling and damaged plaster that in times gone by was more or less ignored and left in place for as long as possible. Now they want it out. Which gets me to the project I worked on this summer.
ALL ABOUT WINDOWS
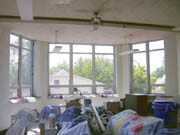
I was working for a contractor who supplies me a tremendous amount of repair work. The bulk of his work is kitchen and bathroom remodels.However, he was also in touch with a school board who was working down a punch list of things to be done as summer began to come to an end. They had the windows replaced, as you can see in photo #1. This gives you an overview of one end of the classroom. There were about 16 rooms in all. They wanted to get the interior work done before the kids came back to school, which included fixing the areas around each window frame.
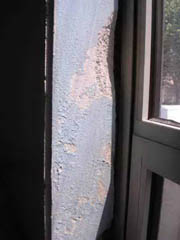
I wanted to give you an idea of the type of work that needed to be done. In photos #2, when they were removing the old windows and putting in the new, some pieces of the plaster were chunked out. There were also quite a few places where water damage occurred, with bubbling plaster very evident. Apparently, the older windows had leaked and a lot of condensation formed on the inside areas, leading to damage over the years. In several places, the metal lath had rusted out and left large holes, as in this photo.
PREPARATION STATION
You can imagine that one of the big factors was the preparation involved before the plastering was even done. Windows and tiled sills needed to be covered. And then there was the matter of hauling out the debris that was removed from around the windows. After this was done, the next step was to establish one place that would serve as my base camp; the place I would bring all materials to and where I would do all my mixing. My strategy was this: I knew I would be working on several windows simultaneously, so there would be a lot of moving from room to room. Fortunately, the rooms had very large doorways that meant I could use a rolling scaffold and work off of it as I went along.I used the scaffold to carry the equipment (construction adhesive, metal lath and tools and acrylic bonder) for the preparation stage of things and to get ready for plastering. The area and others similar made it difficult to tie the metal lath into anything with nails. So, I used the construction adhesive to glue the metal lath in place. I got all the metal lath put in place and allowed it at least a day to set up. This served as a great base for the plaster later on. There were many areas where I was going to use fiberglass mesh to reinforce and repair over cracks. To help myself even more, I cut these to length and had them placed close to where I would embed them with the plaster.
There is an area that has had all the damaged plaster removed. It also has had the bonder applied and is all set to be repaired. Take note that around several of the windows, there is was a 1/2 to 1-inch gap between the plaster and the new window frame itself. Some were a little larger. I'll explain the process of how we dealt with these next.
LIGHTS, CAMERA AND PLASTER!
I set up the mixing area close to a janitor's closet and got plenty of water on hand in 5-gallon buckets. (When I work inside homes or buildings I rarely use a water hose, to be cautious.) I got hot water when I needed it to use with the sponges when I applied the finish. To save my strength, I used a hand dolly to bring the water from the closet to the room where I was mixing. So all was in order and ready to go.Once I mixed my basecoat in a 5-gallon bucket, I put it along with my plastering tools and rinse out bucket of hot water on the rolling scaffold. Now I could move from place to place without physically carrying the buckets, which helped in a huge way by the end of the day. I mention this only because often, in schools during the summer break, the air conditioning is not on. Unfortunately the temperatures this summer were in the mid and high 90 degrees F during this entire project.
I ran a scratch coat over the metal lath ahead of myself, adding accelerator and hot water to a hawk full at a time. I then dropped back and embedded mesh around the edges of all the windows where there was a gap. I would pre-fill the cracks between the frames and plaster and then place the mesh over them. I'd allow this to set up and then come back over the entire area with a coat of base. Where the gaps were bigger, I cut metal lath strips about 2 inches wide, bent them and placed them in the gaps, using construction adhesive to hold them in place.
Once the basecoat was applied, I mixed a batch of sand finish and ran this over the areas. I used sponges to pre-float the areas. This left a rough surface, which I then went over with a paint roller to knock out any pattern. I brushed in the angles with a small paintbrush and this completed each area.
Some damage caused by the old windows also extended down below the sills in some places. This was mostly finish coat that was affected but it's just a point to keep in mind when you go to figuring an estimate on a project. Be aware of the condition of the areas around the places they want repaired. And make sure you spell out what is and is not included in your estimate. Or you may end up doing extra work you did not figure into the pricing.
Since it was a school, there were hallways with rooms off of each one. I decided for my own sanity to work each hallway section. This kept me from getting too far ahead. Large projects can become overwhelming. I then felt like I was accomplishing and completing a section and making progress.
There is not room in this column to go into the factors that were involved in pricing and estimating this project out. I will tell you that prices are always higher when working off a scaffold and for any high work. Perhaps in the future I'll outline some of the pricing strategies I use.
If you have any questions on this in the meantime, don't hesitate to contact me by e-mail at robin@plasterzone.com or through letters to Plaster Man in care of this magazine. By the way, this month's winner of the Walls & Ceilings/Plaster Man T-shirt is Greg Skafec, from Ohio. Until next time, may your overhead be low and your profits high! And remember to "Plaster On!"
Looking for a reprint of this article?
From high-res PDFs to custom plaques, order your copy today!


