Finish Line: Flashings

Illustration 1
This is part one of a two-part article on flashings. Flashings are a very important part of an EIFS-clad wall assembly but are not an EIFS product per se. Hence, their use is a matter of general design and construction, i.e., an architectural and contracting issue, and not an EIFS issue. But the proper design and installation of flashings is critical to keeping water out of a building-any building-including one clad with EIFS. Because there are so many points to be made about flashings, I've split this article into two parts. Although a lot of what follows also applies to wall claddings in general, EIFS is different than other claddings in many ways. I will emphasize those differences, as well as provide general guidance on this important topic.
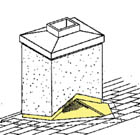
Figure 1
EIFS AND FLASHING
Prior to my getting involved in the EIFS industry, I worked as a design engineer for a large curtainwall producer and erector. We did mostly huge projects that used metal panels and I learned a great deal about flashing-for instance, how to seal the huge number of hot pipes that penetrate the walls of the turbine building in a nuclear power plant. Serious stuff.When I first started working with EIFS, I was surprised to see the lack of use of flashings; it was common back in the '80s to see EIFS installed without any flashing anywhere. Although flashing-less EIFS is still common, the use of flashing is now much more prevalent. There are lots of reasons for this change and many things to understand about flashing. Here are some of the keys ones.
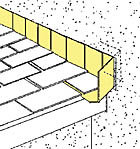
Figure 2
EIFS VS. STUCCO
The first thing to realize is that EIFS is a product quite different than traditional Portland cement plaster, despite the common nickname for EIFS as "synthetic stucco." This includes the way in which flashings and other system edge terminations are handled. One of the main differences is that stucco is thick and flashings can be embedded in much more easily. Unless you are using a very thick EIFS basecoat, like they do in Europe, most EIFS terminations, including flashing, hang loose from the EIFS and are not in the EIFS.WHAT IS FLASHING?
For purposes of this column, my definition of "flashing" is cold-formed (aka "brake-formed" or "roll-formed") sheet metal, and is usually painted galvanized steel or aluminum, copper or stainless steel. Occasionally, you'll see lead or zinc being used but it's pretty rare. There are all types of materials that can also be called "flashing." For example, extruded metal and plastic flashings or "trim" pieces also exist but have their own peculiarities and are not the subject of this column. Various sheet and tape goods also exist, such as membranes and peel-and-stick tapes, and these too must be integrated with the sheet metal flashing to form a complete leak control system. These sheet goods and tapes are subjects unto themselves, and will be the subject of a separate column.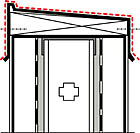
Figure 3
THE THEORY
The idea behind using flashings is that it is essentially impossible to create a wall assembly that does not leak at least somewhere; submarines, too, have bilge pumps-hulls leak too.So, the question then becomes how to handle the inevitable leaks. The answer is to control the flow of leak water so that it causes no harm and to get the H20 quickly routed back outside, where it belongs. That's where the flashing (and caulking) comes in, as the EIFS itself sheds water (it does not leak itself, as it has joints only at its edges).
The question then begs how far do you go in using flashing? For instance, the idea of somehow creating a micro-flashing that seals the TV cable hole that the cable guy just "carefully" installed is ludicrous. Again, what you are trying to do is keep the water out and at small openings it's just impossible to flash the "opening," and thus you use caulking alone (no flashing) as a practical matter. Thus, the "All openings shall be flashed" is the impossible dream. For instance, how do you flash an opening that was cut into the EIFS after the EIFS was installed, such as a small air vent next to the hot tub. You can, if you are willing to remove and rebuild some of the EIFS. Be practical.
THE CODES
Building codes require "flashing." Here is verbatim wording from the 2003 International Building Code:"1405.3 Flashing. Flashing shall be installed in such a manner so as to prevent moisture from entering the wall or to redirect it to the exterior. Flashing shall be installed at the perimeters of exterior door and window assemblies, penetrations and terminations of exterior wall assemblies, exterior wall intersections with roofs, chimneys, porches, decks, balconies and similar projections, and at built-in gutters and similar locations where moisture could enter the wall. Flashing with projecting flanges shall be installed on both sides and the ends of copings, under sills and continuously above projecting trim."
Powerful words. The above is worth memorizing and the IRC has related requirements for EIFS.
However, the term "flashing" itself is defined elsewhere in the code but not completely. For example, sometimes wall components are said to be "self-flashing," i.e. the "flashing" capability is built into (or is part of) another wall component. A case in point is the nail flange window used in homes, where incorporating a flashing at the sill is very difficult-the sill flange prohibits easily placing a flashing all the way under the window frame and the flange shouldn't be removed to make way for the flashing, as it helps mount and support the window. EIFS producers provide guidelines for construction details on how to deal with this difficult common condition, some of which are even more complex than the following schematic drawing shown.
In Illustration 1, the light blue is the nail flange window, the red is the water resistant barrier, the dark blue is the opening wrap, and the yellow is the drainage cavity. Some people say such windows are self-flashing but they are more like self-mounting, as there is no discrete through-the-way flashing per se but rather a series of interconnected water barriers.
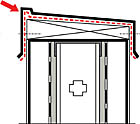
Figure 4
AREAS REQUIRING ATTENTION
In terms of designing flashings with EIFS, here is a quick list of flashing areas that seem to cause the most problems if not handled right. In other words, give the design and installation of these flashings extra attention:- Window sills (see Illustration 1)
- Window heads
- Roof-to-EIFS-chimney flashings (aka "cricket" flashings), where the roof slopes down into the side of an EIFS-clad chimney enclosure (see Figure 1). If the roof is simply allowed to "die" into the EIFS (i.e., no cricket is used), water can back up under the EIFS.
- Diverter flashings (aka "kick-out" flashings), at the low end of a sloped roof with EIFS following the slope above (see Figure 2). This flashing goes under the bottom edge of the EIFS and up behind the foam; note how the flashing comes through a vertical slot in the face of the EIFS. These somewhat complex-shaped flashings are also available as pre-made molded plastic pieces, while the step flashing, further up the slope, is sheet metal.
- Large openings that flex or vibrate, especially HVAC units and wood deck beams.
- Parapet caps and top-of-balcony-wall flashings (see Figure 3). The dotted line indicates a splice where the ends of flashing sections abut. Such splices can also be placed inside the flashing, which looks better but the upper outer edge needs to have a big enough "stop" so the inner splice piece can nest properly (see arrow on Figure 4). The outside of the parapet is to the left. Note in both cases the basecoat comes up and over the top of the framing, thus sealing the top of the wall.
EIFS WITH DRAINAGE
The lower horizontal edge of an EIFS with drainage wall assembly is often left open to allow the leak water, if there is any, to get back outdoors. Although extruded drainage "tracks" that wrap around the bottom edge of the EIFS are available, sometimes their design does not work well in a specific wall design, such as with windows that are flush with the EIFS. In this case, sheet metal flashings can be used that are custom-sized to fit the foam thickness and the window edge detail. Such a flashing would obviously extend out past the face of the EIFS and would have a drip edge to get the water away from the face of the EIFS.If you are designing custom flashings, with perforations in the horizontal leg to let the water out, the holes should be at least 1/8-inch diameter, otherwise the water may hang up at the hole (not pass through) and small holes tend to get plugged with crud.
DRIP EDGES
Flashings at the bottom of wall areas, that have a horizontal leg that goes back toward the wall, must have a drip edge and some slope, otherwise water can "hang" on the underside of the flashings and possibly flow back to a place where you do not want it, such as a window head. The drip edge also helps keep the flashing straight.ATTACHING TO EIFS
EIFS is one of a handful of wall claddings to which flashings cannot be directly attached in a strong, structural manner-the EIFS lamina is just too thin. For example, with metal wall panels, screws can be run through the flashing into the panel to hold down the overhanging edge of a parapet flashing. Not so with EIFS, as the screw does grip well into the EIFS lamina. I've even seen desperate people try to use pop rivets and molly bolts, to no avail.Instead, the screw must go all the way through the EIFS (sometimes several inches) and into something solid. With the widespread use of gypsum-based sheathing as the EIFS substrate, finding something solid behind the EIFS can be a problem-"where is the stud?" This means that from a flashing design standpoint, the flashing needs to be connected to something structural inboard of the EIFS. It also means that sometimes it helps (with large flashings with wide flat faces) if the gauge of the metal is heavy enough so that the flashing will stay straight on its own. There are ways around this basic problem.
THIN GAUGE FLASHINGS
With thin gauge sheet metal flashings-which tend to be wavy-I have seen people try to glue the overhanging edge to the EIFS to make it somehow become flat. It's a good joke. This approach is marginal, as to get it to be flat while the adhesive dries, you need to clamp it down. The bonding also interferes with the normal thermal movement of the metal and can make things worse.A cheap way to get a lot of extra stiffness and straightness into a wide-faced lightweight flashing is to put a shallow "V" crimp in the metal along the length of the flashing. The tip of the "V" is toward the outside and such flashings will still "lap" and "nest." Another solution is to use a wood nailer under the flashing and to have the EIFS come up and stop right at the nailer.
This way, there's not much overlap onto the EIFS but if the drip edge is sealed (not left open), it'll keep the water out. Still another approach is to embed a piece of wood within the EIFS foam layer at the bottom edge of the flashing. That way you can screw into the wood (or use clips to hold down the free end) and allow the EIFS to continue behind the flashing to the top of the substrate (several inches of overlap). This is a sensible approach if the exposed face of the flashing is very wide, which is sometimes done for appearance purposes.
Stay tuned for more on flashing in part two of this article.
If you read this article, please circle number 376.
Looking for a reprint of this article?
From high-res PDFs to custom plaques, order your copy today!


