Master the Taping Process
A thorough, step-by-step tool operation review for the drywall taping process ensures better quality overall.
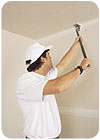
The first step in the taping process is the drywall inspection. It is important during the inspection that all conditions are met (i.e. joints are tight, flat and even), so that the drywall can be accepted and the taping process can begin. If conditions are not met, cut out and pre-fill must be completed, drywall fasteners addressed and accessories and trim corrected.
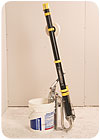
For convenience, a cart or 4-foot scaffold can be used as a mobile taping platform for carrying buckets (water and compound), drywall tape, clean-up brush, tools and a trash container. This allows the tools and materials to be kept closer to the work area and saves steps.
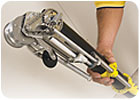
To fill the taper, be sure that the gate control valve is in the closed or fill position. Place the taper on the gooseneck with the filler nozzle firmly seated. Place the index and middle fingers of your left hand in the open end of the tube and begin pumping. Stop pumping when the plunger reaches your fingers (an empty taper takes nine to 10 pumps to fill).
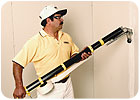
The best time to install tape is when the taper is seated securely on the gooseneck. Remove the tape retainer wire and load a roll of tape onto the spool post, with the tape unwinding in a clockwise direction. Replace the retainer wire and feed the tape through the tape guide at the automatic taper head.
When correctly installed, the tape will curl over the drive wheel. After loading the taper, turn it upright and rest it on top of your foot with the drive wheel facing away from you and the gate control lever on the right. Open the gate control valve to engage the drive mechanism, and turn the key to start the compound flow.
Place the drive wheels on the wall and roll along the joint allowing the head of the taper to lead. This makes tracking and control easier. Come to a complete stop about 21⁄2 inches from the end of the joint and cut the tape by pulling on the control tube. Roll out the last 21⁄2 inches on the joint and advance the tape for the next joint by pushing forward on the control tube.
For ceilings, use both drive wheels on the joint for the first 4 to 6 inches. Engage the creaser wheel and tilt the bottom of the taper toward you at a slight angle leaving only one drive wheel in contact with the drywall surface. Leading with the head of the taper, move along the joint and stop 21⁄2 inches from the end. Cut the tape, roll out the end and advance the next piece of tape.
Whenever you are not running the taper, close the gate control valve and place it on the gooseneck. It is important to wipe in all the flat joints before proceeding to the angles. Wipe the tape from the center out to the ends to avoid stretching/wrinkling. Tape must be wiped cleanly, avoiding picking up debris from the floors. If taking a break, place the taper head into a bucket of water to prevent the compound from drying and clogging the tool.
To tape angle joints, both wheels must run in solid contact with the adjacent wall surfaces, bisecting the angle with the taper. Tracking must be in a straight line with the creaser wheel extended. This secures the tape to the joint and eases the corner roller operation. Again, stop 21⁄2 inches from the end of the joint, cut the tape, roll out the end and advance the tape for the next joint.
For vertical angles, roll out a 6-inch tab of tape, place the end of the tape at the bottom of the angle, roll the drive wheels along the angle and apply light pressure to the creaser wheel. As you roll up the wall the angle of the taper changes, so you must ease off the pressure on the creaser wheel to maintain even pressure on the angle tape.
For ceiling angles, roll out a small tab of tape until the end is at a nine o'clock position on the drive wheel. Set the tape tight into the corner touching the adjacent wall. Roll the tape along the joint while applying light pressure with the creaser wheel.
(Professional tip: It is important to apply light pressure on the creaser wheel for the first 2 to 3 feet of any angle to avoid pulling the tape away from the end of the joint.)
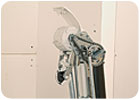
Four rollers will embed and smooth the tape forming a sharp corner. For best results, start from the middle of the angle joint, and use light pressure to roll toward both ends. Make a second pass, again from the middle, working toward both ends with firm pressure. This will force excess compound from under the tape and prepare the angle for the corner finisher. Remember to prime this angle tool by applying compound to the cavities of the corner finisher.
Smoothing the compound over the tape is accomplished by seating the corner finisher at the end of the joint, applying light pressure and moving the tool along the joint to the other end. The corner finisher is moved with the center nose clip leading and the blades wiping behind. After the angles have been skimmed, detail the bottom corners and ceiling angle intersections with a drywall knife.
 First coat nails and/or screws
Available in 2 and 3 inch widths, the nail spotter fills fastener depressions. Most walls and ceilings can be completed from the floor. Normally no water needs to be added to thin the compound. The nozzle adapter is used with the pump to load the nail spotter.
Make positive contact with the drywall surface at the beginning of a row of fasteners. Apply moderate pressure to start the compound flow and draw the tool along the row. After passing the last fastener come away from the wall in a sweeping motion. The nail spotter blade skims off excess compound while leaving a slight crown over each fastener.
The walk-through inspection ensures that all flats and angles are taped, detail is completed, fasteners are first coated, and bead and trim is coated and properly installed. Staging for the next day's work can now be evaluated to continue with the automatic taping and finishing tool system.

This basic cutting process allows users to establish the proper muscle memory and eliminates the challenges related to rushing through the learning process. Speed occurs naturally as the user masters the cutting process.
If you read this article, please circle number 175.
The first step in the taping process is the drywall inspection. It is important during the inspection that all conditions are met (i.e. joints are tight, flat and even), so that the drywall can be accepted and the taping process can begin. If conditions are not met, cut out and pre-fill must be completed, drywall fasteners addressed and accessories and trim corrected.
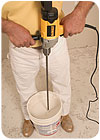
Mix compound to a creamy consistency using a drill and paddle.
Prepare compound
Thin all-purpose or taping joint compounds down to a creamy consistency using a drill and paddle or hand mixer. Mix the compound with consideration to the manufacturer's recommendations and climatic conditions on a protected, easy-to-clean surface (i.e. scrap of drywall).For convenience, a cart or 4-foot scaffold can be used as a mobile taping platform for carrying buckets (water and compound), drywall tape, clean-up brush, tools and a trash container. This allows the tools and materials to be kept closer to the work area and saves steps.
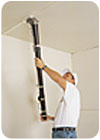
Install tape when the taper is seated securely on the gooseneck.
Set-up taper
Visually inspect the taper. Oil all moving parts and confirm that all parts are operational. Inspect the pump and ensure that the gooseneck is attached. Place the loading pump into the bucket filled with compound and prime the pump. The pump is primed by pumping the handle until the air is purged from it.To fill the taper, be sure that the gate control valve is in the closed or fill position. Place the taper on the gooseneck with the filler nozzle firmly seated. Place the index and middle fingers of your left hand in the open end of the tube and begin pumping. Stop pumping when the plunger reaches your fingers (an empty taper takes nine to 10 pumps to fill).
The best time to install tape is when the taper is seated securely on the gooseneck. Remove the tape retainer wire and load a roll of tape onto the spool post, with the tape unwinding in a clockwise direction. Replace the retainer wire and feed the tape through the tape guide at the automatic taper head.
When correctly installed, the tape will curl over the drive wheel. After loading the taper, turn it upright and rest it on top of your foot with the drive wheel facing away from you and the gate control lever on the right. Open the gate control valve to engage the drive mechanism, and turn the key to start the compound flow.
Tape should curl naturally over the drive wheel.
Tape butt joints
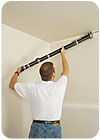
Butt joints are any joints in drywall that have a cut edge and are not recessed. Butt joints are taped and wiped in first, followed by the sidewall flats and then ceiling flats. All tape should be wiped from the center of the joint out to avoid wrinkling, as wet tape has a tendency to stretch.Place the drive wheels on the wall and roll along the joint allowing the head of the taper to lead. This makes tracking and control easier. Come to a complete stop about 21⁄2 inches from the end of the joint and cut the tape by pulling on the control tube. Roll out the last 21⁄2 inches on the joint and advance the tape for the next joint by pushing forward on the control tube.
Tilt the bottom of the taper toward you at a slight angle when taping ceiling flats.
Tape flat joints (sidewalls) then ceilings
Recessed factory edges of drywall, when joined together, are called flats. For sidewalls, place the drive wheels on the wall and roll along the joint allowing the head of the taper to lead. Come to a complete stop about 21⁄2 inches from the end of the joint and cut the tape by pulling on the control tube.For ceilings, use both drive wheels on the joint for the first 4 to 6 inches. Engage the creaser wheel and tilt the bottom of the taper toward you at a slight angle leaving only one drive wheel in contact with the drywall surface. Leading with the head of the taper, move along the joint and stop 21⁄2 inches from the end. Cut the tape, roll out the end and advance the next piece of tape.
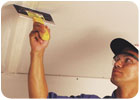
Whenever you are not running the taper, close the gate control valve and place it on the gooseneck. It is important to wipe in all the flat joints before proceeding to the angles. Wipe the tape from the center out to the ends to avoid stretching/wrinkling. Tape must be wiped cleanly, avoiding picking up debris from the floors. If taking a break, place the taper head into a bucket of water to prevent the compound from drying and clogging the tool.
Wipe tape from the center out to avoid stretching/wrinkling.
Tape angle joints
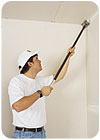
The taper applies the angle tape in conjunction with the corner roller and 2- or 3-inch corner finisher. The corner roller and corner finisher angle tools should be primed prior to use by applying compound to the corner roller wheels and filling the cavities of the corner finisher.To tape angle joints, both wheels must run in solid contact with the adjacent wall surfaces, bisecting the angle with the taper. Tracking must be in a straight line with the creaser wheel extended. This secures the tape to the joint and eases the corner roller operation. Again, stop 21⁄2 inches from the end of the joint, cut the tape, roll out the end and advance the tape for the next joint.
For vertical angles, roll out a 6-inch tab of tape, place the end of the tape at the bottom of the angle, roll the drive wheels along the angle and apply light pressure to the creaser wheel. As you roll up the wall the angle of the taper changes, so you must ease off the pressure on the creaser wheel to maintain even pressure on the angle tape.
For ceiling angles, roll out a small tab of tape until the end is at a nine o'clock position on the drive wheel. Set the tape tight into the corner touching the adjacent wall. Roll the tape along the joint while applying light pressure with the creaser wheel.
(Professional tip: It is important to apply light pressure on the creaser wheel for the first 2 to 3 feet of any angle to avoid pulling the tape away from the end of the joint.)
Roll the tape along the joint while applying light pressure with the creaser wheel for ceiling angles.
Roll, skim and pick angles
After applying tape to the angle joints, embed the tape using the corner roller. Remember to prime this angle tool by applying compound to the corner roller wheels.Four rollers will embed and smooth the tape forming a sharp corner. For best results, start from the middle of the angle joint, and use light pressure to roll toward both ends. Make a second pass, again from the middle, working toward both ends with firm pressure. This will force excess compound from under the tape and prepare the angle for the corner finisher. Remember to prime this angle tool by applying compound to the cavities of the corner finisher.
Smoothing the compound over the tape is accomplished by seating the corner finisher at the end of the joint, applying light pressure and moving the tool along the joint to the other end. The corner finisher is moved with the center nose clip leading and the blades wiping behind. After the angles have been skimmed, detail the bottom corners and ceiling angle intersections with a drywall knife.
The corner roller beds the tape, forcing out excess compound and leaving the angle ready for finishing.
Install and coat trim, bead and accessories
This is the recommended time for any remaining trim or bead to be installed and coated for a systematic finish with the automatic taping and finishing tool system.The corner finisher wipes down and feathers both sides of the angle in one pass.
Available in 2 and 3 inch widths, the nail spotter fills fastener depressions. Most walls and ceilings can be completed from the floor. Normally no water needs to be added to thin the compound. The nozzle adapter is used with the pump to load the nail spotter.
Make positive contact with the drywall surface at the beginning of a row of fasteners. Apply moderate pressure to start the compound flow and draw the tool along the row. After passing the last fastener come away from the wall in a sweeping motion. The nail spotter blade skims off excess compound while leaving a slight crown over each fastener.
Speed occurs naturally as the user masters the cutting process.
Walk-through inspection of day's operation and clean-up of all tools
The taping process is now complete, except for clean up of tools and final walk-through. The tools must be washed with a brush and water (or a water hose and nozzle) after each use. Pay close attention that all joint compound is flushed from all mechanisms. Complete the clean up by lightly oiling all wear points and mechanisms using any light machine oil. This operation may be completed at the end of the day by keeping all tool heads submerged in a bucket (or buckets) of water.The walk-through inspection ensures that all flats and angles are taped, detail is completed, fasteners are first coated, and bead and trim is coated and properly installed. Staging for the next day's work can now be evaluated to continue with the automatic taping and finishing tool system.
The nail spotter blade skims off excess compound while leaving a slight crown over each fastener.
Training tips
When training new tool users on the automatic taper, begin with two to three rolls of dry tape. This allows them to get the feel of starting at the end of the joint, rolling out the tape along the joint and the cut process (stop, cut, roll out and advance). New users should be encouraged to start off each joint slowly and smoothly, pausing between each segment. The basic cutting process is the most critical part for new users to learn:- Stop completely 21⁄2 inches from the end of the joint (pause)
- Hold the bottom of the taper still, and cut the tape by pulling down on the control tube (pause)
- While holding down the control tube, roll out the end of the tape (pause)
- Pull the taper away from the wall, and advance the tape by pushing up on the control tube
This basic cutting process allows users to establish the proper muscle memory and eliminates the challenges related to rushing through the learning process. Speed occurs naturally as the user masters the cutting process.
If you read this article, please circle number 175.
Looking for a reprint of this article?
From high-res PDFs to custom plaques, order your copy today!


