Bench test: Just Add Water
When we first saw a roll of Wet-N-Stick
demonstrated, we were skeptical to say the least. Many of the rules that apply
to taping did not seem to apply to this product. But the idea of being able to
string tape without using mud was intriguing. We decided to keep an open mind
and give it a try.
When we first saw a roll of Wet-N-Stick demonstrated, we were skeptical to say the least. Many of the rules that apply to taping did not seem to apply to this product. But the idea of being able to string tape without using mud was intriguing. We decided to keep an open mind and give it a try.
Our first test was done in a garage and lo and behold it worked. It stuck to the walls and ceiling great. In fact, when we tried to peel it off, it took the drywall paper with it. The cool thing was it dried in about 20 minutes.
Our next question was how it would look after we applied the first coat of mud. Would it blister, peel or swell? Well, the next day we were pleased to see that it didn’t. We finished the garage as we normally would and after the paint was applied there was no difference in the quality compared to a job finished the traditional way. But just because it worked one time on this garage we were not convinced completely that it would work the same way on every job, so we tried it again.
We tried it on different types of jobs: Over plaster, previously painted walls, prefill, etc.; we wanted to make sure we wouldn’t get burned. We ran it through the mill, so to speak and it performed every time.
Next we took into consideration how much time it took to get our tools ready, the buckets moved to the area we would be working and finally putting tape onto the wall. In most cases, we were looking at a minimum of one hour just getting ready to start taping. The next aspect we considered was that while one guy is applying the tape, another guy has to follow along wiping every piece. Then at the end of the day, we spent at least half an hour washing the tools. Our conclusion was: Using our method of mud taping, we were spending at least an hour and a half carrying buckets, mixing mud and cleaning up.
Since time is money, we considered how much time would be spent on taping with Wet-N-Stick tape. We only needed one bucket of clean water, our tape dispenser, a roller and a sponge. Instead of having to mix mud and carry buckets around the job, we all started stringing tape (we have a three-man crew). Three men all taping at the same time for an hour and a half can tape a whole floor in an average house. Now consider that with a price of $10 per bucket for mud, we were saving more than $60 just in mud alone. This more than made up for the extra cost of the tape. The extra production was a bonus. Plus, when we were done taping, we were completely clean and didn’t have to change clothes to go out for lunch.
We now wipe with a sponge instead of a knife and only roll our angles once. We don’t have to skim or pick corners or the bottoms. We coat the angles twice using CanAm angle tools, a 3-inch glazer for the first coat and a 4-inch for the final coat. This makes the corners finish out perfect, even with the deep bevels the board seems to have now days. We bed coat the flats with a 10-inch box but we like to finish the butts by hand. One thing we do different now, is since the tape sucks into the bevel and has a slight recess after the bed coat is dry, we skim the center of the flats while we coat the screws to fill this slight indent. Then we finish coat the flats with a 12-inch box and sand. Done. If you three-coat the flats with a 7, 10 and 12 inch, you can skip the skim between coats.
Another thing we have found that saves us time, is doing touch up in a house that is finished. Now we are able to do a patch or fix a crack without having to mix quick-set. We wet the tape and place it over any bad spots, let it dry for a short time and skim the edges. We can get in and out in a hurry without any mess at all.
For those out there who are willing to try something new, this stuff works. And hopefully you’ll be like us and save time, money and laundry soap in the end.
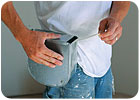
Heath Jimerson, a builder and drywall
contractor of Jimerson Construction, located in Nebraska, pulls the Wet-N-Stick
out of the Tape-Tube, a product I created to help the delivery process of using
the tape. The box submerges the tape in water that helps activate the
adhesive.
When we first saw a roll of Wet-N-Stick demonstrated, we were skeptical to say the least. Many of the rules that apply to taping did not seem to apply to this product. But the idea of being able to string tape without using mud was intriguing. We decided to keep an open mind and give it a try.
Our first test was done in a garage and lo and behold it worked. It stuck to the walls and ceiling great. In fact, when we tried to peel it off, it took the drywall paper with it. The cool thing was it dried in about 20 minutes.
Our next question was how it would look after we applied the first coat of mud. Would it blister, peel or swell? Well, the next day we were pleased to see that it didn’t. We finished the garage as we normally would and after the paint was applied there was no difference in the quality compared to a job finished the traditional way. But just because it worked one time on this garage we were not convinced completely that it would work the same way on every job, so we tried it again.
We tried it on different types of jobs: Over plaster, previously painted walls, prefill, etc.; we wanted to make sure we wouldn’t get burned. We ran it through the mill, so to speak and it performed every time.
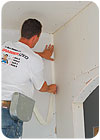
Wet-N-Stick can be used in corners.
The breakdown
Now that we knew it worked, it came down to if it would save us time and money. We broke down our taping process. We looked at how much mud it takes to apply tape the conventional way, how much time-not only carrying the buckets onto and around the job-but also spent time mixing. We found that it takes about five minutes to mix a bucket of mud. If the job requires six buckets that equates to almost half an hour just to mix.Next we took into consideration how much time it took to get our tools ready, the buckets moved to the area we would be working and finally putting tape onto the wall. In most cases, we were looking at a minimum of one hour just getting ready to start taping. The next aspect we considered was that while one guy is applying the tape, another guy has to follow along wiping every piece. Then at the end of the day, we spent at least half an hour washing the tools. Our conclusion was: Using our method of mud taping, we were spending at least an hour and a half carrying buckets, mixing mud and cleaning up.
Since time is money, we considered how much time would be spent on taping with Wet-N-Stick tape. We only needed one bucket of clean water, our tape dispenser, a roller and a sponge. Instead of having to mix mud and carry buckets around the job, we all started stringing tape (we have a three-man crew). Three men all taping at the same time for an hour and a half can tape a whole floor in an average house. Now consider that with a price of $10 per bucket for mud, we were saving more than $60 just in mud alone. This more than made up for the extra cost of the tape. The extra production was a bonus. Plus, when we were done taping, we were completely clean and didn’t have to change clothes to go out for lunch.
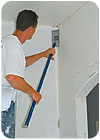
Jimerson rolling a vertical angle with a standard corner-roller. It depresses the tape and places it in the corner, exactly where it is needed.
Sticky fingers
Here are the steps we take when using Wet-N-Stick tape. We walk the job and cut out and pre-fill bad spots just like we did before, fill any bad seam and bevel cuts and fill the butts. We use quick-set mud for this process. We also apply all of the flats first, then the angles. The product dries fast, so we roll the angles right away, especially on hot sunny days. We string the verticals first, then the ring (where wall meets ceiling). When we do this, the corners for some reason turn out nicer.We now wipe with a sponge instead of a knife and only roll our angles once. We don’t have to skim or pick corners or the bottoms. We coat the angles twice using CanAm angle tools, a 3-inch glazer for the first coat and a 4-inch for the final coat. This makes the corners finish out perfect, even with the deep bevels the board seems to have now days. We bed coat the flats with a 10-inch box but we like to finish the butts by hand. One thing we do different now, is since the tape sucks into the bevel and has a slight recess after the bed coat is dry, we skim the center of the flats while we coat the screws to fill this slight indent. Then we finish coat the flats with a 12-inch box and sand. Done. If you three-coat the flats with a 7, 10 and 12 inch, you can skip the skim between coats.
Another thing we have found that saves us time, is doing touch up in a house that is finished. Now we are able to do a patch or fix a crack without having to mix quick-set. We wet the tape and place it over any bad spots, let it dry for a short time and skim the edges. We can get in and out in a hurry without any mess at all.
For those out there who are willing to try something new, this stuff works. And hopefully you’ll be like us and save time, money and laundry soap in the end.
Looking for a reprint of this article?
From high-res PDFs to custom plaques, order your copy today!


