The Finish Line: Moisture Testing on EIFS-Clad Walls

Some people count sheep to try to get to sleep: I count EIFS jobs I’ve looked at. If I’m having trouble getting to sleep, sometimes I’m up all night counting them.
Some of the jobs I’ve seen supposedly had EIFS problems-water leaks, mostly-usually due to leaky windows or failed caulking, not EIFS problems. As a result of that many experiences I have amassed a series of techniques that work well when assessing a wall’s condition. In this article I’ll share some techniques that work for me when doing moisture intrusion investigations that involve taking moisture level readings.
It's Different
EIFS is different. There are a number of tricks to doing in-the-wall moisture readings with EIFS–clad wall assemblies that are different than with traditional claddings. Some of these techniques are unique to EIFS as a product type, because the coatings are thin but the insulation layer is thick and outboard of the wall structure. Unlike stucco-which has no insulation, and in which the coatings are thick and hard and must be drilled-through to get to the underlying materials-EIFS is relatively soft and can be punched through without drilling. This makes taking numerous readings on an EIFS wall faster and easier.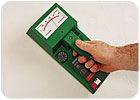
Moisture Meters
There are several types of moisture meters. The most common is the type that has needle-like probes that one can stick into a material. The other is what I call the “scanning type.” This type emits energy into the wall and picks up the signal as it comes back to the unit. This latter type gives a relative reading (one area’s moisture level versus another, but no exact numbers), while the former gives an actual percentage of moisture content reading.The scanning type will pick up other things in the wall too, such as EIFS mechanical fasteners, wet insulation, brackets, pipes, conduits and framing. With EIFS, the foam layer isolates the substrate from the outside face, so these types of scanning units need to be powerful enough to “get through” the foam layer. This type of detector has a variable power setting and it takes some practice to understand what the readings mean. I use the scanning type mostly as a screening tool, to see if there are areas that appear much damper than others and then use the “percentage type” to take actual readings.
Probes
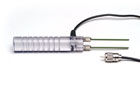
Most moisture meters have two small sharp pins that are attached to the meter case. The pins are stuck into the material being tested, and the moisture percentage is read directly off a scale (analog or digital) on the meter case. Some meters have a built-in memory where readings can be stored and later recalled or downloaded. This technique works fine if you can get at the material being tested, such as wood framing before the drywall is installed. With an in-place EIFS this doesn’t work, as the materials in question (usually the studs and sheathing), are buried in the wall.Some moisture meters have a socket on the case into which you can plug a cord that has the probes on the end of a wand-like handle. This type of probe was developed specifically for EIFS due to the thickness of the soft foam insulation layer. The probes can be changed from short pins to long, knitting needle-like probes of various lengths. Probe lengths up to 4 inches or more are available, making it possible to go through thick layers of foam. The “probes on a cable” also allows getting the probes into areas where it would be hard to read the meter, like cavities and overhead.
When using long probes, one should make sure they are insulated: The probes themselves are metal and are covered with plastic, except at the tip. Sometimes the presence of the plastic insulation is hard to detect. If the plastic comes off, a false reading may result, as the measurement is taken along the length of the probe, rather than at the tip where it should be taken.
To make sure the probes actually get into the material being tested (the sheathing), I determine the foam thickness, then add 1/8 inch for the EIFS lamina and another 1/8 inch for the EIFS attachment adhesive (if used), plus whatever the drainage plane thickness is (if it’s drainage-type EIFS), and then another 1/4 inch to get into the sheathing or framing. I then put masking tape of the probes at the total depth, so I know how far into the wall I am.
I have seen cases where the probes just kept on going – never bottomed out on the substrate or framing. This was because the sheathing had turned to mush and offered no resistance to penetration. There are also EIFS-like products that do not have a solid continuous substrate, but rather use the foam insulation as the sheathing, which is attached directly to open framing. Clearly in this case there is no real structural substrate (like plywood or OSB) so the meter probes would go through the foam and into the stud cavity.
Probe Holes
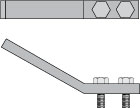
I have seen people try to pound long probes through the EIFS lamina. This inevitably bends the probes. A better approach is to punch two holes first, through the EIFS lamina. Companies that make moisture meters make hole punches that will ‘pre-drill’ proper holes through which the probes can be inserted. The hole punches basically look like the “probe on a cable” described above, but there’s no cable and the probes are short and hard.For punching holes I use a homemade punch I keep on my tool belt when crawling around scaffolds and ladders. It punches two holes at once through the EIFS lamina at the proper spacing. The bolts are hardened steel (Grade 5) and have the ends ground to a point. The bolts are slightly larger than the probe diameter; about 3/16 of an inch works. The bolt spacing is the same as for meter probes. The bar is 3/8-inch thick aluminum and the bolt holes are drilled and tapped, the bolts threaded in, and then the bolts locked in place forever with epoxy. The bar has a bend in it so I can hold it in one hand with the bolt ends in contact with the EIFS lamina, and hit the bolt heads with a hard rubber mallet using the other hand. My handy hole puncher tools speeds things up, but a hammer and a nail set works fine too. I’ve also seen people take a 2 x 4 and drive two nails through it, and use it as a punch.
Once the holes are punched, I use an ice pick, with the tip rounded slightly, to push into the foam all the way to the substrate or framing. If you try to use the meter probes to push through the foam, you may bend them. This is because there may be a hard mass of EIFS adhesive between the foam and the sheathing that the probes can’t punch through. I use the same rubber mallet to tap the probe tips into the substrate. Since leaks usually originate at the edge of the EIFS, this hardened area of EIFS attachment adhesive occurs frequently as the edge of the EIFS is usually backwrapped and there’s a band of adhesive at the very edge.
After taking the reading, I withdraw the probes and fill the holes with a matching 1-part paintable acrylic caulking-the kind that comes in a toothpaste-like tube with an integral tip. It doesn’t need a separate caulking gun and also fits nicely on my tool belt. If one can’t get a caulking color that is a good match, one can get a can of matching paint made up, then dab it over the sealant with a small brush. I put this paint in a nail polish bottle, with an integral brush, which also fits nicely on my tool belt.
A hint: sometimes you don’t want to try to make the probe holes invisible right away. If the reason for the moisture testing is an ongoing problem, such as litigation, you may want to go back to the same location and retake the readings. Or, someone else may want to take readings at the exact same location to confirm your measurements.
Taking Readings
Proper documentation is important to keep track of the numerous readings and to produce a professional report. A proper moisture-level measuring program often requires dozens, if not hundreds, of readings. Keeping track of the readings requires organization. Often there may be a half dozen or more readings at one area, such as windows, and dozens of windows that need to be assessed. When recording readings I use the following technique:I buy large, self-adhering day-glow mailing labels at the local office supply store. These come six to a sheet and peel off as needed. They store neatly as sheets on the clipboard I carry with me to take my notes. I use my computer to print the project name, my name, a scale (in inches), and the date on the labels. I leave a large space for a letter (A, B, C, etc.), number (1, 2, 3, etc.) and an arrow. The letter is for a certain general area (say, a certain deck beam location) and the number is for the reading within that area (there are often multiple readings in a given area).
Then I lay out a grid on the wall, usually six inches on center, of the points at which the readings will be taken. Another hint: I grind a notch in the handle of my hole punch, at six inches from the end of the handle, which then makes for an instant ruler for laying out the grid. Once all the grid points are established, a label is affixed at each grid point. Each label then gets a letter, number and an arrow. The arrows point to the probe holes, or to some other defect like failed sealant or a crack. The letter and number is for identifying which reading is which, for the written report. After I take the readings, I take a photo of the whole area that was just checked. Taking the photo after is a good idea, as sometimes the grid has to be expanded if the process of taking the readings indicates water has moved outside the original grid area.
Sometimes the self-adhering labels will stick to the EIFS finish, but often not. So I use metal pushpins to tack the labels in place (the ones with plastic heads tend to break – the aluminum ones with long sharp points, available at art supply stores, work well). Then I take my moisture percentage readings and log them on a record sheet.
By using this grid technique one can often see how far the water intrusion has spread – you keep on taking readings until the moisture level becomes normal. For instance, if the suspect area is a window sill, the jamb-sill intersection is a good place to check, and the damage, if any, usually spreads laterally from the point of entry, in a triangular pattern. This mapping process helps figure out how much cladding to remove when doing repairs – where is the next stud, etc. It goes without saying that leaks normally are not in the field of blank wall areas, but near joints and openings.
Pattern Recognition
Most buildings use the same details and building products over and over. The classic case is a wood-framed two- to three-story motel. The window details and flashings, and HVAC sleeves are almost always installed the same way at each place that they occur. Chances are good that if the first few windows you check have leaks, the rest will also. Thus a pattern emerges and there’s usually no need to test every single window. In other words, just test enough to be sure you’ve found a pattern that is real. Also, check the side of the building that gets the wind and rain first, as it is more likely to leak than the side away from the prevailing weather.The above technique is not the only way of doing this, but it works for me. You can do this sort of thing yourself for the small investment of a moisture meter. Here is a warning though: Make sure that the owner is aware that this technique penetrates the wall and that it does leave marks. Get their OK first to poke into the wall, so they don’t freak out when they come home and see lots of little holes. But properly patched, the holes can be difficult to spot. Also, sometimes after the moisture readings are taken, the owner may want to immediately tear into the wall and see “how bad it is”. I think it’s a good idea to be mellow for a moment, sit back, and discuss what to do next with the owner – assuming you have not already agreed that it’s OK to tear into the wall. Often I have found that a meeting of the various parties is a good idea, if for no other reason than that everyone can be present when the tear-off is done, and arrangements can be made for contractors to be present to close up and repair or patch the areas where the EIFS has been removed.
In a recent article in W&C, I wrote about using infrared (“IR”) with EIFS to do moisture studies. IR is an electronic, nondestructive process. It does not mar the wall at all. It measures temperature differences on the wall surface using a camera-like device. This temperature difference may be an indication of dampness. IR is a sophisticated technology, and good equipment and training is needed to properly do an IR scan and to properly interpret the results. But, IR, combined with moisture meter readings, can give confirmation of the actual state of the wall – you have two different ‘views’ of the same wall, thus increasing the likelihood that the moisture issues are being properly identified.
No doubt you too may have developed some novel ways of doing this kind of testing. If you have techniques that work, please send them to W&C and share them with the readers.
Looking for a reprint of this article?
From high-res PDFs to custom plaques, order your copy today!


