Are You on the Level?
Today’s level of providing smooth walls and hiding the board joints would have seemed almost impossible 40 years ago. Yet, today they are commonplace and expected. Unfortunately, as the finishers got better and tools and materials improved, the owners and architects have kept raising their level of expectation to almost unobtainable perfection. The finishing and final decoration of gypsum wallboard is more complex than most average people in construction are aware.
Gypsum wallboard is the most economical, seamless, smooth and fire-resistant interior finish system on the market today. The economical fact explains why gypsum wallboard is the most popular wall and ceiling finish system in North America. This was not always true.
Less than 50 years ago gypsum plaster was king and drywall was the ugly duckling of the family. I am a plasterer, and come from a plastering family and saw the situation from my earliest days. A few decades ago, plasterers would not even talk to drywallers, so much so that when I started to work for the Northwest Wall and Ceiling Bureau in Seattle, my father was annoyed that I would work with drywall people. Today, I believe we have to look at each other as brothers in the same business. The fact that many companies have steel stud and drywall crews working along side the plaster crew proves the point.
I love plaster and do wish there was more interior gypsum plaster. However, the fact is gypsum wallboard is economical and has taken over as the dominant interior finish in North America. As gypsum wallboard, drywall, plasterboard, sheetrock or whatever name you call it, the product has evolved and the quality of finishing by the trades people has also evolved.
In the early days, drywall finishers or tapers were not very sophisticated and heavy textures were commonly used to hide taped joints. Today, the quality of finishing gypsum wallboard is unparalleled. I believe this is due to a combination of improved skills by the trades and improved products and tools to achieve the custom fine smooth walls and ceilings. Today’s level of providing smooth walls and hiding the board joints would have seemed almost impossible 40 years ago. Yet, today they are commonplace and expected. Unfortunately, as the finishers got better and tools and materials improved, the owners and architects have kept raising their level of expectation to almost unobtainable perfection.
The finishing and final decoration of gypsum wallboard is more complex than most average people in construction are aware. The fact that I would perform site investigations on residential projects and the gypsum wallboard finish crew who look perplexed and finally ask me “What is a Level 5?” illustrates my point.
The following is a simplistic version of the five levels. For a more detailed and complete explanation refer to the Gypsum Association technical document GA-214 available at www.gypsum.org.
Level 1: Setting the tape over the joints with the joint compound with no concern for tool marks or ridges. Commonly called “fire taping”.
Level 2: After setting the tape with joint compound, the taped joint is immediately wiped down to remove the ridges and majority of tool marks. Commonly used in mechanical rooms, garages or for walls to receive tile or other non-transparent covering.
Level 3: After the setting (first) coat is wiped smooth and allowed to dry, then a second coat of joint compound is applied over the joint and feathered smooth. This is a common level for tract homes, apartments and gypsum panels receiving a medium to heavy texture.
Level 4: After the second coat has dried, a third thin coat is applied, feathering out the joint a little further. This additional coat adds additional hiding power. This is common for light textures and in some cases can work for a final smooth finish.
Level 5: The highest level of finish for gypsum wallboard. After a Level 4 is complete and dry, a thin coat joint compound is applied over the entire surface of the wallboard including joints. The intent is to equalize the absorbing porosity between the gypsum panel face paper and the joint compound. Even a very good Level 4 can and will have the joints flash through the final paint when the paint is glossy and/or exposed to harsh critical side lighting. This is a very common problem on long corridors done with a Level 4 and a paint with a sheen exposed to harsh down or side lighting. The Level 5 coat of joint compound equalizes this porosity to prevent what is known as “joint banding”.
It should be noted that there are manufactured products that can be used in lieu of the skim coat of joint compound. These products work very well, but manufacturers’ instructions must be carefully followed. Only use products specifically labeled to achieve a Level 5 finish.
I have been on many site walks where owners would point to a minor blemish, a slightly out of plumb wall, or a nail pop and then ask “This is a Level 5 Finish?” After reviewing the steps the contractor took, I inform them “Yes, it is a Level 5 Finish.” Three coats of joint compound have been applied and a skim coat. That, by definition, is Level 5. You cannot assume a Level 5 is automatically better than a Level 4 or will fix a poor Level 4 finish. I have also been on sites where a drywall contractor did a very poor job of setting trims and had wavy angles, then used the excuse, “It’s a Level 3 finish, I met a Level 3.” While he did do the steps for a Level 3, tool marks and over-sanding is not a quality Level 3. I would have to inform him, “yes you did a non-industry-conforming Level 3.” A Level 5 does not mean perfection and a Level 3 does not mean improper workmanship shall be tolerated.
In my experience many complaints arise from contractors being directed to provide a Level 4 when a Level 5 should have been specified in the interest of economy. In many cases a Level 4 has provided satisfactory results when a Level 5 should have been specified and misled designers to believe a Level 4 will “always” provide the desired result. When a Level 4 finish is used where a Level 5 should be specified and then aesthetic problems arise, it can lead designers to believe they have been short-changed by the contractor. In reality, they have been taking a gamble and it has paid off in the past. Here are some examples of what can make a Level 4 suddenly seem to fail when it worked in the past:
• Sunlight that hits the wall or ceiling at just the right angle
• The paint has a higher sheen or gloss
• Wall wash or accent lights
• Deep tone or dark colored paints
Not surprisingly, the intent of the Level 5 finish is to solve all of the above problems. Contractors who find themselves bidding a project specified with a Level 4 finish and are fairly certain the project should have been specified a Level 5 might want to put the designer/general contractor on notice.
CLARIFICATION AND INTENT TO PROCEED AS DIRECTED
It has come to our attention that the owner/architect has specified a Level 4 finish for the gypsum wallboard system. The industry associations and ASTM (C-840) would recommend a Level 5 finish for the project given the factors involved. Our company understands that with today’s budget constraints every project must economize wherever possible. While a Level 4 finish “may” work on this project, we ask for you to review the Gypsum Association’s (GA 214) Levels of Finish Document.
Be assured our firm has the intent to provide the best Level 4 finish possible given the circumstances on site. However, we cannot guarantee a Level 4 finish will achieve the desired results of the owner/architect where the Gypsum Association would recommend a Level 5.
Gypsum wallboard is the most economical, seamless, smooth and fire-resistant interior finish system on the market today. The economical fact explains why gypsum wallboard is the most popular wall and ceiling finish system in North America. This was not always true.
Less than 50 years ago gypsum plaster was king and drywall was the ugly duckling of the family. I am a plasterer, and come from a plastering family and saw the situation from my earliest days. A few decades ago, plasterers would not even talk to drywallers, so much so that when I started to work for the Northwest Wall and Ceiling Bureau in Seattle, my father was annoyed that I would work with drywall people. Today, I believe we have to look at each other as brothers in the same business. The fact that many companies have steel stud and drywall crews working along side the plaster crew proves the point.
I love plaster and do wish there was more interior gypsum plaster. However, the fact is gypsum wallboard is economical and has taken over as the dominant interior finish in North America. As gypsum wallboard, drywall, plasterboard, sheetrock or whatever name you call it, the product has evolved and the quality of finishing by the trades people has also evolved.
In the early days, drywall finishers or tapers were not very sophisticated and heavy textures were commonly used to hide taped joints. Today, the quality of finishing gypsum wallboard is unparalleled. I believe this is due to a combination of improved skills by the trades and improved products and tools to achieve the custom fine smooth walls and ceilings. Today’s level of providing smooth walls and hiding the board joints would have seemed almost impossible 40 years ago. Yet, today they are commonplace and expected. Unfortunately, as the finishers got better and tools and materials improved, the owners and architects have kept raising their level of expectation to almost unobtainable perfection.
The finishing and final decoration of gypsum wallboard is more complex than most average people in construction are aware. The fact that I would perform site investigations on residential projects and the gypsum wallboard finish crew who look perplexed and finally ask me “What is a Level 5?” illustrates my point.
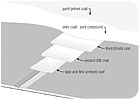
The levels of finish and coats of joint compound are sometimes confusing. The first or embed coat may be a level 1 or 2. Left with tool marks, the embed coat is a level 1 and often known as “Fire taping”. A level two is wiping down the first coat to remove tool marks. The Fill coat, or second coat is a level 3 finish. The finish or third coat would be a level 4 finish. The skim coat of joint compound is a level 5.
The 5 Levels
The levels refer to the levels of finish to the wallboard joints, fasteners and trim accessories, more specifically the coats of joint compound over these items. Even the contractors, designers and dealers that are aware of the five levels of finish more often than not misinterpret the intent.The following is a simplistic version of the five levels. For a more detailed and complete explanation refer to the Gypsum Association technical document GA-214 available at www.gypsum.org.
Level 1: Setting the tape over the joints with the joint compound with no concern for tool marks or ridges. Commonly called “fire taping”.
Level 2: After setting the tape with joint compound, the taped joint is immediately wiped down to remove the ridges and majority of tool marks. Commonly used in mechanical rooms, garages or for walls to receive tile or other non-transparent covering.
Level 3: After the setting (first) coat is wiped smooth and allowed to dry, then a second coat of joint compound is applied over the joint and feathered smooth. This is a common level for tract homes, apartments and gypsum panels receiving a medium to heavy texture.
Level 4: After the second coat has dried, a third thin coat is applied, feathering out the joint a little further. This additional coat adds additional hiding power. This is common for light textures and in some cases can work for a final smooth finish.
Level 5: The highest level of finish for gypsum wallboard. After a Level 4 is complete and dry, a thin coat joint compound is applied over the entire surface of the wallboard including joints. The intent is to equalize the absorbing porosity between the gypsum panel face paper and the joint compound. Even a very good Level 4 can and will have the joints flash through the final paint when the paint is glossy and/or exposed to harsh critical side lighting. This is a very common problem on long corridors done with a Level 4 and a paint with a sheen exposed to harsh down or side lighting. The Level 5 coat of joint compound equalizes this porosity to prevent what is known as “joint banding”.
It should be noted that there are manufactured products that can be used in lieu of the skim coat of joint compound. These products work very well, but manufacturers’ instructions must be carefully followed. Only use products specifically labeled to achieve a Level 5 finish.
CONFUSION AND ILLUSION
The levels of finish for gypsum wallboard, 1 through 5, do have a direct correlation on the quality. However, this does not mean a Level 5 (highest) is meant to be a perfect finish. Owners and architects have often made the mistake that specifying a Level 5 has in some way given them the right to examine walls and ceilings under a magnifying glass and decide that “any” imperfection is not tolerable.I have been on many site walks where owners would point to a minor blemish, a slightly out of plumb wall, or a nail pop and then ask “This is a Level 5 Finish?” After reviewing the steps the contractor took, I inform them “Yes, it is a Level 5 Finish.” Three coats of joint compound have been applied and a skim coat. That, by definition, is Level 5. You cannot assume a Level 5 is automatically better than a Level 4 or will fix a poor Level 4 finish. I have also been on sites where a drywall contractor did a very poor job of setting trims and had wavy angles, then used the excuse, “It’s a Level 3 finish, I met a Level 3.” While he did do the steps for a Level 3, tool marks and over-sanding is not a quality Level 3. I would have to inform him, “yes you did a non-industry-conforming Level 3.” A Level 5 does not mean perfection and a Level 3 does not mean improper workmanship shall be tolerated.
OWNERS' DESIRES
The levels of finish are “intended” to provide a desired final appearance and more importantly, give clear direction to the contractor as to the required steps. This helps the contractor cost the job. Typically the higher the number, the better the hiding power of the joints. Talented tapers and finishers can make a Level 4 look so good that architects get lulled into a false sense that Level 4 is appropriate for all conditions. I have had architects and painting consultants tell me a Level 5 is a waste of money and they specify a Level 4 in all cases. This is where the real problems begin.In my experience many complaints arise from contractors being directed to provide a Level 4 when a Level 5 should have been specified in the interest of economy. In many cases a Level 4 has provided satisfactory results when a Level 5 should have been specified and misled designers to believe a Level 4 will “always” provide the desired result. When a Level 4 finish is used where a Level 5 should be specified and then aesthetic problems arise, it can lead designers to believe they have been short-changed by the contractor. In reality, they have been taking a gamble and it has paid off in the past. Here are some examples of what can make a Level 4 suddenly seem to fail when it worked in the past:
• Sunlight that hits the wall or ceiling at just the right angle
• The paint has a higher sheen or gloss
• Wall wash or accent lights
• Deep tone or dark colored paints
Not surprisingly, the intent of the Level 5 finish is to solve all of the above problems. Contractors who find themselves bidding a project specified with a Level 4 finish and are fairly certain the project should have been specified a Level 5 might want to put the designer/general contractor on notice.
THE CYA LETTER
A clarification letter could be sent to head off potential problems or, at the very least, provide some back-up if litigation ultimately becomes necessary.CLARIFICATION AND INTENT TO PROCEED AS DIRECTED
It has come to our attention that the owner/architect has specified a Level 4 finish for the gypsum wallboard system. The industry associations and ASTM (C-840) would recommend a Level 5 finish for the project given the factors involved. Our company understands that with today’s budget constraints every project must economize wherever possible. While a Level 4 finish “may” work on this project, we ask for you to review the Gypsum Association’s (GA 214) Levels of Finish Document.
Be assured our firm has the intent to provide the best Level 4 finish possible given the circumstances on site. However, we cannot guarantee a Level 4 finish will achieve the desired results of the owner/architect where the Gypsum Association would recommend a Level 5.
Looking for a reprint of this article?
From high-res PDFs to custom plaques, order your copy today!


