Why Use Automatic Taping and Finishing Tools
Automatic taping and finishing tools are divided into three sub-systems for high-production, high-volume environments (taping, topping coat and finishing coat). The taping system includes a taper, corner roller, corner finisher and loading pump. The topping coat system includes a nail spotter, flat box, handle and loading pump. And the finish coat system includes a flat box, handle, angle box and loading pump. Let's take a look at the unique features of these tool systems and how they are used in the finishing process.
Taping system
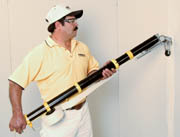
The first step in the taping operation is applying compound and tape to wall, ceiling and corner joints. This is achieved by working with the taper (or Bazooka), which simultaneously applies compound and tape to any joint on walls, ceilings or corners. The taper automatically dispenses the correct amount of compound under the tape, regardless of the tool user's speed and cuts the tape to the desired length.Operating the taper is a straightforward process. Push the control tube forward to advance a starting tab of tape and pull the tube back completely to cut the tape (come to a complete stop before cutting the tape). A lever at the lower end of the tube controls the creaser wheel behind the head of the taper. This creaser is used mainly for taping ceiling flats and inside angles.
When working with the taper, carry the weight mostly in the hand that grips the control tube (either the right or left hand; whichever is most comfortable). Transfer the weight to the drive wheels on the wall, and keep the taper close to your body. Place the other hand over the open end of the main tube for steering and control. Roll the taper along the joint, stopping three inches from the end of the joint. Cut the tape using the control tube, and roll out the end of the tape. Finally, advance the tape for the next wall or ceiling joint.
The second step in the taping operation is to wipe down the tape. It is important to wipe all the flat joints before taping the angles.
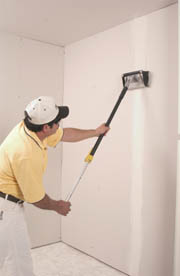
To wipe down corners or angles, use the corner roller and the 2- or 3-inch corner finisher. Remember to first "prime" the angle tools by applying compound to the wheels of the corner roller and then filling the cavities of the corner finisher. The corner roller beds the tape into the corner and forces out excess compound.
After rolling the corner, use the corner finisher attached to the ball-end of the support handle to distribute the compound evenly over the tape and feather the edges. Keep the bend of the handle positioned to allow for freedom of movement with the pointed end of the corner finisher leading forward. These two tools finish the bedding coat, except in corners where the ceiling and wall angles meet. Use a drywall knife to detail these corners.
Make sure the bedding coat is dry, hard and stable before proceeding to the next step-applying the topping coat.
Topping coat system
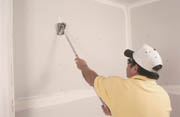
Begin the topping coat with the nail spotter. Use the 2-inch nail spotter for the first coat. By doing this first, an entire row of fasteners can be covered with each pass without having to interrupt for freshly finished joints. For smooth wall applications, apply the first coat before taping has begun with the automatic taper and a second coat using the 3-inch nail spotter during the topping coat process.Apply topping coats to flat and butt joints with the flat box. A Power Assist box can also be used to apply topping coats. The flat box come in three widths (7, 10 and 12 inch), and handles any situation as most jobs require at least two sizes. The flat box has several handle lengths from 3 to 6 feet, including an extension handle, which adjusts from 41 to 63 inches for all-in-one ease of use.
The flat box has a hinged pressure plate. When the box is full of compound, pressure on the handle forces the pressure plate forward and pushes compound out through the slot in the faceplate. A steel blade then smoothes the compound to a uniform thickness, leaving it slightly crowned over the centerline of the joint.
Whenever it is possible, work toward openings with the flat box. Otherwise, it is best to start at the end of a joint and work toward the middle. When the end of the joint is approaching, lock the box with the brake lever. Ease off on the pressure and remove the box in a sweeping motion. If the flat box is stopped without releasing pressure, excess compound will be left on the joint.
The angle box works in conjunction with the 3-inch corner finisher to apply a consistent finish to both sides of an angle at the same time. A MudRunner can also be used for this application. To apply the finishing compound begin by setting the finisher in one corner. Apply pressure as you work toward the other end, keeping the angle box centered on the corner finisher. Steady pressure will distribute the compound evenly and feather the edges neatly.
Finishing coat system
After the topping coat comes the finishing coat. This coat is very thin and usually dries quickly. Some light sanding may be needed with a universal sander to smooth out small, uneven spots.
First, go over all rows of nail heads with the 3-inch nail spotter. Then apply a finish coat to all flat and butt joints with the 10- or 12-inch flat box. If a final skim coat is required, use the 12-inch flat box on all joints after the finish coat is dry. When the finish coat is thoroughly dry, sand lightly to even out all drywall surfaces. The finishing process is now complete.
Review
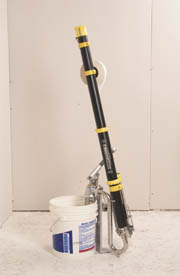
Let's go back and take a quick look at the sequence of operations that makes every move count. First, be sure all tools and supplies are at hand before starting. Include an extra bucket of water to soak tools that aren't being used. Mix and keep the joint compound at the proper working consistency. When the pump and bucket have been set up, it's a good idea to place them on a scrap piece of drywall for easy clean up.Now, tape all the butt and flat joints on the walls and ceilings with the automatic taper. Tape as many joints as possible (a full Bazooka applies approximately 80 feet of tape) before putting the taper down and proceeding to the next step, which is wiping down all the flat joints. The timing on wiping down the tape will depend on weather conditions.
Now comes taping the inside corners and angles. Do these in the right sequence and it will only take one walk around the room. The corner roller and corner finisher work best over freshly applied angles, before the compound begins losing its workability.
When the taping coat is dry, spot the fasteners with the nail spotter, covering an entire row of fasteners with each pass. Then coat all the flat and butt joints with the flat box.
Finally, apply the finish coat with the 3-inch nail spotter, the 10- or 12-inch flat box and the angle box (or MudRunner) with 3-inch corner finisher attachment. Do the sanding where necessary and the job is complete.
The process of finishing drywall is more an art than most realize. When done by hand, the learning process can take years. But when an automatic taping and finishing tool system is used, the contractor will notice an increase in speed, efficiency and will improve the quality of the finish. In the hands of a skilled tradesman, these high-performance finishing tools deliver consistent, high-quality results.
Looking for a reprint of this article?
From high-res PDFs to custom plaques, order your copy today!


