Tech Tip
Introduction
Flex-C Trac is an innovative product that can be purchased at many metal-stud and drywall yards to easily build smooth strong curves in minutes. It's easy to use and no special tools are required.
Con Flex-C Trac usted puede construir f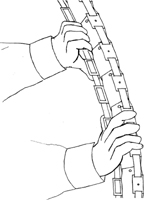
Step 1
Determine the contour the wall will follow. Usually, one can draw the radius on the floor or surface using a pencil and string. Or if following an existing curve such as a curved slab, that can be used for the pattern.
Lay the Flex-C Trac on top of the desired curve. Shape the Flex-C Trac by hand to match. Run a piece of masking tape along one side of the Flex-C Trac to hold the curve securely, in case it gets jostled during the next step.
Determine el contorno que seguir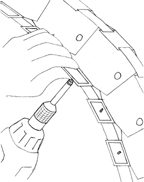
Step 2
Secure the curve with self-tapping screws. These can be inserted along one side of the track or through the overlapping base portions. This curve is ready.
Next, a matching top track is needed. Simply flip this fixed curve over, lay another piece of Flex-C Trac on top of it, back to back, and match it precisely as the original pattern was matched. Tape, screw and it's finished.
Ensamble la guía con tornillos autorroscantes. Estos se pueden colocar sobre los laterales de la guía o sobre las porciones de la base que se traslapan. Esta guía ya est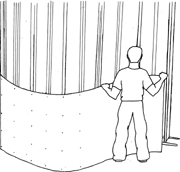
Step 3
Secure the bottom track to the floor and plumb up to locate and anchor the top track. Now this wall is ready for studs. On tighter curves, use more studs to support the drywall.
Ahora se requiere otra guía igual en la porción superior. Esto se logra volteando la guía ensamblada y se coloca encima otro Flex-C Trac y se hace concordar exactamente con la guía original. Se asegura con cinta masking y tornillos y la forma queda lista.
Conclusion
It's easier to cover these curves using one of the new flexible versions of drywall. Each brand has a chart showing when to wet the drywall on the tighter radii walls.
Fije la guía inferior al piso y aplome para posicionar correctamente y fijar la guía superior. Con las guías en posición, se pueden instalar los travesaños. Si se requiere una curva m
Looking for a reprint of this article?
From high-res PDFs to custom plaques, order your copy today!


