Boom Boom Pachoo!
A look in The Portland Cement Plaster Manual, published by the Portland Cement Association, showed the term, along with illustrations of several other textures that I thought were Spanish skip trowel. Not so! On a number of occasions, I have had customers request a Spanish-style skip trowel texture then explain what they wanted. Only on rare occasions have they been alike and, for the most part, did not look like the illustrations in the manual.
In Florida, trowel textures take on all kinds of transformations, some quite attractive and some plain bizarre. I saw one house where the texture was created by moving the trowel in half-circle patterns, making the building appear as though it was covered with fans. I have also seen contractors strike diagonal lines on a house and texture along those lines, making it appear as though there were large diamond shapes all over the structure. I have also seen textures that resemble stalactites hanging from the ceiling.
So then, what exactly are Spanish-style skip trowel finishes and how do we quantify them? For the most part, they are applied with a trowel, with distinctive trowel marks that run either horizontal or vertical. Sometimes they are stippled on with sea sponges or trowels and then the high spots are knocked down.
I can only surmise that Spanish-style skip trowel has become a bit of a generic term referring (in most people’s minds) to a variety of textures and in many respects, Spanish-style skip trowel is in the eye of the beholder.
The ins and outs
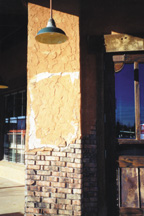
There is a great variation in Spanish trowel, depending on a particular plasterer’s technique. It has been my experience that only on rare occasions can one plasterer reproduce another plasterer’s style of texture accurately.Because of a trowel texture’s ability to hide dimensional flaws in a structure, it has been used over work that was, at best, second rate. On more than one occasion, I have gone to do a repair job on an older home and my first reaction was that 70 years ago, the lowest bidder got the job.
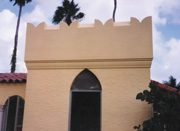
According to Preservation Brief 22, put out by the National Park Service, prior to the 20th century, the most common finish for stucco was smooth. Textured finishes are associated with the period or “revival” styles of the early 20th century. In Florida, the architect Addison Mizner and his contemporaries used Spanish-style skip trowel finishes on many of their Mediterranean revival projects of that period. Today, many of the newer commercial and large residential projects in Florida use this same type of styling and detail. In fact, almost 90 percent of new houses in Florida have skip trowel finishes of some sort. Because of the ease of application and the technique’s ability to hide flaws, it is a cost-effective way of providing an attractive exterior.
Although Spanish-style skip trowel is not as common on interior walls as on exterior, it can be quite an effective way of giving an informal look to any interior space. On the interior, these finishes tend to be flatter and less dramatic, for the most part, than something applied to the exterior. In some cases, it will be mopped over with a thin plaster wash or even sanded to visually soften the surface and give it a gentle undulating appearance (see photo on page 22). It can also be added to the interior plaster to give it more body, thus making the texture stand out in sharper contrast.
Please refer to the Portland Cement (Stucco) Manual for more detail concerning the various type of finishes, but what follows is a good beginning.
Stucco
The preparation is the same as for any stucco wall. When applying the finish, first apply a scratch coat and then, after it has taken up a bit, apply the texture. It gets no double coat and usually, no floating of any kind.When applying the texture, take a small amount of stucco on the length of the trowel and gently lift the trowel up the wall and only slightly flatten as you go up. It takes a light touch and very short strokes of about 4 inches. The stucco will stick to some areas and fall off the rest. Once you get a feel for it, you will begin to get a rhythm to your movements.
Some plasterers define a texture by its rhythm. A very common one is “boom, boom, pachoo.” This texture is two short upstrokes and a short upstroke and long downstroke, together, all with one trowel of stucco. On some jobs, you just go up the wall vertically with your movements, on others, only across the wall horizontally. This is called “cross texturing.”
After the texture has taken up a bit, gently glide over the texture with a clean trowel. This will knock off any burrs and flatten the texture some. This is called “knocking it down.”
The dryness or dampness of the wall will affect the texture. In most cases, it should have moisture in it but should still be firm. If a wall gets too dry, it will have to be given another skim coat. Depending on the texture, a dryer or damper wall may be required. It depends on what the customer wants and how the material is working. When I meet a customer, I will usually offer several samples on the job site. I never give a texture that is too complicated or difficult to do.
It is common practice for one person to do all the texturing on a project as no two people texture alike. Everyone else on the job is there to serve the texture applicator.
Plaster
As with almost all plaster finishes, a scratch coat and double coat of finish material should be applied. If there is good suction and no obvious joints showing through these coats, it is possible to apply the texture to this surface. For a finer texture, trowel the wall once, just to make sure it is in good shape.When do you texture? I like to do it when the wall is firm but not quite set. It is a little easier with a lime/gauging mix as the set is a bit more gradual than veneer plasters. A little moisture in the surface helps you move around the texture. The best rule of thumb would be the greener the wall, the lighter the texture. If a wall gets away from you, you can still apply a light texture by using a very thin texture mud. A dryer wall will allow for a heavier texture application. Some unusual textures require that the wall dry overnight.
Texturing technique of plaster is a little different from that of stucco. Take a small amount of plaster on the trowel and gently lift it up the wall. I have seen some apply their texture in a slapping motion and others just lift up the wall in short strokes. Movements should be more random on an interior than an exterior. As plaster finish has little or no aggregate, compared to stucco it can be a bit smeary in comparison with stucco textures.
As with stucco, after the wall has taken up a bit, it should be knocked down with a clean trowel. This is very important: How high or flat the texture is will depend on when it is knocked down. Early in the set will flatten it more; late in the set will leave more high spots. As with stucco, one person should do all the texturing.
Although these textures may seem a bit careless to some, they are not. In some respects, these uneven textures make details stand out more. Details still count. Different kinds of faux finishes work quite nicely with textured walls. Dark washes and pigments settle more deeply into a textured wall, giving the faux artist another tool in creating a finished surface.
Looking for a reprint of this article?
From high-res PDFs to custom plaques, order your copy today!


