Plaster man
Humpty Dumpty's Kitchen!
You remember the nursery rhyme about Humpty Dumpty? Part of it goes, "All the king's horses and all the king's men, couldn't put Humpty together again." Now, my mom always told me that Humpty was pushed but that's another story!
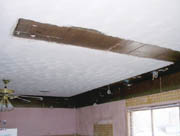
I thought of Mr. Dumpty when I was called into a kitchen remodeling project. You can see it in photo #1. It seems more and more homeowners are steering away from soffits-tearing them out in record numbers and this can result in a project that needs more work and healing than Humpty Dumpty needed. The problem was he had horses and an army of men that were of little help to him, and the same is the case with these ceiling and wall areas. It takes quite a bit of skill to know how to put it all back together.
All the king's men
There are of course many options open to this kind of situation. My rule of thumb that I refer back to often is the "one-third rule," which simply means that if more than a third of a ceiling or wall is in need of repair, it is more logical to resurface the entire ceiling or wall. Sometimes, it's just as easy-and cost effective-to skim coat the whole surface and retexture the whole area to give it a brand new look.
In the case of this kitchen however, the ceiling was quite large and the homeowner was really more interested in having it "patched in" to keep costs down. And I must admit that there are situations like this that give me a great opportunity to prove to myself and to those I'm working for that I still have the skill to match in the areas to the existing ceiling. I am going to share the steps I took to blend these areas in to the existing ceiling.
A few scoops to fill
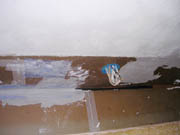
Photo #2 shows a closer view of the first steps I took to get these areas back in shape and to blend them in so they would not show when the final coat of paint was applied. To prep these areas, I started off with a sealer and then a latex bonder. This ensured that the plaster would adhere properly to these areas and I applied the bonder to extend out about 10 inches on to the existing plaster that bordered any and all areas that I was repairing and filling in.Next came the fill-in process. Notice in this second photo that there are definite areas that could pose a challenge and that needed to be worked with first-the corner and the edge where the board meets the ceiling-and where the board meets the existing wall areas. The corner actually had gaps up to an inch wide. This needed to be filled first and reinforced.
The "edge" closest to the ceiling was exceptionally deep-there was about 1 inch that had to be filled in. The wall areas matched up pretty close, so the board only needed a skim coat of base to bring them in line with the wall surface. To get things to work out well, I decided to break the basecoat process up into two segments: one to partially fill these areas and the second to bring all areas out to match the existing ceiling and wall surfaces.
First segment
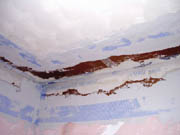
I made up a batch of basecoat in a 12-gallon bucket and dipped out a few scoops on to a piece of 15-pound felt paper. I added some accelerator and mixed it in well with this small amount of base. This I used to fill the corner and the edge area that bordered the ceiling. I used a 4-foot rod to measure off the existing ceiling, extending it to the very corner to make sure the basecoat I was applying was lower than the existing ceiling. After this was done, I quickly doubled back and filled in with the rest of the basecoat I had left. I then pressed in heavy fiberglass mesh-both in the corner, as well as using pieces about 6 inches wide to bridge the area where the existing ceiling or wall met with the soffit areas-3 inches on each-as shown in photo #3.
I then took a sponge, and rubbed down and feathered out the basecoat on the ceiling. The wall areas didn't need this as I was going to run the next basecoat down to the countertops since the walls needed a skim coat to cover the old paste left behind from tile removal.

Second segment
In my opinion, when I work an area that has this deep of fill, I like to wait a little while and let the basecoat start setting up to a firm feel. This is very important, especially when forming the new corner. Jumping on it too quickly can lead to cutting into the new corner or having it turn out uneven by running it too soon with a corner trowel. So, I waited about a half hour and then came back with a second coat of base, as shown in photo #4.A trick I like to use has to do with the timing of the basecoat. When I saw small dots of basecoat starting to set-they turn a darker brown-this is when I started mixing my second batch to run the final basecoat. This has an interesting effect. The lower coat of the basecoat that is starting to set will get additional agitation by the second coat being run over it. This causes it to set faster and also will tend to speed up the set of the fresh coat being applied over it. This method can also be used with sand finish that is applied over a fresh basecoat. When the basecoat is hard to the touch and starts turning (meaning the small dots of dark brown start appearing over the surface), I begin to apply a thin coat of sand finish over it. This really works slick for smaller ceilings.
The basecoat will actually speed the set and help you work down the sand finish into a nice fine swirl texture in a much shorter time than it ordinarily takes. I finished applying the basecoat and then blended the edges out into the existing areas that I would soon be covering with sand finish. For the walls, I simply smooth coated them after finishing the ceiling areas.

Finish coat and matching in
Photo #5 shows the finished product-the swirls match the pattern of whoever did the original ceiling. Now this may seem a small point but it's worth noting and mentioning: Study the swirl or texture pattern carefully so you can match into it properly. Believe it or not, I find repair after repair that is done quite well mechanically-it is brought up and matched into the existing area OK with the basecoat. Then the final step, the texturing, is botched by swirling it in the wrong direction or the repair is left smooth while the surrounding areas are textured. With a little time and effort, these areas can be blended to leave a wonderful repair that will amaze the homeowner and give them something to brag about for years to come!Plaster Man would like to congratulate the winner of the Bosch Power Box. Kathy Kobe, of Michigan, sent in this comment, "I enjoy your column and pretty much read the entire magazine!"
I'm looking forward to visiting with many of you on the upcoming cruise. It‘s going to be a great opportunity to bring a lot of skilled plasterers together to talk over the trade and where it‘s headed. This is the last opportunity to get in on the special pricing. Get in touch with me at robin@plasterzone.com before the end of June and I‘ll tell you what you need to do to be a part of this. I hope to see you on board!
Until next time, Plaster On!
Editor's Note:
In the April issue, the wrong picture and caption ran on page 44. We apologize to the readers and Plaster Man for the mistake.Looking for a reprint of this article?
From high-res PDFs to custom plaques, order your copy today!


