Walls & Ceilings logo
search
cart
facebook twitter linkedin youtube youtube Spotify Podcasts Apple Podcasts Spotify Podcasts Apple Podcasts
  • Sign In
  • Create Account
  • Sign Out
  • My Account
Walls & Ceilings logo
  • NEWS
  • TOPICS
    • Drywall
    • Stucco/EIFS
    • Ceilings
    • Steel Framing
    • Fireproofing
    • Interior Plaster
    • Building Envelope
    • Insulation
    • Technology
    • Interior
    • Exterior
    • Women In Construction
  • COLUMNS
    • Up Front
    • All Things Gypsum
    • Art & Craft of Plastering
    • Stucco Stop
    • Steel Deal
    • Industry Voices
  • PRODUCTS
    • Buzz Guide
  • EVENTS
    • Industry Events
    • Webinars
    • BUILD Expo
  • MEDIA
    • Videos
    • Podcasts
    • Photo Galleries
    • BUILD26 Videos
    • Take our Quiz!
    • Infographics
  • EXCLUSIVE
    • Newsletters
    • Top 50 Contractors
    • Contractor of the Year
    • State of the Industry
    • W&C Store
    • Market Research
    • CEUs
    • Sponsor Insights
    • Custom Content & Marketing Services
  • DIRECTORY
  • EMAGAZINE
    • eMagazine
    • Advertise
    • Archive Issues
  • SIGN UP!
Columns

Plaster Man
Minor & Major Makeovers (Part Two)

By Robin Raymer
August 1, 2005
Last month, we covered some repairs to two kitchen areas (what I would consider "minor" in nature). One had a hole that was repaired and then the whole ceiling resurfaced. The second involved skimming out some areas that the homeowner had attempted to repair himself. This month, we're going to look at a bigger project-the "major" part, which includes both the walls and ceilings from top to bottom.

Photo 1: Some areas were full coat plaster and others were plaster board.

A meeting of old and new

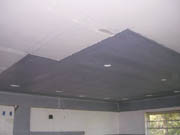
Photo #1 gives you the scoop, score and the skinny on what needed to be tackled. It involved areas that were full coat plastered and left in place and some sections where this was taken out and 5/8-inch plaster board was installed on the ceiling area and 1/2 inch on the walls. This type of "old and new" project presents unique challenges.

A new project with all plaster board skimmed out with two coats of base and finish and the project is done. Resurfacing over walls and ceilings of existing plaster at least gives a consistent base over which one's basecoating and finishing. With this one, it's a little of this, a little of that and so it took a little more to bring it all together.

Photo 2: Where the new board and old plaster don't butt against each other quite right.

The gap thing

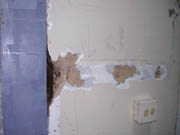
Photo #2 shows one of several areas that give plasterers fits-a wide-open gap where the new board and the old plaster just don't come together quite right. Now, I don't mind gaps of 1/4 inch or so but when it gets to be 1 inch or wider, the plaster that is pushed into such an area is going to slip through and it's nearly impossible to get any kind of firm base in areas like this.

Photo 3: Using aluminum patches to bridge the gap.
The area just cannot be made solid and secure. I opted to use aluminum patches to bridge the gap (see photo #3). These gave me a solid foundation over which I apply the basecoat plaster.

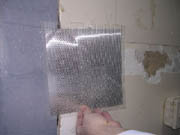
When I do training of individuals who really want to learn this trade, one thing I emphasize from the start is to look the project over well before giving a bid. Contractors often have to be trained to get things right and ready for the plastering work that comes after them. For instance, when soffits are taken down in kitchens or walls are removed, there are often edges of old paint and plaster left behind that outline all the areas that were removed; or it might be chicken wire or metal lath that was cut and the ragged edges are all hanging through and need to be dealt with before any plastering can be done. Add to this the stabilizing and securing of the areas (loose board, nails and screws left out about 1/4 inch or so, and you start to get the picture).

I remember one project where it took me almost half a day to get the surfaces ready for plaster. Often, when a contractor or homeowner is looking at these areas, they are completely oblivious to the amount of work that these small details require. So, I try to educate the contractors I work with, helping them to understand clearly what I want the job to look like when I get there. This is a much more positive approach then arriving on the job and getting mad because of some surprises. Sometimes, those who do this type of work are so familiar with it, expectations are set too high on what the contractor is supposed to know and not enough communicating is done to ensure that the areas needing to be put back together are prepped and in a ready-to-plaster condition. Walking them through it a few times goes a long way in making sure the job goes smoothly.

Photo 4: A lot of wall space I’m doing.

Bond and beyond

The next step is to bond the walls and ceilings with a latex bonder. Maybe I'm overly cautious but I like to double bond the surfaces-running a coat of bonder over the existing plaster, then doubling back and coating it again. It builds up the bonding agent and ensures that the existing plaster is going to form a good strong bond to the new plaster being applied. I've been receiving too many letters and e-mails lately from people who have had nightmares, all because the plaster was delaminating from the walls or ceilings. Simply put: The wrong type of bonder was used, or not enough was used. This is too critical a step to slough off on. It's got to be done right and taking the time to do it properly pays in the long run.

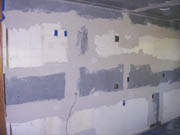
After bonding, I get some fans going and dry the surfaces thoroughly. Now, I'm ready for the next step, embedding the fiberglass mesh in areas where the old meets the new. You can see how it's done in photos #4 and #5. I mix up a batch and work on all the areas where old meets new. I keep it tight. In other words, I don't build up the basecoat in a thick layer. My main goal is to embed the heavy fiberglass mesh into the basecoat-bridging the gap between the two surfaces.

Photo 5: Working on all the areas where new meets old.

Quality all the way

Now here is one more point: Notice that there's a lot of wall space I'm doing in photo #4. Most of this area is going to be covered in cabinets. But I approach it as if it all was going to show. The reason is simple: If I start skimping and trying to figure where I can get away with doing a cruder job, that's the time I should hang up my trowel. It's interesting and almost amusing at times when a contractor or more often a homeowner will take me through the room and draw these invisible lines, basically saying, "Now here you can do a little less of a job but in these spots here-and-here it's going to show, so make sure it looks great here." I'm not into that. And I encourage readers to do the best in all areas and resist the temptation to divide the type of work you do into "good," "good enough" or "close." It will come back to haunt you.

Photo 6: After I embedded the mesh, I put a basecoat over everything.
The last picture I'll share with you this time around is photo #6. Most of the time I work alone and I do the basecoat in one-and-a-half- or two-bag batches. Traditionally, it's best to do the top work first. After I embedded the mesh, I then put a basecoat over everything. You can see in the photo that part is a darker brown and part is lighter. The darker is what I did first. See that I spent quite a bit of time on the top half of the walls and also turned the angle and did part of the ceiling. I then finished out the bottom part of the walls and continued on with the ceiling.

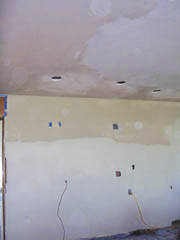
The challenge that this type of project poses is the difference in the absorption rate between the boarded areas and the existing plaster. To even it out, I waited until the next day to finish coat the surfaces. I used a pump sprayer and wet the ceiling and wall areas down just before smooth coating them. This gave me a nice even surface to finish out.

I also wanted to let you know we're still running the Plaster Man/Walls & Ceilings T-shirt giveaway. Simply send your name and address via e-mail to robin@plasterzone.com or send it by mail to this magazine. Congratulations go out to this month's winner Dan Griffin, of Oklahoma.

Until next time, Plaster On!

Share This Story

Looking for a reprint of this article?
From high-res PDFs to custom plaques, order your copy today!

Robin Raymer, the "Plaster Man," is a veteran repair specialist, consultant and speaker on all aspects of the plaster trade. Robin is a 20-year veteran of the plastering trade and has produced a series of videos on the subject. Write to the Plaster Man c/o Walls & Ceilings, 2401 W. Big Beaver, Suite 700, Troy, Mich. 48084.

Recommended Content

JOIN TODAY
To unlock your recommendations.

Already have an account? Sign In

  • Abercrombie & Fitch

    EIFS in 2026: How Specialty Finishes Are Redefining Exterior Wall Systems

    As building codes, owner expectations, and design demands...
    Stucco/EIFS
    By: Regi Mendoza
  • proper air and vapor control

    From Energy Efficiency to Moisture Management: Why Air and Vapor Control Matter

    How proper air and vapor control within building...
    Building Envelope
    By: Benjamin Meyer AIA, LEED AP
  • Linear Metal Ceiling Beam Baffles

    Top 25 Ceiling Contractors of 2026

    Suspended ceilings demand precision, code compliance and...
    Ceilings
    By: John Wyatt and Tanja Kern
You must login or register in order to post a comment.

Report Abusive Comment

Manage My Account
  • eMagazine Subscription
  • Newsletters
  • Online Registration
  • Manage My Preferences
  • Subscription Customer Service

More Videos

Sponsored Content

Sponsored Content is a special paid section where industry companies provide high quality, objective, non-commercial content around topics of interest to the Walls & Ceilings audience. All Sponsored Content is supplied by the advertising company and any opinions expressed in this article are those of the author and not necessarily reflect the views of Walls & Ceilings or its parent company, BNP Media. Interested in participating in our Sponsored Content section? Contact your local rep!

close
  • medical professionals moving a patient on a stretcher through the halls of a medical building
    Sponsored byNational Gypsum Company

    What Does High Performance Mean When It Comes To Gypsum Boards?

Popular Stories

Linear Metal Ceiling Beam Baffles

Top 25 Ceiling Contractors of 2026

Wichita Biomedical Campus

Wichita Drywall Worker Dies After Scaffolding Fall

QXO Just Changed the Game-Here's What Contractors Are Asking

QXO Just Changed the Game-Here's What Contractors Are Asking

Less compound

Joint Compound Market to Reach $9.7B by 2033

Events

June 24, 2026

The Bright Side & Benefits of Designing with Integrated Lighting

Credits 1 AIA LU/HSW; 0.1 ICC CEU

This course will explore the pivotal role architects and lighting design play in creating safer, more sustainable spaces. Learn how to avoid common lighting mistakes and make informed decisions that create the best visual environment for occupants. 

January 1, 2030

Webinar Sponsorship Information

For webinar sponsorship information, visit www.bnpevents.com/webinars or email webinars@bnpmedia.com.

See our full library of webinars

View All Submit An Event

Products

2026 National Painting Cost Estimator

2026 National Painting Cost Estimator

See More Products

Related Articles

  • Plaster Man
    Minor & Major Makeovers (Part 1)

    See More
  • Plaster Man: Plaster Man's Q&A

    See More
  • The Plaster Man: The Trip Out West, Part 2

    See More

Related Products

See More Products
  • plaster and drywall

    Plaster and Drywall Assemblies Manual

  • Builder's Guide to Stucco, Lath & Plaster

See More Products

Events

View AllSubmit An Event
  • June 8, 2026

    Texas Lathing and Plastering Contractors Association (TLPCA) Annual Convention and Trade Show

    The TLPCA Annual Convention and Trade Show will be held at the Horseshoe Bay Resort. As in year’s past, the Annual Convention & Trade Show will offer meetings, receptions, a golf tournament, an exhibitor’s trade show, an educational program, an Annual Design Awards Competition, spouses program, awards banquet, dinners and entertainment.
View AllSubmit An Event
×

Connect with the industry’s leading resource for unparalleled insights and education.

Join thousands of industry professionals today. Shouldn’t you know what they know?

JOIN NOW
  • RESOURCES
    • Advertise
    • Contact Us
    • Directories
    • Store
    • Want More
  • SIGN UP TODAY
    • Create Account
    • eMagazine
    • Newsletters
    • Customer Service
    • Manage Preferences
  • SERVICES
    • Marketing Services
    • Reprints
    • Market Research
    • List Rental
    • Survey/Respondent Access
  • STAY CONNECTED
    • LinkedIn
    • Facebook
    • Instagram
    • YouTube
    • X
  • PRIVACY
    • PRIVACY POLICY
    • TERMS & CONDITIONS
    • DO NOT SELL MY PERSONAL INFORMATION
    • PRIVACY REQUEST
    • ACCESSIBILITY

Copyright ©2026. All Rights Reserved BNP Media, Inc. and BNP Media II, LLC.

Design, CMS, Hosting & Web Development :: ePublishing