Plaster Man
Minor & Major Makeovers (Part 1)
Wide-open spaces
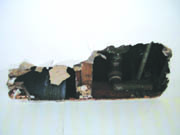
Holes can pose a challenge in any project, and the ceiling in photo #1 shows a typical situation where water damage from leaking pipes caused this area to turn to mush.The first steps involved cutting back the damaged plaster to where it was solid. Next, I secured it with screws around the perimeter. Now with an open hole, you have the advantage of being able to use construction adhesive of some sort to secure the perimeter in a great way. The joists often are exposed and you can reach in and fill the area between the plaster and wood lath, or between the plasterboard and joists. Wherever I can I like to add adhesive, as it gives that extra stability to the area-especially where the plaster is not as stable and as strong as I'd like it to be around the edges of the area I am going to repair. The combination of both screws and adhesive gives that extra insurance that things will hold together well.
The next step involves deciding on which way the hole will be filled. The plaster can be cut back to the joists or wood backers can be put into the hole and secured in place. In this particular case it's difficult to insert backers, as there was not a good way to secure the wood against the wall area inside the hole. So, cutting the hole back seemed the best way to go. You can see the joist in photo #1 showing in the center of the hole already. I removed all nails from it and then cut back to the other joists. When doing this, remember that it's important to leave half the joist exposed and half with the existing plaster or board in place. This way, the existing plaster can be secured to the joist and the piece of board you are putting into the hole can be secured to the other half. Try to fit the board that's going into the hole as tight as possible up against the existing plaster all the way around.
You'll also notice in photo #1 that I am dealing with existing wallpaper that is on the wall area and borders right up against the hole. I have used blue painters tape-something that helps keep the peeling and damage to the wallpaper to a minimum.
I have mentioned this before but it bears repeating: It's a very good idea to give the homeowner a heads up on the possibility of wallpaper damage. Plastering uses a lot of water and the water will soak into the top part of the wallpaper. How it will react when you start pulling it is anyone's guess. It could pull cleanly, or it can be a bear to deal with. In this particular project (where I plastered the entire ceiling), I used a utility knife to cut at the top of the blue tape where it meets the plaster all the way around the ceiling. As I pulled the tape, I did so very slowly and it came off cleanly-though it did pull the wallpaper loose in a few spots (it could be glued back down pretty easy after it dried out).
Once the board is in place, I bonded the ceiling and filled the area with base coat, as in photo #2. For this project, I mixed up the batch for the entire ceiling in a 10-gallon bucket. I then took a hawkful and spiked it up with a margin trowel full of accelerator. This I used to fill over the board and get it about even with the surface of the ceiling. I then filled out around it and put a piece of heavy fiberglass mesh over the area.
Sand right
The second project is one that the homeowner had started and decided he needed help to complete. You can see the situation in photos #4 and #5. The repairs he had attempted extended out of the kitchen area and included many cracks that were over doorways in the surrounding rooms and in the hallway. They also included areas on the kitchen ceiling, the soffit area and down the wall where the soffit had been cut back.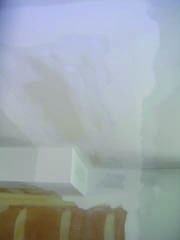
This project was much different than many I come in on, where the compound or other material has been applied in a thick band or layer and it takes more time to remove it than it does to get it right again. To get these areas ready to paint, it was basically a two-step process. First, I bonded the area with my special latex bonding agent. This was allowed to dry about a half hour. Then it was simply a matter of mixing up a patch mix and skimming the areas out. I skimmed the entire ceiling area out about a foot on each side of what he had done. After a half hour, the areas were completely smooth. I suggested they wait about three to five days to let the plaster cure up and then follow with a latex primer.
Next month, we'll get into part two: a complete kitchen makeover from head to toe.
We have more of the Plaster Man/Walls & Ceilings T-shirts to give away. If you'd like to get entered in the contest to get one of these, just send an e-mail to me at robin@plasterzone.com. Or mail your entry to this magazine. We'll give one away each month, so be sure and send in your entry as soon as you can!
Thanks again for your e-mails and letters. They are appreciated very much. There have been some great projects you've been sharing, and hopefully we'll include some of these in future columns. Keep up the good work, and until next time, "Plaster On!"
Looking for a reprint of this article?
From high-res PDFs to custom plaques, order your copy today!


