Finish Line: Rebuilding Sealant Joints
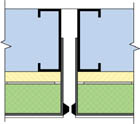
Figure 1. Panel joint with old sealant still in place.
One of the questions I am frequently asked is how to fix sealant joints when the edge of the EIFS is coming apart or the sealant has detached from the EIFS, or when the sealant simply wears out. Sometimes, the old sealant can be removed and the existing edge of the EIFS reused for the application of new sealant. If this is the case, the whole edge of the EIFS needs to be rebuilt. Oftentimes, I get asked how to rebuild joints step-by-step. What follows is how to take apart and completely rebuild an EIFS-to-EIFS joint.
This description is not for joints between EIFS and other wall components (like windows) but rather for a condition where the sealant has failed or when removing the sealant, the EIFS is damaged so much that there is no choice but to rebuild the entire joint-the EIFS and the sealant itself.
If you've ever tried to remove failed sealant, doing so can ruin the EIFS during the process-you can end up with an edge of the EIFS that is mangled and unsuitable for reuse. In other words, the edge needs to be rebuilt. Also know that getting all the old sealant off EIFS-in an attempt to reapply new sealant-can be very tedious, slow and expensive. Thus, the easiest approach is to rebuild the entire joint and replace it with a whole new one, rather than trying to repair it.
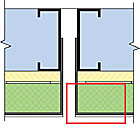
Figure 2. Area to be removed (in red box).
Cut away the old EIFS and joint
Here's one method I've seen used many times. This method is especially good if the original joint was too narrow-the narrowness perhaps having contributed to the joint failure. This approach can be used as an opportunity to make the joint the correct width.For purposes of this procedure, let's assume we're talking about simple vertical expansion joints between two prefabricated EIFS panels and that the substrate is some sort of gypsum-based product.
Using a Matt knife, slit the sealant bead vertically down the middle. In some modes of sealant failure, the interior of the sealant bead may have "reverted" back to a semi-liquid state and slitting the bead can be messy (the old sealant is gooey inside and gums-up to the knife).
Using a circular saw with a masonry cut-off blade or diamond blade, set the blade cutting depth so that the blade will just miss cutting into the substrate. Note that for thick foam, this can require a large diameter blade. Make vertical cuts 3 to 4 inches on either side of the edge of the joint, parallel to the joint. This can create a lot of dust, so be sure to wear a safety mask and other protective gear. Cut the two sides of the EIFS joint crosswise back to the substrate, creating sections several feet long. With a little prying, the pieces of the edge of the EIFS, along with the sealant, can be broken free into manageable sections.
When doing this, try not to damage the substrate. If the surface or core of the substrate comes apart (possibly due to water intrusion and the prying force needed to break free the EIFS), then the substrate too may need to be replaced. This can be difficult, as you'll need to splice-in new sections of substrate. One way to avoid damaging the substrate is to not get the old attachment adhesive off the substrate-just leave it there-and pry at the foam, rather than the adhesive. Then, use a slightly thinner piece of new foam when rebuilding the edge of the EIFS to adjust for the thickness buildup of the old single adhesive layer vs. the new layer of old and new attachment adhesive.
If the edge of the EIFS is wrapped onto the edge of the opening (not onto the surface of the substrate), i.e., not back wrapped, then the EIFS lamina will have to be cut free at the point the basecoat meets the outside edge of the substrate. Since the inside of the joint is now inaccessible, the new edge will have to then be created by back wrapping. One way to get at the basecoat-to-panel frame is to go into the foam with the saw and cut at an angle using a hot knife or reciprocating saw. This will let you create a wedge of loose foam that can then be cut free. Keep in mind that in the end, the remaining beveled piece of foam at the edge of the joint will need to be removed so the new foam can be back wrapped.
At the now-exposed edge of the existing EIFS, grind off the EIFS finish at least 3 inches. This will expose the EIFS basecoat. Be careful not to dig into the basecoat and damage the mesh.
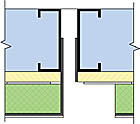
Figure 3. Joint with one side removed. Note cutting through of the basecoat at substrate and remaining attachment adhesive.
Apply new EIFS
Prepare vertical strips of foam to replace the removed areas. Apply the attachment adhesive, basecoat adhesive and mesh as if back wrapping a new edge. Allow enough mesh to dangle past the edge of the new foam to allow overlapping it onto the ground-off area. Bond these new strips onto the substrate using new attachment adhesive. Make sure the new foam butts tightly against the old. It's difficult to make a perfectly straight cut, so the new foam pieces will probably not perfectly abut the old foam.You may need to test-fit the new foam pieces to be sure they fit tightly. If there are gaps between the old and new foam, they will need to be filled with foam slivers. Using extra basecoat adhesive, lap the dangling mesh onto the surface of the ground-away area and bond the old and new basecoats together. Let this dry.
Apply new EIFS finish onto the outside face of the new basecoat, carefully blending it into the existing finish. Do not get finish into the area where the new sealant will be bonding to the basecoat. Let the new finish dry.
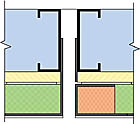
Figure 4. New joint (one side). Note splicing-in of basecoat and finish, back wrapping and thinner new foam.
Install new sealant
Depending on the specific sealant and EIFS product, a primer may be needed where the sealant bonds to the basecoat. If needed, apply the primer, backer rod and new sealant. (Hint: If you can live with the appearance of a non-flush joint, recess the sealant bead back within the joint cavity. This will allow a place to install new sealant over the old the next time the sealant needs replacing. The recessed location also protects the sealant somewhat, allowing it to age more slowly and last longer. Another hint: Use a good grade of sealant so that the sealant will need to be replaced less frequently. Low modulus silicones are especially good.)Pre-formed sealant strips
Sometimes, the time and cost of the above process can get serious. If aesthetic concerns permit, one way to fix the failed joint is to use precured silicone rubber strips that are bonded onto the outside face of the EIFS finish. The bonding is done with an adhesive that comes in a tube like caulking. The sealant strip bridges the joint and covers the old sealant. This allows you to leave the old joint intact and saves time. These strips come in various widths, textures and colors, and come in roll-like tape. Some can be painted to make the whole wall uniform in color.This repair technique results in an appearance of the joints of having "battens," which may be visually unacceptable. But the cost savings can be huge, so it's worth doing a small mock-up area to see if the resulting appearance looks bad before rejecting this approach out of hand. This approach works best of sealant joints where the adjacent EIFS is in the same plane but sometimes can also be done at windows and other right angle conditions. The sealant strips are soft and flexible, and can be bent but sometimes the joint geometry simply does not permit bending, such as at a window frame that projects just slightly past the outside face of the EIFS.
I have seen contractors try to mimic the "Band-Aid" technique of using pre-cured sealant strip by using liquid applied sealant and creating a strip in-place. My impression is that this is OK for spot repairs (maintenance) but it's hard to make it look neat. To do this well, carefully mask the sealant area and carefully tool the surface of the sealant. There's also the basic problem of the new, wet-applied sealant bonding to the old sealant, thus degrading the performance of the new sealant.
Trim vs. back wrapping
Another approach to this remove-and-replace approach is to dispense with the back wrapping and used pre-formed plastic or metal trim as the new edge of the EIFS. This has the advantage that the new sealant can be bonded to a robust, solid surface (the trim) rather than to the EIFS coatings.The monotony of rebuilding sealant joints in EIFS points towards encouraging well designed original joints and the use of long lasting sealants. Perhaps someone will come up with a design for a mechanical joint of some sort, such as the metal and rubber joints used for joint with large movements. Aside from using the expanded foam sealant strips, the use of wet-applied sealants is basically the only way of doing EIFS joints.
If you read this article, please circle number 340.
Looking for a reprint of this article?
From high-res PDFs to custom plaques, order your copy today!


