The Finish Line: Leaks
The number one source of litigation in the construction industry is leaks. People tend to describe buildings in terms of the dominant opaque cladding: “Turn left at the brick building,” instead of “Turn left at the building with windows.” Thus when a building that has EIFS on it has leaks, the automatic mantra is “the EIFS is leaking.” This is almost never the case, as usually it’s the interface between the EIFS and adjacent wall components, or some other wall component. Windows and doors, and the related flashings and caulking, are usually a culprit. But once in a blue moon the EIFS coatings are actually leaking. So, the first thing to do when working on an EIFS-clad leaky wall system is to check out this remote possibility, and eliminate it. Here’s how you check for leaking EIFS coatings.
There are actually two water-related tests that are common. The first is sometimes called the “float the boat” test. This test is simple: you take a sample of the full system (foam plus basecoat plus finish), seal the edge and put it upside down in a tray full of water. Since you can’t see the interface of the foam and the basecoat, you can’t see if water if getting through, but by carefully weighing the sample before and after water immersion, the absorption of water by the EIFS can be determined. There is a somewhat related test where a sample is wetted and dried and frozen and thawed. Basically such tests are an attempt to simulate nasty real world conditions. EIFS coatings, due to their synthetic polymeric compositions, are not particularly absorptive (unlike stucco) and hence any decent EIFS product can easily pass these tests.
A similar technique is to peel the basecoat and finish off of the foam. The lamina is placed horizontally, finish side up. Water is placed on the finish. If the coatings are porous, a damp spot will occur on the underside on the basecoat. This test is a bit tricky as peeling off the lamina can cause micro-cracks in the lamina which can allow water to get through what otherwise would be a watertight coating. A more gentle approach is to slice off the foam using a hot wire, and then lightly sand the remaining foam granules to fully expose the basecoat.
There are a number of reasons why an EIFS basecoat and/or finish may be porous. It could be defective manufacturing, improper mixing, improper application technique, improper curing, or a combination of these factors. The point is that it is possible to seal such surfaces by applying paint or water resistant coatings but you need to be careful that water vapor doesn’t get trapped in the EIFS by virtue of sealing the outermost surface. Also, remember that the lamina is backed-up by foam insulation, which itself resists water penetration. Hence, even if the EIFS lamina is porous, the water has no way to get through the foam anyway, except possibly at the insulation board joints or if the foam itself is not properly fused.
Keep in mind that the basecoat does most of the work in keeping the water out. The finish actually may have tiny pinholes in it. You can see this by spreading some finish on a polyethylene cutting board, and peeling it off. Hold it up to a light and you’ll see thick and thin areas. It’s worth noting also that basecoats with higher resin levels are more water penetration resistant than ones with a high cement content.
A RILEM tube is a simple device. It is a clear glass or plastic tube in the shape of an “L.” It is open at both ends (see the drawing). The horizontal leg has a flange on it and is glued to the wall with a special putty, with the vertical leg pointing upward. The tube is then filled with water. The vertical leg has markings on it so the water level change, if any, can be noted. The height of the water column exerts a slight pressure on the wall surface, and if the wall is leaky, the water level will go down over a period of several hours. You can place RILEM tubes all around the façade of a building, thereby quickly garnering a lot of information. RILEM’s were originally used on masonry but will work on materials that have some chance of being porous; like brick, stone, stucco and EIFS but obviously not metal or glass. You can buy RILEM tubes on the Internet.
It is possible to force water through the EIFS lamina but it takes much more force than is present under any conditions other than a hurricane. Keep in mind that a 90-mile per hour wind is about equal to 20 pounds per square foot of wind pressure, which is equal to about only a few ounces of pressure per square inch. This is why using high-pressure washers (that operate at 500 psi and above) to clean EIFS is not a smart move: water can get forced through the lamina and into the foam, and takes forever to dry out. Also, if the lamina is saturated with water and the water freezes, it’s possible for the coating to come apart due to the expansion of the water as it freezes.
Once the fact that the EIFS itself has been established as not being the leak source, the diagnostic process continues to find the real culprit. At this point the challenge becomes one of a wall system problem, rather than an EIFS problem. A standard way to recreate leaks is to carefully spray the wall with a calibrated nozzle and look for leaks. Another method is to place a grid of nozzles over the suspect area and see where the water is getting in. This later method is often done in conjunction with inducing a vacuum on the indoor side, thereby drawing water into the building in a manner similar to the air pressure differential that occurs due to wind and/or HVAC equipment.
If you are looking at a sealant joint at the perimeter of an EIFS, make sure to nudge the sealant bead. When the wall gets cold it contracts, tugging on the bond between the sealant and the EIFS. A sealant bead that is in contact with, but not bonded to, the EIFS may open up, causing a leak where none was previously present.
If you see the perimeter of the EIFS foam insulation, it may look like the EIFS lamina is damp. Usually this is a transient condition caused by water vapor migrating from indoors to outdoors. The vapor works its way out through the joints between the insulation pieces and condenses on the cool lamina, usually in the morning. Often this dampness disappears, only to form again briefly. If the insulation boards are properly and tightly fitted together, this effect normally does not occur. However, if you see efflorescence at the board joints, it means that liquid water is somewhere in the wall and is trying to get out. This is usually due to something above that is leaking and the water is wandering downward between the sheathing and the EIFS foam.
On non-vertical surfaces, such as balcony tops or parapets without flashings, water that ponds on the EIFS can soften the coatings and eventually allow the water to seep into the supporting wall. This tendency for slow permeation of water on flat surfaces can be dealt with somewhat by using a hard, clear sealer to keep the water off the EIFS surface but the best approach is simply to use flashings.
You can see from the above descriptions that these tests are not rocket science. Hence, if you are confronted with the claim that the EIFS is leaking, you can do some of the initial diagnostic work yourself and thereby save some time and money. W&C
PROVE IT
First, in order for an EIFS to be code-accepted, it must be shown to not leak. This is one of the many tests that EIFS is subjected to in order to receive the necessary Evaluation Report from code groups like the International Code Council. Other tests include those for fire, strength and other basic code-regulated product attributes.There are actually two water-related tests that are common. The first is sometimes called the “float the boat” test. This test is simple: you take a sample of the full system (foam plus basecoat plus finish), seal the edge and put it upside down in a tray full of water. Since you can’t see the interface of the foam and the basecoat, you can’t see if water if getting through, but by carefully weighing the sample before and after water immersion, the absorption of water by the EIFS can be determined. There is a somewhat related test where a sample is wetted and dried and frozen and thawed. Basically such tests are an attempt to simulate nasty real world conditions. EIFS coatings, due to their synthetic polymeric compositions, are not particularly absorptive (unlike stucco) and hence any decent EIFS product can easily pass these tests.
A similar technique is to peel the basecoat and finish off of the foam. The lamina is placed horizontally, finish side up. Water is placed on the finish. If the coatings are porous, a damp spot will occur on the underside on the basecoat. This test is a bit tricky as peeling off the lamina can cause micro-cracks in the lamina which can allow water to get through what otherwise would be a watertight coating. A more gentle approach is to slice off the foam using a hot wire, and then lightly sand the remaining foam granules to fully expose the basecoat.
There are a number of reasons why an EIFS basecoat and/or finish may be porous. It could be defective manufacturing, improper mixing, improper application technique, improper curing, or a combination of these factors. The point is that it is possible to seal such surfaces by applying paint or water resistant coatings but you need to be careful that water vapor doesn’t get trapped in the EIFS by virtue of sealing the outermost surface. Also, remember that the lamina is backed-up by foam insulation, which itself resists water penetration. Hence, even if the EIFS lamina is porous, the water has no way to get through the foam anyway, except possibly at the insulation board joints or if the foam itself is not properly fused.
Keep in mind that the basecoat does most of the work in keeping the water out. The finish actually may have tiny pinholes in it. You can see this by spreading some finish on a polyethylene cutting board, and peeling it off. Hold it up to a light and you’ll see thick and thin areas. It’s worth noting also that basecoats with higher resin levels are more water penetration resistant than ones with a high cement content.
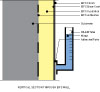
Vertical Section Through EIFS Wall
FRENCH CONNECTION
The above two tests require that a section be removed from the wall to check for leakiness. Obviously, this looks bad and needs to be patched, and hence another method was developed. It’s called a “RILEM” (pronounced “rye-lemm”) tube. The word is an acronym for a series of French words that relate to building science: Reunion Internationale des Laboratoires et Experts des Materiaux, Systemes de Construction et Ouvrages (International Union of Laboratories and Experts in Construction Materials, Systems and Structures).A RILEM tube is a simple device. It is a clear glass or plastic tube in the shape of an “L.” It is open at both ends (see the drawing). The horizontal leg has a flange on it and is glued to the wall with a special putty, with the vertical leg pointing upward. The tube is then filled with water. The vertical leg has markings on it so the water level change, if any, can be noted. The height of the water column exerts a slight pressure on the wall surface, and if the wall is leaky, the water level will go down over a period of several hours. You can place RILEM tubes all around the façade of a building, thereby quickly garnering a lot of information. RILEM’s were originally used on masonry but will work on materials that have some chance of being porous; like brick, stone, stucco and EIFS but obviously not metal or glass. You can buy RILEM tubes on the Internet.
It is possible to force water through the EIFS lamina but it takes much more force than is present under any conditions other than a hurricane. Keep in mind that a 90-mile per hour wind is about equal to 20 pounds per square foot of wind pressure, which is equal to about only a few ounces of pressure per square inch. This is why using high-pressure washers (that operate at 500 psi and above) to clean EIFS is not a smart move: water can get forced through the lamina and into the foam, and takes forever to dry out. Also, if the lamina is saturated with water and the water freezes, it’s possible for the coating to come apart due to the expansion of the water as it freezes.
Once the fact that the EIFS itself has been established as not being the leak source, the diagnostic process continues to find the real culprit. At this point the challenge becomes one of a wall system problem, rather than an EIFS problem. A standard way to recreate leaks is to carefully spray the wall with a calibrated nozzle and look for leaks. Another method is to place a grid of nozzles over the suspect area and see where the water is getting in. This later method is often done in conjunction with inducing a vacuum on the indoor side, thereby drawing water into the building in a manner similar to the air pressure differential that occurs due to wind and/or HVAC equipment.
If you are looking at a sealant joint at the perimeter of an EIFS, make sure to nudge the sealant bead. When the wall gets cold it contracts, tugging on the bond between the sealant and the EIFS. A sealant bead that is in contact with, but not bonded to, the EIFS may open up, causing a leak where none was previously present.
If you see the perimeter of the EIFS foam insulation, it may look like the EIFS lamina is damp. Usually this is a transient condition caused by water vapor migrating from indoors to outdoors. The vapor works its way out through the joints between the insulation pieces and condenses on the cool lamina, usually in the morning. Often this dampness disappears, only to form again briefly. If the insulation boards are properly and tightly fitted together, this effect normally does not occur. However, if you see efflorescence at the board joints, it means that liquid water is somewhere in the wall and is trying to get out. This is usually due to something above that is leaking and the water is wandering downward between the sheathing and the EIFS foam.
On non-vertical surfaces, such as balcony tops or parapets without flashings, water that ponds on the EIFS can soften the coatings and eventually allow the water to seep into the supporting wall. This tendency for slow permeation of water on flat surfaces can be dealt with somewhat by using a hard, clear sealer to keep the water off the EIFS surface but the best approach is simply to use flashings.
You can see from the above descriptions that these tests are not rocket science. Hence, if you are confronted with the claim that the EIFS is leaking, you can do some of the initial diagnostic work yourself and thereby save some time and money. W&C
Looking for a reprint of this article?
From high-res PDFs to custom plaques, order your copy today!


