Web Exclusive: The Four Seasons
The weather extremes in Northeast Wisconsin are the stuff of legends. Nowhere are those extremes more noticeable than on Lake Winnebago, the largest freshwater lake in the state. Each year, the story of the changing seasons is dramatically told in four distinct acts: winter, spring, summer, and fall. Having a front row seat to an award-winning production by Mother Nature appealed to Linda and Tom Van Wyk, who decided to build their $2 million dream home in Menasha, on the lake’s north shore.
“I grew up here and there’s nothing like it,” says Linda, adding that she and her husband are avid boaters. “When we talked about where we wanted to be, it always came back to being on the water, so our lakeshore home is a dream come true.”
After the home was built, the question of how to furnish and adorn it became the focus. The couple designed their 7,500 square foot home in a French country style, which incorporates natural elements in the architecture, such as stone and wood, as well as a deep, rich color palette in furnishings, trim, accent pieces and décor. It’s a look that’s rustic, warm and welcoming; perfect for self-described “casual and comfortable” people like the Van Wyks.
HAPPY HOUR
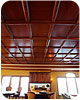
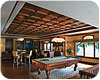
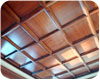
They decided a wood coffer ceiling would perfectly accent their second floor game room, which overlooks the more formal living room on the first floor. With its wood floor, pool table and bar setup, the game room exudes all the cozy ambience of an English pub, and is perfect for entertaining either large groups or intimate gatherings. They chose ACP’s Evoba wood ceiling system to accomplish their goal, the second time they’ve used the product.“Last year, we installed the wood coffer ceiling in the office of our Florida home and we were so impressed with how it turned out we knew we wanted to use it again,” Linda says.
Steel Homes By Design president Don Springhetti, who worked with the Van Wyks to design and build their dream home, says he recommends the ACP wood coffer ceiling system to clients because it creates an instant designer look without the expense. (He himself installed it in the boardroom of his Neenah, Wis., business.)
“Traditional custom coffer ceilings are perhaps the most expensive ceiling treatment there is,” Springhetti says, pointing out that it can cost upwards of $13,000 in materials alone to coffer a 12 foot by 14 foot area. The ceiling area in the Van Wyk’s home, which measures approximately 20 feet by 40 feet in a tray design, cost roughly half that amount.
“With the Evoba system, you get the rich, authentic, architectural details of custom millwork, so it looks really professional and high-end, but it’s much easier to install and far more economical,” he says.
“In that regard, the installation process is not that different from an acoustical ceiling installation,” Springhetti says. “We were able to put the whole thing up in less than two days with only two guys and it only cost around $7,500. To get a carpenter to build something like that in place would probably take a minimum of seven to 10 days and cost three times as much.”
Linda and Tom couldn’t be more pleased with the finished product. “It just sets off the whole room, but it’s not pretentious,” Linda says. “The new ceiling makes the entire room very cozy and inviting and we just love relaxing in there, looking out the windows and watching all the happenings on the lake.”
Sidebar: Installing an Evoba Wood Ceiling System is Simple
- First measure the ceiling height of the room. The minimum drop for the system is 2¾ inches.
- Mark each corner of the room the distance below the floor joists where the ceiling is to be suspended and snap a chalk line to illustrate the new ceiling height on each wall.
- Attach the corner medallions with brad nails. Nail wall molding, which abuts the corner medallion, to the wall studs every 24 inches. The ends of the intersections of wall molding can either butt together square or mitered. Repeat the process on all four walls.
- Once the center of each wall is marked, snap a chalk line onto the floor joists to connect those marks, perpendicular to the floor joists at the centerline of the room, to set up for the main beam installation. Wire hangers, no more than 48 inches apart and affixed with lag eye screws to the ceiling, are installed to hold the main beams in place.
- Using a miter saw and wood chisel, create a “tongue” on one end of the first main beam for it to rest on the wall molding. The installation of the cross tees follows the main beam installation, creating a grid pattern in which the panels are installed.
- Slide the cross tees out of the way so there’s enough room to tilt each panel as it’s put in place. Repeat with the rest of the panels.
For more information, call ACP at 800-434-3750, email productinfo@acpideas or visit www.acpideas.com.
Looking for a reprint of this article?
From high-res PDFs to custom plaques, order your copy today!


