Trowel Talk: House of Mud
“Some men must follow, and some command, though all are made of clay” ~ Henry Wadsworth Longfellow

One of the very best things about my job as the director of a national training program, and a part-time columnist for Walls & Ceilings magazine, is the talented people who make up this industry who I get to meet along my way. The following narrative was submitted by my good friend and former co-worker, Jeff Crothers, who offers his insight this month on a relatively new take on an old idea-American Clay Plaster.
~ William E. Rogers
Living here in California we pride ourselves on making the planet healthier and greener. Not to say other states don’t feel the same, we just seem to get more air time. It was time for me to see if there was an interior plaster product that would be environmentally correct. A product that was beautiful and durable, without breaking the bank.
 I came upon a Web site where the material met the requirements of being ecologically correct, that was durable, beautiful and cost effective. American Clay was the manufacturer of this product and now my curiosity level was high. I fired off an e-mail to have them contact me with more information. The very next day, a representative from American Clay contacted me and told me about the product. To say that I was impressed with what I heard would be an understatement. Plasterers’ Local Union 66 in San Francisco, and the OPCMIA have always been proactive in making sure our apprentices and journeyperson are well trained in all plastering applications. Seeing the value and potential in this product was all the motivation we needed. So in a matter of weeks we had our lead plastering apprentice instructor flown to their headquarters in Albuquerque, N.M.
In 2002, Croft Elsaesser, the inventor of American Clay, had his material ready for mass production after two years of experimentation. Working with multiple finish materials in his career, Elsaesser wanted to make a finish plaster that would be less harmful not only to its applicators but to the environment as well. He accomplished both while still keeping the beauty and durability of the material.
Starting with the substrate this could be a painted surface or drywall that has a Level 3 finish, concrete, cement block or a gypsum plaster walls. A finish painted surface should be clean. Use TSP if needed to remove grease that may be on the surface. Make sure there is no loose paint and lightly sand the wall to help with bonding. If you are going over a gypsum board wall, make sure there are no high spots at the tape joints and everything is sanded smooth. Imperfections on the surface of the sheet rock can telegraph through and ruin the desired effect. Make sure you have wiped your wall clean of any sand dust. Not doing so will result in problems later. Prime the tape joints where you have used taping mud to eliminate uneven suction on the substrate. For addressing other substrate applications always follow the manufacturer’s recommendations.

Loma clay will always be used as your basecoat. Using a 5 gallon bucket to mix in, add a third of a bucket of water and a half sack of Loma to the bucket and give it a quick mix. You can put your color in before or after you add the half sack of Loma to the bucket.
 Here’s a tip: If you put the color in the water first, and mix the color with a drill and paddle, this will help eliminate a “star-burst” effect in the material from unmixed color pigment. Pigments sometimes smaller than you can see or feel will stay intact in the material if they are not mixed well enough, resulting in a streak of color when you are toweling or compressing the material.
Add the rest of the sack of material to the bucket and add enough water so the material takes on the consistency of yogurt. Continue mixing the material until all lumps have been eliminated and wipe any material on the inside of the bucket and add it to the beaten material. This will eliminate any unmixed material that has stuck to the bucket sides from streaking the material color. Choosing a color may be your biggest decision; with 43 different colors to choose from, the sky’s the limit. Let the material sit for a minimum of 30 minutes. Don’t be afraid to let the material sit for longer periods of time. It actually becomes better the longer it sits.
For the second coat, mix the material the same way you mixed the first coat and let rest for 30 minutes or more. You may lightly mist the wall before spreading the second coat, but be careful. Over-wetting the wall will result in peeling or bubbling of the material, not a desired effect. The desired finish or look will be a direct result of the material you’re using and your application of method.
 Some of the various American Clay products:
• Loma: This is the workhorse for the company. You can spread it on smooth, or use it in a texture pattern. Depending how long you compress the material with a stainless steel trowel you will burnish or give movement to the wall. You can craft the finish to resemble suede, or you can give it a matte finish or a polished look.
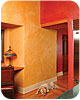
• Porcelina: American Clay’s smoothest finish can be troweled to resemble the finest Venetian Plasters at a fraction of the cost. The rich warm color that immediately draws your eyes is achieved by craft persons that have learned to work the material as if it were a piece of art. Your walls will take on a life of their own and you’ll be proud to show them off.
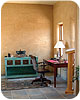
• Maritimo: The strongest and most durable of American Clay’s finishes. It gets its strength from crushed sea shells. It resembles the look of a fine terrazzo floor. When the material is polished with a Lexan trowel even more color and depth is added to this beautiful finish.
• Enjarre: Is designed for commercial applications, housing tracts or condos and is meant for spray-on applications. The beauty of the material enables you to go over Level 1 or 2 gypsum board walls and ceilings in a single pass, providing color and texture at the same time. This material eliminates the need to hire a painter and is easily repaired.
 Always remember, before using any of these products, make sure you have read all information about the product you are using. American Clay has placed videos on Youtube so you can see many of the application procedures. Covering all areas that you don’t want the material to get on is a must.
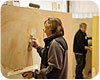
Now you can see why I was so excited about this product and found it necessary to have our journeypersons and apprentices trained on this product. This training allows us to do work from the past and to be able to apply the materials of the future. American Clay Plaster, when used by trained craftspersons makes a great product a work of art.
There is much more to this product than we have room for in this article. I recommend going online and visiting americanclay.com to see all the possibilities they have to offer for your project. Your clients and workforce will thank you. W&C
Jeff Crothers is a journeyman plasterer with more than 20 years experience in the trade, an experienced apprenticeship instructor, and currently serving as a union representative for Operative Plasterers and Cement Masons International Association - Local Union 66, located in San Francisco.
One of the very best things about my job as the director of a national training program, and a part-time columnist for Walls & Ceilings magazine, is the talented people who make up this industry who I get to meet along my way. The following narrative was submitted by my good friend and former co-worker, Jeff Crothers, who offers his insight this month on a relatively new take on an old idea-American Clay Plaster.
~ William E. Rogers
Living here in California we pride ourselves on making the planet healthier and greener. Not to say other states don’t feel the same, we just seem to get more air time. It was time for me to see if there was an interior plaster product that would be environmentally correct. A product that was beautiful and durable, without breaking the bank.
In 2002, Croft Elsaesser, the inventor of American Clay, had his material ready for mass production after two years of experimentation. Working with multiple finish materials in his career, Elsaesser wanted to make a finish plaster that would be less harmful not only to its applicators but to the environment as well. He accomplished both while still keeping the beauty and durability of the material.
Starting with the substrate this could be a painted surface or drywall that has a Level 3 finish, concrete, cement block or a gypsum plaster walls. A finish painted surface should be clean. Use TSP if needed to remove grease that may be on the surface. Make sure there is no loose paint and lightly sand the wall to help with bonding. If you are going over a gypsum board wall, make sure there are no high spots at the tape joints and everything is sanded smooth. Imperfections on the surface of the sheet rock can telegraph through and ruin the desired effect. Make sure you have wiped your wall clean of any sand dust. Not doing so will result in problems later. Prime the tape joints where you have used taping mud to eliminate uneven suction on the substrate. For addressing other substrate applications always follow the manufacturer’s recommendations.
Maritimo Finish
SOME TIPS FOR THE NEW (AND OLD)
If you are a first time user of the product, it’s always better to set up a practice area so you can see how the material is going to work, and for you to gain confidence with the product. The traditional system will be the easiest to work with and starts with rolling on a sanded primer. The sanded primer enables the base coat to grab onto the wall. Make sure you prime the whole surface of the wall and give the corners two coats. Leaving unprimed areas can cause the base coat or the finish coat to delaminate leaving you very disappointed. If you are an experienced plasterer you can skip rolling the surface with sanded primer. Using mud glue as an ad-mix to your first coat will also help keep the material from delaminating. You still have to give corners two coats of sanded primer and the wall is much less forgiving when working the material, but this will save on time and that represents savings to your customer.Loma clay will always be used as your basecoat. Using a 5 gallon bucket to mix in, add a third of a bucket of water and a half sack of Loma to the bucket and give it a quick mix. You can put your color in before or after you add the half sack of Loma to the bucket.
Porcelica Finish
Add the rest of the sack of material to the bucket and add enough water so the material takes on the consistency of yogurt. Continue mixing the material until all lumps have been eliminated and wipe any material on the inside of the bucket and add it to the beaten material. This will eliminate any unmixed material that has stuck to the bucket sides from streaking the material color. Choosing a color may be your biggest decision; with 43 different colors to choose from, the sky’s the limit. Let the material sit for a minimum of 30 minutes. Don’t be afraid to let the material sit for longer periods of time. It actually becomes better the longer it sits.
Loma Finish
SPREAD IT ON
It’s time to spread the material on the wall. Using a hawk and trowel, spread the basecoat thinly on the wall, about the thickness of a credit card. Keep this thickness over the entire wall. Make sure all surfaces of the wall have been covered so that you can’t see any of the sanded primer coming through the first coat. Don’t over-trowel the material; doing so can cause the sand to move to the top of the material, and you will start to see the material peel away from the sanded primer. Let this first coat dry overnight before applying the second coat.For the second coat, mix the material the same way you mixed the first coat and let rest for 30 minutes or more. You may lightly mist the wall before spreading the second coat, but be careful. Over-wetting the wall will result in peeling or bubbling of the material, not a desired effect. The desired finish or look will be a direct result of the material you’re using and your application of method.
Training
• Loma: This is the workhorse for the company. You can spread it on smooth, or use it in a texture pattern. Depending how long you compress the material with a stainless steel trowel you will burnish or give movement to the wall. You can craft the finish to resemble suede, or you can give it a matte finish or a polished look.
• Porcelina: American Clay’s smoothest finish can be troweled to resemble the finest Venetian Plasters at a fraction of the cost. The rich warm color that immediately draws your eyes is achieved by craft persons that have learned to work the material as if it were a piece of art. Your walls will take on a life of their own and you’ll be proud to show them off.
• Maritimo: The strongest and most durable of American Clay’s finishes. It gets its strength from crushed sea shells. It resembles the look of a fine terrazzo floor. When the material is polished with a Lexan trowel even more color and depth is added to this beautiful finish.
• Enjarre: Is designed for commercial applications, housing tracts or condos and is meant for spray-on applications. The beauty of the material enables you to go over Level 1 or 2 gypsum board walls and ceilings in a single pass, providing color and texture at the same time. This material eliminates the need to hire a painter and is easily repaired.
Training
Now you can see why I was so excited about this product and found it necessary to have our journeypersons and apprentices trained on this product. This training allows us to do work from the past and to be able to apply the materials of the future. American Clay Plaster, when used by trained craftspersons makes a great product a work of art.
There is much more to this product than we have room for in this article. I recommend going online and visiting americanclay.com to see all the possibilities they have to offer for your project. Your clients and workforce will thank you. W&C
Jeff Crothers is a journeyman plasterer with more than 20 years experience in the trade, an experienced apprenticeship instructor, and currently serving as a union representative for Operative Plasterers and Cement Masons International Association - Local Union 66, located in San Francisco.
Looking for a reprint of this article?
From high-res PDFs to custom plaques, order your copy today!


