Rough Stuff
The areas where two or more different construction products, details and systems intersect are always places of potential risk.
Leaking windows are one of the most frequent callback issues in the building industry. They leave many contractors feeling like the old sailor in “The Rime of the Ancient Mariner” when he cried, “Water, water everywhere!” When wind and water leaks into the interior living space from the perimeter of a window, it’s all too easy to blame the window for the problem. However, the odds are great that it isn’t a faulty window but rather a faulty window rough opening that’s responsible for those leaks and drafts. We need to focus our attention on the window rough opening and the wall system itself to overcome these air and moisture infiltration issues.
Rough opening moisture management.
Moisture should also be diverted away from construction details with drainage products as quickly as possible to minimize risk.
Detail Failures
Exterior building envelope construction systems (roofs and walls) often fail in the detailing of openings, projections and transitions. The detailing process is complicated because it involves more than a single individual or discipline. The challenge is uniting the various disciplines using a wide range of materials into a cohesive unit. The need for holistic building is imperative. Each party involved needs to know how their work and materials are used to complete that task and how they impact the final result.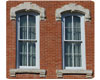
A thin veneer with a predictable rain screen drainage plane affords an opportunity to apply moisture diverter technology on the inside of the void of the rainscreen drainage plane rather than by adding architectural details on the outside.
Risk Zones of a Window Rough Opening
Moisture risk at the top of a window detail can come from a number of sources, such as:Condensation or frost accumulation from warm, moist air coming in contact with dew point temperature in the air or on surfaces of the interior of the window rough opening and on the surfaces of the window unit.
Openings or voids in the waterproofing material at the top of the window (installation flange and flashings).
Moisture that may have entered the wall system above the window and moved from the high point of the entrance down to the top of the window detail in an open waterproofing system.
To a lesser degree, the voids at the sides of the window rough opening have the same condensation concerns as the top and bottom because the surfaces are vertical rather than horizontal. However, they are dependent on the top of the window being properly treated to manage moisture correctly so that it doesn’t allow moisture to move down into the voids at the side.
Cover the construction details that you don’t want to get wet with moisture-proof or moisture-resistant materials. Moisture should also be diverted away from construction details with drainage products as quickly as possible to minimize risk. The combination of a well-designed drainage system and a moisture-resistant or waterproofing system is the ultimate detail to manage moisture.
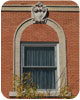
Historical Basis for Moisture Diversion
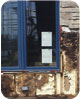
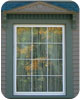
Diverting water away from window details is not a new idea nor is it a new technology. Designing a pattern in the veneer immediately above a window has a long and successful history. What is not commonly known or understood in today’s construction and design industry is that most of the patterns in older historical building veneers were there to manage moisture and to move it off of-and away from-sensitive details such as windows and doors.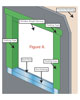
Rough Opening Moisture Management
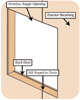
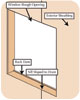
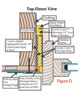
The bottoms of chases in framed construction window rough openings should be addressed with the following details and materials:Figure A Detail
The construction materials that make up the bottom of this detail must be covered with a waterproofing material that turns up the sides of the window rough opening a minimum of 8 inches.
The top surface of the bottom of the window rough opening must be sloped to drain to the exterior of the building.
The back edge of the bottom of the window rough opening must have an elevation change that is higher and creates a back dam.
A pathway must be provided for moisture to move out of and off this detail. This needs to be done for moisture that may enter at the sides as well as at the bottom.
A pathway must be provided for moisture to exit the wall detail once it has drained out of the window rough opening.
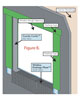
The next step involves moving water away from the top. Remember that moisture moves downward. If we follow the examples from history that created external details away from the top of windows and doors, much of the moisture problem can be eliminated from the window rough opening. The only difference is that the moisture diverting mechanism is inside the building envelope.
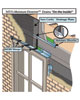
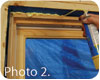
Apply flashing tape to the top edge of the moisture diverter. The layers of construction paper should overlap the top of the moisture diverter and extend down into the trough.
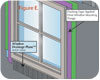
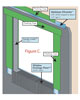
Use a window drainage plane for drainage at the bottom of the rough opening (see Figure E). The plane will also provide a pathway for moisture to enter the rainscreen drainage plane system.
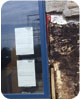
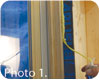
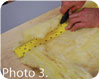
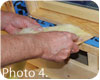
The bottom should be insulated with fiberglass batt insulation cut to size; the addition of the insulation will seal off the bottom of the detail while still allowing drainage (see photos 3 and 4).
Conclusion
Placing blame is always easier than working for perfection. Most of us parrot the words “best construction,” “sustainable design” and “green building,” but do we truly try to attain them? If we honestly want to employ these practices, we need to use what works even though it may seem to infringe on our long-held beliefs about correct building methods.Looking for a reprint of this article?
From high-res PDFs to custom plaques, order your copy today!


