Plaster Man
Picking Up the Pieces From Those We Follow
First off I wanted to thank you for your e-mails and letters. It is very good to hear from you and I encourage you to continue writing. To get started this month, let's look at a few pictures, which should set the mood nicely.
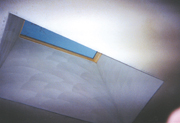
Photo #1 shows the project in a nutshell. I was called in to plaster four skylights and blend them into the existing ceiling. This was a day's work and from this first glance it looks like everything is fine. However, notice photo #2. Here's a view up inside one of the skylights. Do you notice anything unusual? I can count on one hand the amount of screws used to hold this board in place. I searched for one screw in the field but came up empty handed. As I surveyed this situation and scoped the job out, the board hangers who did this work were getting ready to leave the job site. I asked them about the lack of fasteners. "Oh, there wasn't much to screw to," they replied. "Besides, we wanted to make your life easier. You won't have as many screw heads to cover." As hard as it is on me to do this, let's leave this story right here for a minute. We'll come back to it after we finish looking at the pictures.
Photo #3 shows something that at first glance may seem to be a small part of this job. Actually it turned out to be the most time consuming of anything I did that day. After basecoating the skylights, I ran a ring of basecoat in on the ceiling, prefilling the corner beads. I ran another coat to feather it out and then smoothed the outside edges with a wet sponge as they started to set. The next step is shown in photo #4 where I used smooth coat plaster to fill in and smooth out the ceiling area so that it would blend in to the existing ceiling. The ceiling had a little bumpy texture to it, with no particular pattern, so I used some Spraytex orange peel texture to finish it out. I sprayed this on first and finished the ceiling area, then floated the skylights down to the ceiling level, as shown in photo #5. The total for the project was $780 for a six-hour job, with a half-hour lunch. Now, let's get back to the story.
Abominable workmanship
There have been two projects I have been involved with since our last visit. The one I am describing here, basically a remodel and repair job, and a new home that was hung with plaster board (which will be the subject of next month's column) and veneer coat plaster. What I wanted to address now is part of this column's title, "Those We Follow." In both instances, the remodel job and the new house, the plaster board and drywall that was hung by these crews was absolutely awful. And the scoop, score and skinny is that they didn't care. No remorse and no change of course. I bring this subject up for two reasons.First, to discuss what should be done in case you have a similar experience in following up after someone who really doesn't care about quality in the least and, second to turn this otherwise negative experience into something that benefits you financially.
Let's first go over one reaction option. It's always good to refrain from blowing up at the hanging crew. It probably wouldn't do any good, anyway. So that moves us to consider action that will be positive and constructive. I personally find it good to inform the contractor of the situation right away. Ease the situation by telling him or her that you can remedy the situation and that there is no need to send the crew back to make things right. A crew sent back to eat crow is not a pleasant group to be around.
The point is make sure that the person who is in charge knows what's going on. Don't cover for a crew that does inferior work. Be tactful but be straightforward. Take it to the top person who can do something about it. Avoid wrangling with the crew over the type of job they have done.
What you gain from saying something is that this job will have a far smaller chance to come back and haunt you. If cracks appear later on, it's not going to be such a shock or surprise to the contractor. Your words will be echoing in his or her ears. Remember: Plaster cannot hold inferior work in place. If things shift or settle, there is pressure created on the plaster surface and it's going to become visible sooner or later. Letting the contractor know let's them make the decision: either to leave it "as is" or allow you to fix it. The liability shifts from you to them by having them make the decision. Which gets us to the second point, turning a negative into a positive.
When rivers become oceans
Years ago I learned rather quickly that carpet installing was not for me! And I also learned a strategy I've been working on for a while now that I think could help you add more to your bottom line. It has to do with this set-up topic.We've talked in past columns about half-day/whole-day charging vs. per hour. We've also discussed breaking up estimates into two parts: the material amount and the labor amount. This is how insurance companies like proposals broken down.
However, I have added a third area on bills lately. It's what is involved before plastering is done on the job. Some of those things are: Coming to the job to estimate it (your travel time and gas); time you spend writing out the proposal; coming back to do the job (your travel time and gas); picking up materials or getting things ready the night before or the morning of the project. All these can be listed as set-up charges, a whole new thing to charge for that you may have eaten in the past. Now, once you get to the job there is another set of things you do.
These can also be put under set up, or you may put them under another title like stabilizing or securing the area. Here's what's included under this: Putting drops down and putting up plastics; removing the damaged plaster and removing it from the site (including time spent taking it to the dump and any dump charges); installing board in the areas to be plastered; installing screws and washers to hold loose or insecure plaster in place; installing corner beads, mesh and bonder prior to plastering. (Note: On both the remodel project and the new house, I added a securing charge on to the final bill. This was to cover my time that was spent hanging a few small pieces of board that were forgotten in the new house, as well as pumping in about 150 screws here and there to ensure a solid base.)
Into the Plasterzone ...
By creating a billing category outside the traditional materials and labor breakdown, you in effect create a new revenue stream, another way to meet expenses and ensure profitability. My proposals now are broken down into at least these three main sections at the end: Securing and stabilizing of area, materials and labor. Try it out and let me know your results.Next issue we'll go over some of the steps involved in doing veneer basecoat work in new construction.
I hope this coming year turns out to be the best yet for your business! If there's anything I can do to help make that happen, let me know. Thanks again!
Looking for a reprint of this article?
From high-res PDFs to custom plaques, order your copy today!


