Plaster Man
Profit Projects
Venetian seems to be just the tip of the iceberg, as they say. I was just in a supply house here in the Midwest and they showed me several new products that can be applied over foam board and gypsum board. The finished surface resembled the walls in a castle, as if large stones or blocks were fit into place. Many of these products are used for exterior or interior applications and the psi strength they have is also impressive.
Venetian and other finishes
The feeling I get is that the appearance of interiors across the country will be brought up to another level, which should help improve work and living spaces in a way never before possible. It's an exciting time to be in the finishing trades. Again, this always leaves the door open for the contractor, the manufacturer or applicator.One that I was just part of was done in Peoria, Ill. I wanted to provide some shots of what was done here and some of the details. I've mentioned before that there are so many facets of plastering and one that I am particularly interested in is ornamental work. Many readers are just as interested as I am in this area of expertise. There doesn't seem to be a lot of written information on it-especially on the repair and restoration side, which to me really opens up the opportunities to anyone who can do this type of work.
There is a tremendous amount of ornamental work in place and instead of tearing it down, it's great if it can be restored to its former condition. Up to this point, I've called in experts who can do this type of work. On this particular project I brought in Steve Hyatt, from Missouri. He's one of the best in the business, especially on the restoration side. Let's talk over some details:
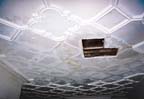
Photo #1 shows the project. Originally, the house did not have this ornamental work. It was added some years later, both on the entryway ceiling and this, the living room ceiling. The problem was that a plumbing leak developed and caused many of the ornamental pieces to loosen. It required cutting a hole for the plumber to fix. So, the first step was to fill this with board and secure the perimeter of the area to be repaired. With this done, it was time for the second step.

Ornamental project
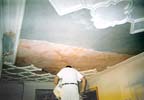
While this work was being done, Steve also worked on getting the ornamental ceiling pieces made. Photo #3 shows that there were two distinctive pieces that repeated over and over across the ceiling to form the pattern. He looked at two ways of accomplishing this: The first involved the idea of brushing layers of latex rubber over the existing ornamental pieces-while they were still in place on the ceiling. A release agent would be put on the pieces first, then the rubber applied in successive layers. This would be put on until it built up a thick enough layer to form the "mother" mold that could be used to cast pieces in.He decided on the second way, which involved actually removing one each of the two designs from the ceiling and setting them with the design up. He then brushed the layers of rubber on to form the mother mold. This worked very well. After this mother mold was formed from the rubber, he made a second mold that was made of basecoat and mesh. This was used to give support to the rubber when the plaster was poured into the molds. The pieces were then cast and set aside for the next step of attaching them.
Attaching the pieces involved marking the areas where they would go back. They held each piece up tight to the ceiling, penciling around the design to leave an outline. This area was then sprayed down with water from a mist bottle until it was thoroughly wet (the piece to be attached to this area had been soaking in water for about 20 minutes before it was put up in place). The piece was then "buttered" with a thin coat of lime and molding and quickly put into place. Hyatt then filled in around each piece and finished it out. The finished product is shown in photo #3.
I am quite certain that we will talk more about this type of work in the future. Besides being interesting work, it is highly profitable. So, it's a double win.
GNM Plastering, of Massachusetts, is the winner of the "Ride the White Wave!" and Walls & Ceilings' T-shirt. To win a shirt, send the information via e-mail at robin@plasterzone.com or to the magazine in the mail.
Until next time, Plaster On!
Looking for a reprint of this article?
From high-res PDFs to custom plaques, order your copy today!


