Walls & Ceilings logo
search
cart
facebook twitter linkedin youtube youtube Spotify Podcasts Apple Podcasts Spotify Podcasts Apple Podcasts
  • Sign In
  • Create Account
  • Sign Out
  • My Account
Walls & Ceilings logo
  • NEWS
  • TOPICS
    • Drywall
    • Stucco/EIFS
    • Ceilings
    • Steel Framing
    • Fireproofing
    • Interior Plaster
    • Building Envelope
    • Insulation
    • Technology
    • Interior
    • Exterior
    • Women In Construction
  • COLUMNS
    • Up Front
    • All Things Gypsum
    • Art & Craft of Plastering
    • Stucco Stop
    • Steel Deal
    • Industry Voices
  • PRODUCTS
    • Buzz Guide
  • EVENTS
    • Industry Events
    • Webinars
    • BUILD Expo
  • MEDIA
    • Videos
    • Podcasts
    • Photo Galleries
    • BUILD26 Videos
    • Take our Quiz!
    • Infographics
  • EXCLUSIVE
    • Newsletters
    • Top 50 Contractors
    • Contractor of the Year
    • State of the Industry
    • W&C Store
    • Market Research
    • CEUs
    • Sponsor Insights
    • Custom Content & Marketing Services
  • DIRECTORY
  • EMAGAZINE
    • eMagazine
    • Advertise
    • Archive Issues
  • SIGN UP!
Columns

Plaster Man
Texture, Talent and the Total

By Robin Raymer
September 27, 2001
Robin discusses the textures he used some recent jobs.

Photo 1: Ice damming that caused plaster damage.


Photo 2: Applying bonder to damaged area.
I am dedicating this column to my dear cousin and friend, Betty Raymer, who is putting up a valiant fight against cancer. She has been a member of the Plaster Man Team for many years now and has given me her encouragement and support, helping me put together training programs and events. I want her to know how much I appreciate her and all she has done for me, and I wish with all my heart that she is able to make a full recovery.

This time around I wanted to spend some time discussing textures. If the repaired surface is not smooth, then texturing is necessary. Matching and blending the repaired area with the existing area that surrounds it is a true art. Let's look at two examples. I'll use the PATCH system to evaluate the first repair.

Photo 3: Applying another layer of basecoat.

What's the problem here?

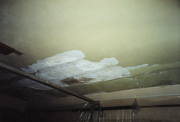
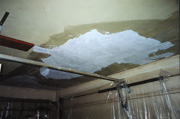
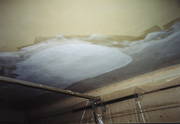
Problem: In photo #1 you'll notice damage that occurred due to ice damming in the garage. On this ceiling USG Rocklath was installed with basecoat and a random float finish made from lime, Keenes cement and river sand. The water caused a separation between the finish coat and the basecoat.

Approach: The board itself was quite solid and in good shape, so the removal involved parts of the basecoat and finish. In photo #2, I applied bonder to the affected area and extended the application of it a good foot beyond what I was actually repairing. This allowed me to feather and blend the repair into the existing ceiling. The next step involved applying a layer of basecoat (Kal-Kote Basecoat from National Gypsum and USG's Diamond Basecoat are two brands I frequently use) over the entire area and then I embedded heavy fiberglass mesh into the basecoat. In photo #3 you'll see that I then applied another thick layer of basecoat over the entire area.

Because this ceiling had such a rough random float finish, I was able to work this repair in a way that's different from what I usually do. Usually I feather in the edges of the basecoat and then allow it to set up completely. I apply a sand finish over the basecoat and floated it to match the ceiling. However, in this case, I was able to finish out the basecoat. I began by feathering the edge around the perimeter of the repair and then running a very wet sponge across all the basecoat, combing it down and making it all a uniform level. As brown spots in the basecoat started to appear, I went back and random floated the entire area. The texture matched perfectly with the existing ceiling.

Time: It took about an hour and a half for set-up and scraping the ceiling. I then cleaned up the area and was ready to bond the ceiling. Bonding the ceiling took about 15 minutes. After I bonded the ceiling, I waited about an hour before beginning the basecoat (while the bonder was drying I did a small repair inside the house). From the time I began applying the basecoat until I finished took about another hour and a half to complete.

Cost: Originally my estimate was somewhere in the $975 range. This included the repair inside the house and the garage work. However, the couple called me back and asked if I would do the work less their $250 deductible. The insurance company was cutting a check for $725. I agreed and did the job. However, I would like to relate a story that might explain my stance on pricing.

Photo 4: Crack starting to open up between the wall and ceiling area.

Surviving the game

There was a boy who was made fun of for years in a small town. One day a salesman came through and the town folk wanted to show him off. They brought the little boy in and showed the salesman how they tricked him. One of the men in the coffee shop held out a nickel and a dime in front of him. "Now Billy, which one do you want, the little dime or the big nickel?" he asked. Without answering, Billy grabbed the nickel and ran out of the shop. Everyone broke out laughing. Everyone except the salesman. He didn't find it very funny. So he went outside and found Billy.

"Billy, I want to help you. For all these years these men have been making fun of you." The man then took out a dime and nickel from his pocket. "Billy, even though this dime is smaller than the nickel, it's worth two nickels."

"I know that," Billy said without hesitation.

"You do?" asked the surprised salesman. "Then Billy, why do you keep taking the nickel?"

"Because if I took the dime, they'd stop playing the game!" said the smart little boy.

How: How did the job work out? Very well. The homeowner was happy with the job, the insurance company was happy getting the claim settled, and I was happy both in getting paid and in being able to put this garage area back together. How was the proposal originally laid out? I gave them two options: repair or resurface. I leaned more toward repair here because the homeowner was more concerned with getting it done so there wouldn't be loose plaster falling on his car. And he was not as concerned with its being perfect. If he was in any way expecting the most perfect of jobs, then I would have insisted on resurfacing. Making sure the customer is going to be happy with the end result is the key here.

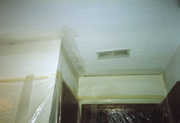
Example 2 is what we're running into more and more these days: drywall finished homes. In photo #4 you will see a bathroom where a crack started to appear and open up between the wall and ceiling area. In the past I would have avoided this type of repair, simply because I didn't get into the splatter texture and acoustical popcorn-type finishes. I stuck mainly to plaster repair. However, that all changed recently when Jay Boswell from Spraytex introduced me to its line of spray textures. Take a look at photo #5. Here I have used plaster to do the initial repair. I cut out the damaged paper tape and then used lime and molding plaster to repair the area, with mesh tape being embedded into the angle. The wall was smooth finish, so I needed only to apply some splatter texture to the ceiling along the edge. This I sprayed on and then knocked down with a margin trowel. It blended in perfectly.

Until next time, keep in touch and let me know about the projects you're working on. Take care!

Share This Story

Looking for a reprint of this article?
From high-res PDFs to custom plaques, order your copy today!

Robin Raymer, the "Plaster Man," is a veteran repair specialist, consultant and speaker on all aspects of the plaster trade. Robin is a 20-year veteran of the plastering trade and has produced a series of videos on the subject. Write to the Plaster Man c/o Walls & Ceilings, 2401 W. Big Beaver, Suite 700, Troy, Mich. 48084.

Recommended Content

JOIN TODAY
To unlock your recommendations.

Already have an account? Sign In

  • Abercrombie & Fitch

    EIFS in 2026: How Specialty Finishes Are Redefining Exterior Wall Systems

    As building codes, owner expectations, and design demands...
    Stucco/EIFS
    By: Regi Mendoza
  • proper air and vapor control

    From Energy Efficiency to Moisture Management: Why Air and Vapor Control Matter

    How proper air and vapor control within building...
    Building Envelope
    By: Benjamin Meyer AIA, LEED AP
  • Linear Metal Ceiling Beam Baffles

    Top 25 Ceiling Contractors of 2026

    Suspended ceilings demand precision, code compliance and...
    Ceilings
    By: John Wyatt and Tanja Kern
You must login or register in order to post a comment.

Report Abusive Comment

Manage My Account
  • eMagazine Subscription
  • Newsletters
  • Online Registration
  • Manage My Preferences
  • Subscription Customer Service

More Videos

Sponsored Content

Sponsored Content is a special paid section where industry companies provide high quality, objective, non-commercial content around topics of interest to the Walls & Ceilings audience. All Sponsored Content is supplied by the advertising company and any opinions expressed in this article are those of the author and not necessarily reflect the views of Walls & Ceilings or its parent company, BNP Media. Interested in participating in our Sponsored Content section? Contact your local rep!

close
  • medical professionals moving a patient on a stretcher through the halls of a medical building
    Sponsored byNational Gypsum Company

    What Does High Performance Mean When It Comes To Gypsum Boards?

Popular Stories

Linear Metal Ceiling Beam Baffles

Top 25 Ceiling Contractors of 2026

Wichita Biomedical Campus

Wichita Drywall Worker Dies After Scaffolding Fall

QXO Just Changed the Game-Here's What Contractors Are Asking

QXO Just Changed the Game-Here's What Contractors Are Asking

Less compound

Joint Compound Market to Reach $9.7B by 2033

Events

June 24, 2026

The Bright Side & Benefits of Designing with Integrated Lighting

Credits 1 AIA LU/HSW; 0.1 ICC CEU

This course will explore the pivotal role architects and lighting design play in creating safer, more sustainable spaces. Learn how to avoid common lighting mistakes and make informed decisions that create the best visual environment for occupants. 

January 1, 2030

Webinar Sponsorship Information

For webinar sponsorship information, visit www.bnpevents.com/webinars or email webinars@bnpmedia.com.

See our full library of webinars

View All Submit An Event

Products

2026 National Painting Cost Estimator

2026 National Painting Cost Estimator

See More Products

Related Articles

  • Plaster Man: Plaster Man's Q&A

    See More
  • The Plaster man: Damaged Plaster
    -A Closer Look

    See More
  • The Plaster Man: The Trip Out West, Part 2

    See More

Related Products

See More Products
  • plaster and drywall

    Plaster and Drywall Assemblies Manual

  • Builder's Guide to Stucco, Lath & Plaster

  • 1118749847.jpg

    The Gypsum Construction Handbook, 7th Edition

See More Products

Events

View AllSubmit An Event
  • June 8, 2026

    Texas Lathing and Plastering Contractors Association (TLPCA) Annual Convention and Trade Show

    The TLPCA Annual Convention and Trade Show will be held at the Horseshoe Bay Resort. As in year’s past, the Annual Convention & Trade Show will offer meetings, receptions, a golf tournament, an exhibitor’s trade show, an educational program, an Annual Design Awards Competition, spouses program, awards banquet, dinners and entertainment.
View AllSubmit An Event
×

Connect with the industry’s leading resource for unparalleled insights and education.

Join thousands of industry professionals today. Shouldn’t you know what they know?

JOIN NOW
  • RESOURCES
    • Advertise
    • Contact Us
    • Directories
    • Store
    • Want More
  • SIGN UP TODAY
    • Create Account
    • eMagazine
    • Newsletters
    • Customer Service
    • Manage Preferences
  • SERVICES
    • Marketing Services
    • Reprints
    • Market Research
    • List Rental
    • Survey/Respondent Access
  • STAY CONNECTED
    • LinkedIn
    • Facebook
    • Instagram
    • YouTube
    • X
  • PRIVACY
    • PRIVACY POLICY
    • TERMS & CONDITIONS
    • DO NOT SELL MY PERSONAL INFORMATION
    • PRIVACY REQUEST
    • ACCESSIBILITY

Copyright ©2026. All Rights Reserved BNP Media, Inc. and BNP Media II, LLC.

Design, CMS, Hosting & Web Development :: ePublishing