Plaster Man
Repairs and a New Resource
I really don't like to lecture audiences, and this was super because it was a constant flow of questions and comments from the audience, making it more like an enjoyable conversation. This show just reinforced the fact that there are a lot of people who want to learn how to do plaster repair, including painters, drywallers, contractors and even some homeowners who want to do their own restoration work. Connecting these individuals up with the materials, information and products they need has been a challenge, but we're getting there, as you'll see at the end of this article. But for now, let's talk about two repairs I've done recently.
Take off
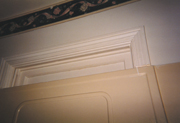
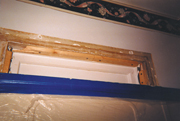
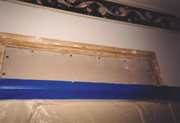
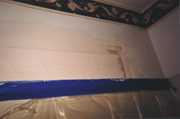
The first step was taking off the trim (picture #1), then putting in some backers (picture #2) which were 1-inch-by-2-inch pieces of pine. I inset the wood about 1/2 inch. This gave me room to install a piece of 3/8-inch board in the opening (picture #3). This left 1/8 inch for the plaster that would complete the repair. I then bonded the area around opening, which allowed me to feather the repair out so it blended in nicely with the surrounding area. I mixed up my repair material and filled in the area over the board (picture #4).I immediately embedded fiber glass mesh around the perimeter of the area being repaired, to bridge the new board and the existing wall area. I then followed up with a thin layer of plaster over the entire area and smoothed this out as it set up.
From start to finish the entire repair took about one hour to accomplish. The price to do this was figured in combination with two other repairs I did while at the house. For this particular project it was decided to go with a half-day rate of $450 for the two repairs in two bedrooms and this repair. Had I broken it out into separate charges for each area it might have looked like this: $250 for the bathroom repair and $150 for each of the two repairs, with the total being $550. I showed these figures to the homeowner and then backed the pricing down to the half-day rate, which was fine with her.
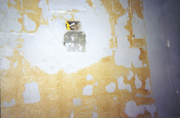
The second repair I wanted to talk about briefly was one in which the entire kitchen wall was covered with a thick adhesive used to originally attach the tiles. Some of the finish coat was scraped off in an attempt to remove the adhesive. What I wanted to focus in on more specifically was the holes found in this wall. They were large and could have been repaired several ways. In pictures #5 and #6 you'll see one of these holes we'll use as an example. The approach could have included the following: the holes could have been cut larger until the wall joists were exposed. Then a piece of board could have been screwed into place in a similar way as our first example.
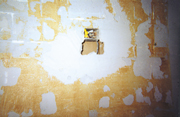
In pictures #5 and #6 I use an aluminum patch that has small pin holes in it and that is covered by a self-adhesive fiber glass mesh. I used a basecoat to first butter the edge of the hole and then stuck a 4-inch-by-4-inch metal patch over the hole. These mesh patches come in a variety of sizes, including 6-inch-by-6-inch, 8-inch-by-8-inch and even larger. I use the 4-inch-by-4-inch patches most often. They're great for covering over light-box holes, door knob holes, etc., that homeowners want to disappear. (It's interesting that the inventor of these patches was a painter who wanted something decent to repair these kinds of holes with!) The next step was to coat the entire wall with basecoat, let it set up, then complete it with a smooth coat of plaster. In about a week it would be ready to paint or wallpaper.
The game of quotes
The question often comes up about how to charge for these types of repairs. I want you to keep in mind that going by the square foot just won't work on these types of projects. This wall situation is not simply a few pieces of blueboard or drywall that need to be finished out. Repairs need to be done to the walls first, to bring them up to a condition that resurfacing can then be done. I want to emphasize that charging for this special work is a key ingredient to your getting paid what you're worth.
It is simply too often that I hear guys saying, "Well, it wasn't that much more trouble to do this or that." Just remember that one of our chief goals is to bring the standards up on what you are doing and, also equally important, what you get paid for doing it. Constantly throwing in the extra work and extra materials you give out could eventually end up in your throwing in the towel, financially speaking. There's nothing more frustrating then to watch on the sidelines as a fellow worker gets into a financial tailspin and ends up in disaster. I stood by once, and I vowed I wouldn't do it again. That's why I feel so strongly about your getting what you deserve and will do all I can in my power to help you attain that.
Your help is needed to keep plaster repair alive and thriving, and to save a lot of people a ton of time in getting the supplies they need.
Until next time, keep up the good work you're doing, and here's hoping one day soon our paths may cross.
Looking for a reprint of this article?
From high-res PDFs to custom plaques, order your copy today!


