Plaster Man
Resurfacing (Part 2)
This month, we continue our discussion of resurfacing. Let’s start with a letter I received in March from Brian, of St. Louis:
“I am rehabbing a house built around 1910. The interior walls are covered with two to three layers of wallpaper that have been painted and cracks are showing through. I heard some conflicting stories. One plaster guy told me that I would not have to remove the wallpaper. He said that I should put a wire mesh over the walls and mud them, some type of ‘floating wall system.’ I had another plaster guy tell me that I would have to scrape all the wallpaper off the walls. Which is true? I am trying to keep my cost down to a minimum. Is mudding the walls the best way to go?”
Color outside the lines
I appreciate Brian’s letter. I am going to put down a few ideas and see what is going to work best in this situation. Let me start by saying that I’m not recommending this next series of techniques as a “standard” way to treat surfaces. However, this topic of wallpaper and resurfacing comes up enough that I thought I’d make a comment on it. It has to do with what I would categorize as extreme plastering—plastering over rugged or hostile surfaces—one of them being wallpaper.This topic takes into consideration the projects where the wallpaper is pretty much part of the surface. When you have to scrape a half-hour to clean a wall space the size of a postage stamp, my thinking is this: If it’s on there that good, is it going to soak loose by applying plaster over it?
That’s the biggest part of the issue here. I talk a lot about having a stable base, a solid foundation on which to build. The worst situation that can happen is to have the wallpaper underneath release and pull, or create bubbles underneath what’s been put over the top. Sometimes, testing an area with the steps below will give an indication whether or not the job is going to stick and stay in place for good.
I have talked to other plasterers who have actually plastered over surfaces that they found out later were wallpapered with a ton of paint over the top. From here on out I am going to be speaking only from personal experience, what I’ve found to be the case in the field.
A recent project
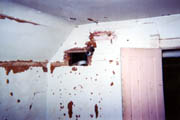
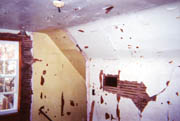
Included are two pictures of a recent project. It was a rental property a friend wanted fixed up. Now, I’ll admit that some plasterers would refuse to do such a project outright and that’s fine. But for those who may wonder what the outer reaches of “possible to plaster” include, here we go.This particular room went down a stairway as well, and if you look closely here is what you would find in photos #1 and #2.
The walls are completely covered with plaster. Much of it was banged up with wood lath showing. The walls are also completely covered with wallpaper (about five layers), and then textured and painted over again and again.
The paint began to peel. Add to this a piece of plywood on the stairway ceiling area about 3 feet by 4 feet that had been painted, as well. I started by scraping all the loose paint. Filled the holes and areas around the window with 3/8-inch plasterboard over the wood lath. Any soft areas that had pulled away from the wood lath I cut holes and pumped in a latex construction adhesive to help secure these areas. The next step was to use the sealer I mentioned last month over these surfaces. It’s amazing how it soaked into everything and when I came back in the morning, the walls were solid as a rock. I then applied a basecoat and embedded mesh into it, followed by a random float swirl that helped hide any imperfections in the walls.
This is a way of doing the project that’s way outside the lines. Some people dread taking the paper off and the only other option is to demolition the plaster down to the wood lath or further, hang drywall and tape it out, and then put a heavy spray on texture over it. That doesn’t sit well with me. My intention here was to preserve as much of the original plaster as possible, which I was successful in doing. I was not going to peel the paper and the landlord was not either. It came down to finding a way to secure the surface to serve as a solid foundation for whatever was put over it. I’m simply pointing out that the sealers I mentioned last month make possible the resurfacing of what was, up to that point, impossible to deal with.
I guess I have been impressed with the results I’ve gotten. Whether you choose to tackle such a project I am leaving up to you. I just want you to know that there are options outside those that are considered standard. If you are the type of person that goes by the book, then I’m sure you have a comment or two you will want to send my way.
I would not recommend the technique suggested to Brian that involves putting chicken wire over the surface and mudding it. I think the project would turn into a nightmare rather quickly. Joint compound does not have the advantage of a chemical set that plaster does, which gives the benefit of setting up hard in a short amount of time, which helps hold the surfaces in place. And he would have to put a ton of layers over the wire mesh to get it completely covered. (Some of you may remember the infamous character whose work and crude tools I showed in an article a few years back. He covered the kitchen with chicken wire and then tried to cover it with about six layers of joint compound. I got a feeling right away that he was in trouble because he was calling me late at night from a phone booth.)
This fall, I will be hosting a seminar in Peoria, Ill., called “High Profit Plastering Techniques.” Held Nov. 10-12, we will focus on one- and two-coat veneer plastering, repair techniques on both smooth and textured surfaces, the resurfacing of wall and ceiling surfaces and much more. For more information, e-mail me at robin@plasterzone.com.
Remember, you can e-mail me through my Web site, http://www.plasterzone.com, or send your letters and pictures of projects and crew to me through this magazine.
The first winner of the Plaster Man and Walls & Ceilings T-shirt isn’t a Beatle but hails from Liverpool, England, and has the ticket to Ride the White Wave! Congratulations to Ed Foulkes.
Looking for a reprint of this article?
From high-res PDFs to custom plaques, order your copy today!


