Walls & Ceilings logo
search
cart
facebook twitter linkedin youtube youtube Spotify Podcasts Apple Podcasts Spotify Podcasts Apple Podcasts
  • Sign In
  • Create Account
  • Sign Out
  • My Account
Walls & Ceilings logo
  • NEWS
  • TOPICS
    • Drywall
    • Stucco/EIFS
    • Ceilings
    • Steel Framing
    • Fireproofing
    • Interior Plaster
    • Building Envelope
    • Insulation
    • Technology
    • Interior
    • Exterior
    • Women In Construction
  • COLUMNS
    • Up Front
    • All Things Gypsum
    • Art & Craft of Plastering
    • Stucco Stop
    • Steel Deal
    • Industry Voices
  • PRODUCTS
    • Buzz Guide
  • EVENTS
    • Industry Events
    • Webinars
    • BUILD Expo
  • MEDIA
    • Videos
    • Podcasts
    • Photo Galleries
    • BUILD26 Videos
    • Take our Quiz!
    • Infographics
  • EXCLUSIVE
    • Newsletters
    • Top 50 Contractors
    • Contractor of the Year
    • State of the Industry
    • W&C Store
    • Market Research
    • CEUs
    • Sponsor Insights
    • Custom Content & Marketing Services
  • DIRECTORY
  • EMAGAZINE
    • eMagazine
    • Advertise
    • Archive Issues
  • SIGN UP!
Columns

Re-surface—With a Purpose!

By Robin Raymer
February 2, 2001
Plaster Man

Block wall


Marvin Newman applying basecoat
I wanted to illustrate with the use of pictures some of the “doors that are opened” when using plaster. This article will set the tone for the rest of the year. I’m including in this column two projects I’ve been on recently to illustrate some techniques used when “re-surfacing.”

There are several problems and situations where re-surfacing can help. #1: It can cover over a multitude of “sins,” ugly work, texture that is “too thick” and that the homeowner now wants to get rid of, or smoothing out “block-type” walls; #2: For older homes, including historic sites where cracks are appearing all over the surface on walls and ceilings; and #3: Ceilings where the popcorn or texture is removed and the homeowner now wants smooth or another type of finish applied. Let’s consider the “photo gallery” now.

Robin and Roy O'Bryan

Into the gallery

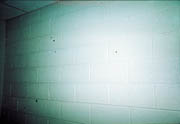
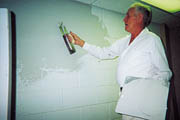
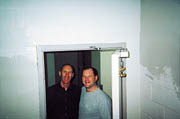
Our first example (picture #1) is a block wall. This was located in Romeoville, Ill., where we were called in to smooth it out for wallpaper. The first step in re-surfacing is to make sure the wall or ceiling is clean and grease- or dirt-free. The next step is to apply a bonder (these vary from a clear solution to ones “pink” in color).

Picture #2 shows Marvin Newman (45 years in the business) applying the basecoat. We applied the first layer of basecoat, then doubled back with a second out of the same batch. This was followed by a thick, smooth coat that was also applied in a two-layer procedure all from the same batch. This was then troweled to a smooth finish. Picture #3 shows me visiting with Roy O’Bryan who was happy to see the block walls go!

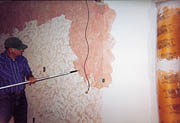
Our second example shows bonder being applied to the walls and ceilings (pictures #4 and #5). In #4 you will notice that the back of the stage area was a very, very heavy texture. Picture #6 shows the technique used on this: A thick first coat was applied and allowed to set. It took about 15 minutes to run the first coat on the entire stage area; it chemically set up about a half hour later. We then followed it up with a second layer of plaster.

If a really heavy texture is to be covered, it is best to run it in two or three separate batches like this. If built out too thick, the mud has a tendency to “slide” or “sag” down with the weight. Separate batches and layers solve this.

In our project, we then followed with a smooth coat. Picture #5 shows the ceiling where popcorn was removed and the surface sustained some nick and tear damage. We applied bonder and a basecoat. This set up in about an hour and a half, and then we were ready for the sand finish coat.

Several plasterers followed up by floating the ceiling with sponges and creating a random swirl texture.

Stage area with heavy texture

Tips for the artist

It’s good when re-surfacing to check the label to see how far in advance you can apply bonder before plastering. It can’t be put on weeks in advance. I personally like to put it on the day before or the morning of the day I’m going to be plastering. If you are in a hurry (or in an area where there is little air movement, like in a small, unvented bathroom) a fan can be positioned to blow directly on the ceiling to help it dry. This will usually take less than an hour.

It is important that the bonder is applied over the entire surface to be plastered. If it does not get a thorough coverage, areas can literally “pop off” the portions that were not bonded. This is a point I can’t overemphasize! I use a small trim brush to apply it in the angles and a paint roller (1/2-inch nap on smooth surfaces, 3/4 inch on heavy textured surfaces) to roll the bonder on. With the tinted bonders, you can tell more easily if you skipped a spot. With the clear types, it’s harder.

I shine a light across the area or look in good sunlight and the areas that were missed will appear “dull.” The areas you bond will have a “sheen” to them. This is very important, especially on heavy textured surfaces. The bonder must get into all the little areas that can be easily missed if done too fast.

As in all projects, make sure the areas around where you’re bonding are protected. One splash of bonder can cause a disaster that sometimes cannot be fixed. Another tip is to lay down thin plastics over your drop cloths and then apply the bonder. Any splashes and drops that come down will land on these and you can then roll these up and throw them away. This will help you from tracking bonder through the house. This extra effort will make you feel better about working on the project and will make the homeowner or contractor you’re working for grateful you showed such care for the property you’re working on. Neatness is a top priority when working with bonder.

If you have any other questions or comments about bonding, or a project you are working on and need assistance on, just drop me a line via the magazine, or visit with me at www.wconline.com on the bulletin board. I’m leaving comments on questions that are found there, as well.

Until next time, may your profits be high and your overhead be low! Thanks again for your letters! They are always appreciated!

Share This Story

Looking for a reprint of this article?
From high-res PDFs to custom plaques, order your copy today!

Robin Raymer, the "Plaster Man," is a veteran repair specialist, consultant and speaker on all aspects of the plaster trade. Robin is a 20-year veteran of the plastering trade and has produced a series of videos on the subject. Write to the Plaster Man c/o Walls & Ceilings, 2401 W. Big Beaver, Suite 700, Troy, Mich. 48084.

Recommended Content

JOIN TODAY
To unlock your recommendations.

Already have an account? Sign In

  • Abercrombie & Fitch

    EIFS in 2026: How Specialty Finishes Are Redefining Exterior Wall Systems

    As building codes, owner expectations, and design demands...
    Stucco/EIFS
    By: Regi Mendoza
  • proper air and vapor control

    From Energy Efficiency to Moisture Management: Why Air and Vapor Control Matter

    How proper air and vapor control within building...
    Building Envelope
    By: Benjamin Meyer AIA, LEED AP
  • Linear Metal Ceiling Beam Baffles

    Top 25 Ceiling Contractors of 2026

    Suspended ceilings demand precision, code compliance and...
    Ceilings
    By: John Wyatt and Tanja Kern
You must login or register in order to post a comment.

Report Abusive Comment

Manage My Account
  • eMagazine Subscription
  • Newsletters
  • Online Registration
  • Manage My Preferences
  • Subscription Customer Service

More Videos

Sponsored Content

Sponsored Content is a special paid section where industry companies provide high quality, objective, non-commercial content around topics of interest to the Walls & Ceilings audience. All Sponsored Content is supplied by the advertising company and any opinions expressed in this article are those of the author and not necessarily reflect the views of Walls & Ceilings or its parent company, BNP Media. Interested in participating in our Sponsored Content section? Contact your local rep!

close
  • medical professionals moving a patient on a stretcher through the halls of a medical building
    Sponsored byNational Gypsum Company

    What Does High Performance Mean When It Comes To Gypsum Boards?

Popular Stories

Linear Metal Ceiling Beam Baffles

Top 25 Ceiling Contractors of 2026

Wichita Biomedical Campus

Wichita Drywall Worker Dies After Scaffolding Fall

QXO Just Changed the Game-Here's What Contractors Are Asking

QXO Just Changed the Game-Here's What Contractors Are Asking

Less compound

Joint Compound Market to Reach $9.7B by 2033

Events

June 24, 2026

The Bright Side & Benefits of Designing with Integrated Lighting

Credits 1 AIA LU/HSW; 0.1 ICC CEU

This course will explore the pivotal role architects and lighting design play in creating safer, more sustainable spaces. Learn how to avoid common lighting mistakes and make informed decisions that create the best visual environment for occupants. 

January 1, 2030

Webinar Sponsorship Information

For webinar sponsorship information, visit www.bnpevents.com/webinars or email webinars@bnpmedia.com.

See our full library of webinars

View All Submit An Event

Products

2026 National Painting Cost Estimator

2026 National Painting Cost Estimator

See More Products

Related Articles

  • Plaster Man: Plaster Man's Q&A

    See More
  • Plaster Man's Q&A

    See More
  • Plaster Man's Q&A

    See More

Related Products

See More Products
  • plaster and drywall

    Plaster and Drywall Assemblies Manual

  • Builder's Guide to Stucco, Lath & Plaster

  • business.png

    How to Succeed With Your Own Construction Business

See More Products
×

Connect with the industry’s leading resource for unparalleled insights and education.

Join thousands of industry professionals today. Shouldn’t you know what they know?

JOIN NOW
  • RESOURCES
    • Advertise
    • Contact Us
    • Directories
    • Store
    • Want More
  • SIGN UP TODAY
    • Create Account
    • eMagazine
    • Newsletters
    • Customer Service
    • Manage Preferences
  • SERVICES
    • Marketing Services
    • Reprints
    • Market Research
    • List Rental
    • Survey/Respondent Access
  • STAY CONNECTED
    • LinkedIn
    • Facebook
    • Instagram
    • YouTube
    • X
  • PRIVACY
    • PRIVACY POLICY
    • TERMS & CONDITIONS
    • DO NOT SELL MY PERSONAL INFORMATION
    • PRIVACY REQUEST
    • ACCESSIBILITY

Copyright ©2026. All Rights Reserved BNP Media, Inc. and BNP Media II, LLC.

Design, CMS, Hosting & Web Development :: ePublishing