The finish line: Attachment of Signs
Over the years, I've had a number of companies as clients that make and install signs. Most of the signs are used for commercial applications (stores and hotels) and they are usually made of metal and plastic but occasionally they'll even make one out of EIFS. Either way, they sometimes ask me how to attach their signs to EIFS walls. If you've ever purchased a custom sign, they are not cheap, so it's not a dumb question. Here are some guidelines on how to deal with signs. These notes relate to design considerations, as well as installation issues.
First, it matters how big and heavy the sign is. In the simplest case, such as fist-sized lightweight plastic numbers for a house's street address, you can glue them on. Since most EIFS finishes are acrylic, an acrylic structural adhesive or even caulking will usually work. Note that some EIFS finishes have additives that make the surface hard to bond to, so try your caulking of choice first. If the letters or numbers use small screws, you can use them to hold the sign in place until the adhesive sets (it will get enough of a grip on the EIFS lamina to serve that purpose).
However, the easy way to attach house numbers (the way I did it at my place) was to use the butyl tape used for glazing. This sticky stuff come in rolls and has release paper between the layers. You just snip off little pieces, press the sticky side against the back of the letter, pull off the release tape and stick it to the wall. This type of tape is usually 1/4 to 1/2 inches wide and 1/16 to 1/8 inch thick. The thickness helps make up for the fact that a lot of letters are hollowed-out on the backside, thus the glue needs some thickness. By the way, carpet tape and the thick foam tapes used to stick small items to drywall don't work outside-they don't get a good initial grip on to the granular EIFS finish and the weather wears them out. Again, this simple adhesive approach only works with small, light objects.
Flush-mounted signs
Once you get bigger house address numbers, you need to go through the EIFS and into something structural behind it. This is because the EIFS lamina simply is not thick or strong enough to accept fasteners. I have seen people try to use pop rivets, self-tapping screws, nails, molly bolts and expansion anchors, and they just don't work.For EIFS that is already in place and for substrates that are structural and capable of getting a grip on a lag bolt (a cross between a hex head bolt and a wood screw), the following technique works:
- Using a spade-type wood boring bit (but this will ruin the bit), drill a hole just slightly larger than the outside diameter of a piece of PVC pipe that the bolt will just fit through. Drill through the EIFS until you touch the substrate.
- Remove the bit and insert a length of the PVC pipe. Place a mark on the pipe where it meets the surface of the EIFS. Note that this length will be greater than the thickness of the foam, due to the EIFS lamina thickness and the thickness of the attachment adhesive and/or drainage mat (if any).
- Remove the pipe and cut off a piece of PVC at the mark.
- Coat the pipe piece with caulking and slide it into the hole.
- Put a ring of caulking all around the perimeter of the hole on the EIFS finish.
- Run the lag bolt through the mounting hole of the object you are installing and cover it with caulking.
- Slip the bolt through the mounting hole of the sign and slip the bolt into the PVC pipe. Cinch down the bolt using a ratchet and socket.
Stand-off signs
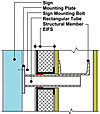
The above strategy is for an EIFS wall that is already in place and for mounting conditions where the contact point of the sign with the EIFS is flush. A different approach is needed when signs stand-off from the wall, such as those used at malls that come as a one-piece box and are suspended off the wall so access can be achieved from behind (to lamps, wiring, etc.). In this case, a bracket is needed for the sign to be fastened. A good solution is a rectangular tube that is attached to a structural member in the wall (such as a stud) and that has a mounting plate on the outside (as shown on page 68 in Picture 1).Tubes work good, as you can run electric wires through them, thereby avoiding putting another hole in the wall. You can use angles and channels too but they are more difficult to seal and install the EIFS around. Galvanized steel works well in areas subject to weather. Since whatever is behind the sign is not visible and there may be multiple penetrations by odd-shaped brackets (I-beams, for instance), the use of pre-cured silicone tape seals (which tend to look ugly if not carefully installed), applied to the face of the EIFS, is sometimes easier than trying to backwrap the EIFS.
In one case I was involved with, the client had a strip mall and had requirements for signs in terms of their size and general design. Each sign was supported on the ends by a bracket, and signs could be removed and replaced as the tenants changed, without leaving holes all over the EIFS. Some tenants had standardized signs that didn't line-up with the pre-installed mounting brackets but this was worked around by making an adjustable metal adapter that connected the sign to the bracket.
Other considerations
Signs often have electrical wiring and lamps in them. Some can produce a good bit of heat and can get hot enough to melt EPS foam in an EIFS. In this case, the lamps, transformers or whatever is producing the heat, needs to be isolated from the EIFS. This is done with either insulation or by leaving an air gap between the back of the sign and the EIFS.When you have a "sign" that is not one piece but rather a series of large letters or graphics, it's easier to mount the sign as a unit by attaching all the letters to a single subframe and to install the sign as one unit. This makes installation faster and reduces the number of potential water leak sources by reducing the number of penetrations through the EIFS. The problem with this approach is that it looks bad and often is unacceptable from a design standpoint.
For substrates that cannot get a good grip on a bolt, such as gypsum-based sheathings and for which the stud framing is hard to locate, molly bolts can be used for lightweight signs. They need to go all the way through the sheathing; don't try to have them open-up inside the EIFS foam insulation. If you use this approach, make sure the dead weight of the sign is fully supported: put a shelf angle at the base of the sign to hold the weight and use the bolts to stabilize the sign.
On some strip shopping malls there is a flat fascia that runs for hundreds of feet with dozens of signs on it. This area is often the outside, upper face of the covered walkway in front of the store entrances. I've seen the designer specify plywood instead of gyp board as the EIFS substrate for this fascia, so they can mount signs more easily using lag bolts as described above. Smart thinking.
I've seen people try to embed continuous horizontal or vertical wood nailers inside the EIFS foam layer as a way of providing a secure, hidden attachment point. The nailer goes all the way through the foam layer of the EIFS and the lamina goes over it. The concept is good but in reality cracks often occur where the EIFS lamina passes over the wood. So, I don't recommend it. Using embedded metal nailers (studs or channels) is worse, as they move more due to temperature change (tend to crack the EIFS lamina) but also act as thermal bridges, making their presence show up as ugly stripes on the wall.
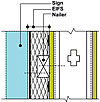
However, there is a variation on this embedded nailer technique that does work. This technique works best when you know where the sign will go, such as a lot of similar size signs in a row on a fascia. You can run long wood nailers horizontally from stud to stud but leave an inch or so of foam over the top of the nailer. This works even when you have a substrate that can't accept lag bolts, such as gypsum-based sheathings, as the nailer is attached to the studs, not the substrate. (Picture 2 on page 68 shows this technique.)
For outdoor signs, aerial critters sometimes want to sit on the tops of signs (electric signs are warm in the winter). This can cause staining of the EIFS due to varmint discharge. There's no real way around this and it's not an EIFS problem per se but sometimes a sloped flashing on the top (so they'd slide off) or using that nasty, prickly-looking tinsel-like stuff (sometimes called "bird spikes," available in colored plastic and metal), will keep them off and thus help keep the EIFS clean.
If you can stand off the sign from the EIFS (allow a 1/2 inch air gap), the tendency for rainwater (which is laden with dirt particles) sitting on top of the sign is reduced. This, in turn, reduces water run-off and thus staining of the EIFS.
When signs are removed, you'll often find that the color of the EIFS finish behind the sign is different than the area around the sign, due to fading. There also are often lots of holes from previous signs. This calls for patching and painting. One developer of strip shopping complexes puts a vertical aesthetic reveal in the EIFS at the break point between each tenant space. This gives some definition as to whose-space-is-whose but also allows for easy patching and painting, as there is a natural break on the façade that can be painted up to.
The issue of how to handle signage is sometimes an afterthought in the design-build process, especially in new retail buildings where the tenants are not even known yet. It's a good idea in the planning stage to alert the architect/engineer of this issue because EIFS is a bit different in terms of attaching things to, say, stucco.
A final thought: I've worked with the cell phone companies that kept running into issues with mounting antennas on EIFS buildings and did not know how to do it. The method of attachment is basically the same as for signage, namely: Connect something structural into the wall and seal all the penetrations.
Looking for a reprint of this article?
From high-res PDFs to custom plaques, order your copy today!


