The Plaster Man: Transformation Time!

This month I thought I’d include a recent project that turned out very well, and which, most importantly, made the homeowner happy as well. It was a nice transformation that was done to a home and I’ve included some pictures to go along with this discussion.
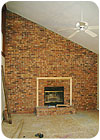
In photo #1 (above) notice a large brick wall in the living room area. The rest of the room is a sand-finish texture. It just so happened that I was doing plaster repairs to another part of the house where quite a bit of remodeling was going on in a bathroom and laundry room area. The contractor was thinking initially of putting drywall over the bricks. You can see in the picture that he had sectioned off the area directly around the fireplace for some tile or marble that would be on the fireplace front itself. But there was a lot of area to cover surrounding this.
I told him it would be no problem at all to match the texture in the rest of the room. So, that’s exactly what I did as follows:
Pre-filling the brick wall’s edges
PRE-FILLING
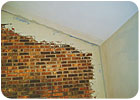
When the bricks were laid they came up only so far and then stopped about one inch shy of the board on the ceiling. This gap was covered up by a piece of trim that ran in an angle from the top of the ceiling all the way down to the other side. This was removed and had to be filled in. Along with this were both sides where the brick met the walls. This too had to be turned and filled in with mesh.The first step was to bond the brick so that the suction to the plaster I put over it would be slowed down. It also ensured a good bond to the brick. I rolled this on the wall and the edges of the two walls and the ceiling about a foot out as well. Photo # 2 shows the pre-filling in progress. I filled in the gap at the top with base coat and embedded heavy field mesh into it, with an inch or two turned onto the ceiling and also along each side. I feathered out the base coat along all edges to make it easier to blend the sand finish that would go over it.
Base coat over mesh covers the wall
BASE & MESH
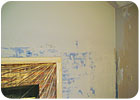
Once I had this mesh in place I ran a coat of base over the entire brick surface. I had pre-cut squares of field mesh about three feet square and stuck these right into the wet base. You can see how it worked in Photo #3. After I stuck the mesh in place I doubled back with a thicker coat over it.Now, I’ve done quite a few block-and-brick projects. Although using fiberglass mesh over the surface is not always necessary (as far as reinforcing it to prevent existing cracks from coming through again), I find that it makes covering the surfaces much easier. Often it takes a second coat of base, if mesh is not used, to cover the brick or block pattern that telegraphs through the material at times. The method I used here prevents that from happening.
TIMING
I was working on the other areas of the house doing crack and hole repairs while the base coat set up. I think it would be possible to do this project in a day, but I waited until the next day to do the sand finish work. I didn’t have any trouble with it being too dry. The bonder I applied before I did the base coat had sealed the brick pretty well, so when I started putting on the sand finish there was a ‘bounce back’ effect that occurred. In other words, the moisture from the sand finish I was applying had nowhere to go; it didn’t absorb into the surface of the brick. It simply went through the base coat and hit the brick and the moisture came back out again to the surface, giving me plenty of moisture to get an effective swirl finish out of it without too much effort.This is important to keep in mind, as going overboard would have been a totally different story. Fogging down the surface would have been required if plasterboard had been used. If you’ve ever tried to rub up the sand in texture with sponges on a dry surface, you know how important fogging the surface down is! Using a pump sprayer to do the fogging works very well.
The final sand & finish coat, working from the top down
FINISHING
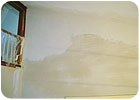
Photo #4 shows how I tackled the sand finish. I began on the ceiling and worked both wall edges down as I came down the wall. I’ve seen some plasterers do the wall first and then cut in the ceiling and side walls and swirl these out, but it can get messy and blobs of sand finish can mess up the wall you finished first. I always like to work down from the top.This had the visual effect of doubling the size of the room. I find this is the case in many situations where a wall had divided two rooms and is removed, opening the whole area up in such an effective way. It’s nice, because your eye is not “stopped” by an obstruction. In this example with the brick wall, your eye just went to the end of the room and it was so dark and stunted. Making it sand textured like the rest of the room gave it a softer tone all the way around and your eye traveled around the room instead of dead-ending at the wall.
PRICING
When figuring the amount to charge, I kept in mind that I was already on the project. This saved some time of setting up, as I was already there. I could also accomplish other repairs while doing this work simultaneously, again saving time.Going at the rate of $750 per day, which I use as a rule of thumb for a day’s work, I figured I could give a break and charge $600 per day for the work, materials and labor. Surprisingly, not that much material was required to do the work, as it was not a lot of fill; more a skim coating of an existing surface. I did throw in “hazard pay” for work over 10 feet high, which amounted to $400. That was to cover working off a scaffold, which made it riskier than low work and also slowed the project down. For doing the turning and blending on the ceiling and walls I figured in another $95.00. So the total was $1,695.00 for the entire brick wall project.
If you have questions, comments, or a picture of your latest project, feel free to send them to me. They’re always welcome. The winner of the Plaster Man/ Walls & Ceilings t-shirt this month is Bob Souter, Sioux Falls, South Dakota. If you’d like to enter, simply send your name and address to me through this magazine or e-mail it to: robin@plasterzone.com. One entry per month please. Until next time, ‘Plaster On!’
Looking for a reprint of this article?
From high-res PDFs to custom plaques, order your copy today!


