The Evolution of a Room: The Coffered Ceiling

We would hang and tape drywall, as much as we could, as fast as we could. We did quality work but like a lot of drywall companies, we thought the money was in the quantity of work done and not so much in the quality. I had little time or interest in doing anything that would slow up the work unless the money was better. But most of my help lacked the skills to do anything out of the ordinary, at least in a timely manner. I have to admit that after 20 years (eight years ago) of this production work, I wanted to work smarter-not harder. I started thinking that maybe doing the smaller, more complicated jobs could be better money-makers and maybe physically easier.
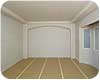
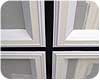
This
was the original idea for the drywall work in the room. You can see that it is
not a plain-looking job. I set the drywall back on the outside corners because
I am using a large bullnose bead that needs to have the drywall set back to
accommodate the radius of the bead.
Drywall tools, materials, and techniques have changed a lot over the years.
When I put on clinics, I often mention that 20 years ago I could go into a drywall supply yard and order a box of cornerbead and the guy would come back with a box of them. Nowadays, ordering bead can be more complicated than ordering a cup of coffee at one of those specialty stores. The cornerbead of the past was just made for corner protection. Nowadays, much more is offered.
Cornerbead has become my specialty. I use them to decorate those plain surfaces between doors and windows.

Two-by-fours
are ripped, glued and screwed along the snapped lines and then the first layer
of
drywall is attached.
I wanted to build a decorative ceiling. The contractor had built an arch over the area where the TV was going to be and had designed an arch over the window area. A lowered soffit area had been built around the perimeter of the ceiling. The homeowners had decided on a 1½-inch bullnose cornerbead on all the outside corners, so right from the start I knew that this customer was a good candidate for some of my decorative drywall ideas.

A second layer of drywall
is attached to the edges. The tray bead I used is made for a 2½ inch drop.
The general contractor on this job was someone who I have worked for a lot over the years. He told me he was very busy, so the idea of me doing some of the work that his finish crew would do was appealing. There was some extra money allocated for some custom work. So, as long as I made the customer happy, kept the job on schedule, and also made his company look good, he was willing to present our ideas to the customer.
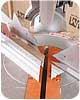
For
the cleanest cuts with vinyl bead, I like to use a miter saw. I used a fine
blade and turned it backwards so it was less likely to grab the bead as it was
cut. I also used a piece of 1/2-inch drywall to lift the edge up so that the
bead could be cut at the proper angle.
I don’t get a lot of opportunities to build a coffered ceiling. I have drywalled and beaded a few before but this was my first chance to actually build the ceiling.
We decided on the layout and snapped the lines. I started out by attaching ripped 2x4s along the inside of each chalked line. If one of the wood strips was not located where I could screw it to a ceiling joist, then I would use some drywall adhesive on the back and hold it in place with temporary screws while the adhesive did its job. This lowered the ceiling 1½ inches. I then attached a strip of 1/2-inch drywall over the framework.
I planned on using a tray ceiling product that creates a real nice angled edge. To do this, I needed to lower the ceiling 2½ inches so I had to attach another piece of 1/2-inch drywall, about 2 inches wide to each edge. The second layer did not cover the entire width because I planned on covering the 1/2-inch thick edge along the inside of the lowered area with another bead that would create the look we decided on.
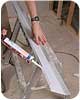
When
building a coffered ceiling, you are essentially building a network of boxes. I
was concerned about having all the edges line up nice and straight, so I
snapped lines along each edge and simply attached the beads to these lines.
I then used spray adhesive on the drywall along where the leg of the EZ Tray would attach and applied adhesive caulk to the edge of the EZ Tray that was in contact with the raised part of the ceiling. The spray adhesive-combined with staples-held the bead firmly in place. The leg along the bottom would be concealed with joint compound later and the edge against the ceiling would be caulked later to create a perfect blend of the edges into the upper ceiling and the lowered area.
Another example of how the project evolved was the owner’s friend owned a cabinet shop and he brought over some mahogany colored plastic laminate. It seemed like a good idea, so I ripped it to width and glued it in place using the spray adhesive.
I then fit each piece of the decorative L bead into place along the center of the beam. The cuts were made with a miter saw just like you would do when cutting wood trim. I used the spray adhesive and staples to attach the bead up against the edge of the EZ Tray.
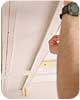
Applying
adhesive caulk to the edge of EZ Tray.
There was not much mudding to do, just the 2-inch wide strip where the edge of the tray ceiling bead meets the edge of the decorative bead. So, the carpenter builds the ceiling, cuts and attaches the bead and then the taper applies the compound. The painter can then apply the caulk and do the painting.
When all the taping and sanding was done, the surfaces were cleaned with a damp sponge to remove any dust and compound on the finished surfaces. Any slight gaps could now be caulked with a high-quality, paintable caulk. The caulk was also applied to the edges of the bead that fit against the ceiling and the laminate edge along the center. When the caulk was dry, the ceiling was ready for priming.
You
can see the area that needs to be concealed with joint compound. It is an area
only about 2 inches wide. It will take two coats of compound to conceal the
edges.
As I worked on this space, I started to worry about how this room would sound. A few years ago, I remodeled my dining room. It had a popcorn-texture ceiling, stone fireplace, knotty pine on the walls and carpet on the floors. The rough surfaces prevented the sound waves from bouncing around too much in the room. When I remodeled the room, I did away with most of these surfaces and now the sound bounces around a lot more and is actually amplified. It’s not a very comfortable room on the ears when a loud group is eating or visiting. I didn’t want this to happen in this home theater room.
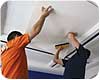
I found a glass textile
wall covering that is sound absorbing. Just cut and stick to the ceiling like
hanging wallpaper. The main difference was that I used joint compound as the
adhesive instead of wallpaper paste.
The project turned out great and the homeowners were pleased. Good luck on your next project and be sure to suggest any creative ideas you have to the customer. It will flex your artistic muscles and perhaps earn you a little extra money. W&C
Looking for a reprint of this article?
From high-res PDFs to custom plaques, order your copy today!


