Channel on Up
A remodeling application in Northern Michigan utilizes a new furring product made for concrete or block walls in basements.
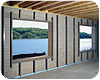
We visited a job in the Upper Peninsula of Michigan, where insulation from the cold is important and used a furring product designed for poured concrete or block walls found in basements and commercial structures. EcoStud products are flanged furring channels and Z clips produced from 100 percent recycled plastic. The products do not rot, rust or support mold or mildew growth, are termite resistant and provide a thermal break.
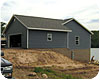
The project we visited is a 1,500-square-foot Ranch-style house with a full walk-out basement, and it was furred out with the flanged furring channels and then insulated with spray-applied, closed-cell foam.
Developer Lyon Construction and General Contractor Sleeman Construction promote energy efficient houses designed to reduce heating costs during the long winter common to the area. The insulation contractor Superior Polymer Products developed the plastic stud concept to insulate basements and Sleeman Construction was one of the early adopters.
The products are simple and will be familiar to contractors: the flanged furring channel looks like a steel stud with an integrated nailing strip. Where they part ways with convention is the lack of a top or bottom plate. Instead, the channel is directly attached to the wall using glue and a track nailer; concrete screws are typically used around openings to minimize the cracking potential of a nail installed with gas or powder actuated tools.
“We tried to use spray foam but it simply didn’t work as the expansion of the foam wreaked havoc,” says Ken Keranen, general manager of Superior Polymer Products.
Another local contractor and block producer Dan Lorenzetti, of Superior Block, suggested using 2 inch by 4 inch rigid foam to fill the corner. The idea worked so well it was immediately adopted. Now, all inside and outside corners are furred-out using the technique.
In place of a bottom plate, 2 inch by 2 inch rips of rigid foam are glued directly to the floor leaving a 1½ inch gap between the base of the wall and the foam. This approach allows the closed cell foam to act as a radon block at the control joint and when it continues up into the band joist it creates a 100 percent airtight basement.
“If you are using bat or blown-in insulation, we’d recommend using a 3½ inch wide rip of foam at the base,” says Keranen.
The top plate-if used-is a 2-inch by 2-inch or 2-inch by 4-inch pine rip attached to the floor joists.
“Because we want to integrate our insulation with the band joist, we typically eliminate the top plate, but in the end we do what the customer wants,” says Keranen.
The installation time of the flanged furring channel for the 1,500 square foot L shaped basement with two large windows and a door was three hours with two installers.
Power tools used during the install included a table saw, chop saw, small hammer drill, portable drill and a track nailer. Other tools included a level, tape measure, caulking gun.
 “Prior
to arriving at the job the guys prep by cutting all the corner and base foam at
the shop, it increases the speed of the install significantly and makes the
transport to the job much easier” says Keranen. He further explains that they
follow a standard sequence when arriving at a project: “The leader takes the
corner foam rips and immediately completes the corners while the helper is
unloading the rest of the tools and stocking the job. This simplifies the
layout work for the project as a tape is drawn out from the corners and the
marks are made on the wall, not the floor. Once the layout work is done the
lead man leaves the helper to attach the flanged furring channels to the wall
using a 7-foot level and the track nailer while the leader moves on to the
openings. Whoever finishes first takes the flooring foam rips and glues them in
place. This approach keeps the team moving at all times without being in each
others way.”
“Prior
to arriving at the job the guys prep by cutting all the corner and base foam at
the shop, it increases the speed of the install significantly and makes the
transport to the job much easier” says Keranen. He further explains that they
follow a standard sequence when arriving at a project: “The leader takes the
corner foam rips and immediately completes the corners while the helper is
unloading the rest of the tools and stocking the job. This simplifies the
layout work for the project as a tape is drawn out from the corners and the
marks are made on the wall, not the floor. Once the layout work is done the
lead man leaves the helper to attach the flanged furring channels to the wall
using a 7-foot level and the track nailer while the leader moves on to the
openings. Whoever finishes first takes the flooring foam rips and glues them in
place. This approach keeps the team moving at all times without being in each
others way.”
We visited a job in the Upper Peninsula of Michigan, where insulation from the cold is important and used a furring product designed for poured concrete or block walls found in basements and commercial structures. EcoStud products are flanged furring channels and Z clips produced from 100 percent recycled plastic. The products do not rot, rust or support mold or mildew growth, are termite resistant and provide a thermal break.
The project we visited is a 1,500-square-foot Ranch-style house with a full walk-out basement, and it was furred out with the flanged furring channels and then insulated with spray-applied, closed-cell foam.
Developer Lyon Construction and General Contractor Sleeman Construction promote energy efficient houses designed to reduce heating costs during the long winter common to the area. The insulation contractor Superior Polymer Products developed the plastic stud concept to insulate basements and Sleeman Construction was one of the early adopters.
The products are simple and will be familiar to contractors: the flanged furring channel looks like a steel stud with an integrated nailing strip. Where they part ways with convention is the lack of a top or bottom plate. Instead, the channel is directly attached to the wall using glue and a track nailer; concrete screws are typically used around openings to minimize the cracking potential of a nail installed with gas or powder actuated tools.
Corner Shop
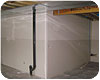
Corners are furred using rigid foam insulation along with the flanged furring channels. The approach to corners using rigid foam, sized at 2 inches by 4 inches, was developed the hard way.“We tried to use spray foam but it simply didn’t work as the expansion of the foam wreaked havoc,” says Ken Keranen, general manager of Superior Polymer Products.
Another local contractor and block producer Dan Lorenzetti, of Superior Block, suggested using 2 inch by 4 inch rigid foam to fill the corner. The idea worked so well it was immediately adopted. Now, all inside and outside corners are furred-out using the technique.
In place of a bottom plate, 2 inch by 2 inch rips of rigid foam are glued directly to the floor leaving a 1½ inch gap between the base of the wall and the foam. This approach allows the closed cell foam to act as a radon block at the control joint and when it continues up into the band joist it creates a 100 percent airtight basement.
“If you are using bat or blown-in insulation, we’d recommend using a 3½ inch wide rip of foam at the base,” says Keranen.
The top plate-if used-is a 2-inch by 2-inch or 2-inch by 4-inch pine rip attached to the floor joists.
“Because we want to integrate our insulation with the band joist, we typically eliminate the top plate, but in the end we do what the customer wants,” says Keranen.
Furring Openings
Another feature of the system is the method of furring openings. Around windows and doors, the frames are made using the flanged furring channel with the flange ripped off on a table saw. Joints are made using L-brackets fabricated on-site using off-cuts with the base cut off. These are attached using 1/2-inch needle point screws. To complete the furring around the windows and doors the flange is cut off the channels using a table saw, a 1/2-inch hole is drilled in the face of the channels on 18 inch centers and the channel is held in position while using a hammer drill to make the first 3/16-inch hole for the concrete screw. After the first hole is drilled, the piece is attached with a screw to hold position while drilling the balance of the holes. Once the remaining holes are drilled the holding screw was removed, the piece is removed to apply the adhesive and it is repositioned and made fast with screws in all the previously drilled holes.The installation time of the flanged furring channel for the 1,500 square foot L shaped basement with two large windows and a door was three hours with two installers.
Power tools used during the install included a table saw, chop saw, small hammer drill, portable drill and a track nailer. Other tools included a level, tape measure, caulking gun.
Looking for a reprint of this article?
From high-res PDFs to custom plaques, order your copy today!


