Waterproof Work Out
Showers in group settings, such as fitness clubs and college residences, are subject to much more demanding conditions than a typical residential shower. These conditions must be understood and accounted for when the shower area is being built. It is essential to create a waterproof and vaportight area that will prevent moisture damage and mold growth. It is also important to build a space that can be effectively maintained while minimizing downtime when the showers are not available for use.
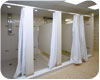
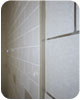
Moisture damage was evident in the unsightly discoloration on the white carrara slabs in the old showers.
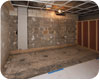
The fi rst step in reconstruction was to frame the partition walls and install the grid for the new dropped ceiling.
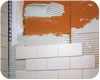
Spot-bonding the panels to the block walls allows them to be set with straight and precisely aligned corners.
Strip Down
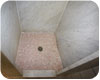
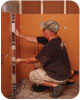
To start the project, the walls were stripped down to the concrete block, the mortar beds and copper pans were removed from the floors, and the plaster coating and steel stringers were removed from the ceilings. All of the concrete block walls were left intact and partition walls were framed with 2x4s to complete the shell for the new space. The next step was to install tracks for a dropped ceiling. The installed tracks served as the upper border for the new white subway tiles that were to be installed on the walls.Local contractor Charles Eckard decided to install a waterproof building panel system on the walls as part of the overall waterproofing system for the showers. The wall panels would be tied in with a sheet-applied waterproofing membrane on the floor and integrated bonding flange drains to create an environment that was completely waterproof and vaportight before the tiles were installed. In the past, when he needed to build a waterproof wall over concrete block, Eckard would spot mount concrete board to the block walls, fill the gaps and seams in the concrete board and then cover the concrete board with a sheet-applied bonded waterproof membrane. By using the new building panel system he would eliminate an entire step from the previous method.
PVC trim profi les in the corners accommodate expansion and contraction of the tiles in these critical transition areas.
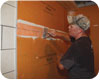
(This picture and the next) The waterproofi ng membrane is set over a seam where two building panels meet so no moisture can penetrate the surface.
Benefits
Eckard recommends using the largest panels possible (most are available in 4-feet-by-8-feet sheets) to minimize the number of seams. The primary benefits of using the building panel system were eliminating the need to waterproof the wall, and the overall ease and speed of installation because of the light weight of the panels. Using the larger panels allows the crew to maximize these benefits.Hygiene is also an important consideration in any shower and the needs are even greater in higher traffic areas like dorm showers. To make the shower areas easier to clean and to reduce maintenance, trim profiles were installed at wall-to-wall intersections and at wall-to-floor transitions instead of using sealant. The profiles provide an easy-to-clean, low maintenance surface. They also help protect tiles and grout by accommodating expansion and contraction of the tile at these transitions.
The outside edge of the tiled shower wall is protected using a metal trim profi le that is anchored behind the building panel on the wall.
In the end, the goals of the project were achieved, and in less time than this type of project would normally require. The new showers are clean, attractive and will be very easy to maintain. The tiles provide a durable, hygienic, and decorative covering that makes the room look great. But it’s the structure underneath that will make these showers long-lasting and economical to maintain.
Looking for a reprint of this article?
From high-res PDFs to custom plaques, order your copy today!


