The Finish Line: Adhesives vs. Mechanical Fasteners
When I do technical seminars about EIFS, one of
the most frequent questions is, “Should I use adhesives or mechanical fasteners
(screws plus washers), or even both, to attach the foam insulation to the
wall?” The answer depends on a number of factors, and sometimes you have no
choice about which to use.
When I do technical seminars about EIFS, one of the most frequent questions is, “Should I use adhesives or mechanical fasteners (screws plus washers), or even both, to attach the foam insulation to the wall?” The answer depends on a number of factors, and sometimes you have no choice about which to use. Here is some information about attachment methods for your arsenal of information to pass on to customers.
The physical condition of the substrate also matters. Crumbling, old masonry needs to be brought into serviceable condition for adhesives or mechanical fasteners to be used. Especially with retrofit EIFS applications on existing buildings, sometimes tests of various mechanical fastener screws are needed to find one that consistently gets a good grip.
On gypsum-based sheathing substrates, the mechanical fasteners must go into the stud framing. The gypsum board is not strong enough to resist the pulling force of a screw drilled into it. This means the contractor must know where the studs are located. Putting longs screws through thick foam and “hitting” the stud face will also require care.
Use a “base layer” of thin, flat foam that is mechanically fastened and then glue the foam shape on top of the base layer.
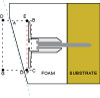
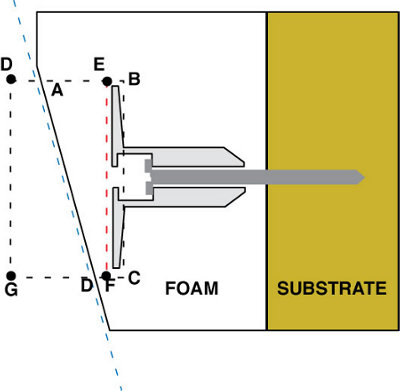
Pre-drill a “core pocket” using a drill hole saw (the pocket being perpendicular to the substrate). The fastener washer is then fit into the hole and screwed into the substrate. Then a round “plug” of EPS is placed in the hole, and sanded to follow the contour of the foam shape. (See Drawing 1 that shows the pocket and fastener.)
Mechanical fasteners hold on to the wall by a clamping action. Thus, the washer must be screwed down tight for the fastener to properly hold the foam to the wall. This means that there is less control in adjusting the outside face of the foam than there is with adhesives.
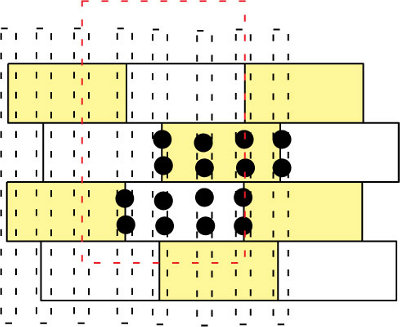
One issue that comes up is when the fasteners are placed between the ends of foam boards and hold down two pieces of foam at once. The problem is that this approach makes the insulation board edges line up with the seams between the sheathing substrate pieces. This can induce cracking. Drawing 2 shows how this occurs.
The fastener washer is not flush with the outside face of the foam, so the rasping, at the fastener, can’t occur. Solution: reset the fastener slightly to get in below the surface.
Fasteners are sometimes used between two insulation boards, and hold down both boards at their edges. Compounding this is the fact that the board-to-board interface is one of the main areas where offsets can occur in the plane of the insulation’s outer face. Thus, this area needs to be rasped. It’s hard to do with the washer in the way. Solution: same as above-seat the fastener just below the insulation surface.
When I do technical seminars about EIFS, one of the most frequent questions is, “Should I use adhesives or mechanical fasteners (screws plus washers), or even both, to attach the foam insulation to the wall?” The answer depends on a number of factors, and sometimes you have no choice about which to use. Here is some information about attachment methods for your arsenal of information to pass on to customers.
Substrate vs. Actual Wall Surface
With adhesives, the outermost surface of the substrate is the key. A concrete wall covered by a waterproofing coating is not a concrete wall in terms of the substrate-the adhesive bonds to the waterproofing, which is not a suitable surface but raw concrete is fine. Although it’s sometimes possible to find an adhesive that will stick to paint and other common surface coatings, it is risky. Even when test patches of adhesive are done first-and which indicate a good bond-there have been many cases over the years of what appeared to be a well-attached EIFS coming off the wall in huge sheets. In cases like this, it’s best to clean the coating off the wall down to the bare substrate, or use mechanical fasteners. If you can’t get the old coating off the wall, you can attach metal lath to the wall with shot fasteners and use adhesives to glue the foam to the lath.The physical condition of the substrate also matters. Crumbling, old masonry needs to be brought into serviceable condition for adhesives or mechanical fasteners to be used. Especially with retrofit EIFS applications on existing buildings, sometimes tests of various mechanical fastener screws are needed to find one that consistently gets a good grip.
Strength of Attachment
On sound, strong substrates, adhesives give a stronger bond. This can make a difference on buildings in high wind areas, such as where hurricanes occur and on tall buildings. Because the adhesive spreads out the wind forces that are trying to pull off the (weak) foam over a large area, the stresses in the foam are much lower. With mechanical fasteners, the high “point loads” at the washers limit the strength of attachment.On gypsum-based sheathing substrates, the mechanical fasteners must go into the stud framing. The gypsum board is not strong enough to resist the pulling force of a screw drilled into it. This means the contractor must know where the studs are located. Putting longs screws through thick foam and “hitting” the stud face will also require care.
The recessed fastener “pocket” is made with a
hole saw and is bounded by A-B-C-D. The plug is a cylindrical piece of EPS that
friction-fits into the hole, and is bounded by points E-F-G-H. The outside face
of the plug is trimmed to follow the shape of the foam shape, along the dotted
blue diagonal line.
Foam Shapes
Foam shapes can present a special problem for mechanical fasteners. The problem arises because the outside of the foam shape is often curved or beveled, so the fastener washer won’t be flush if driven straight in. There are a couple of ways around this:Use a “base layer” of thin, flat foam that is mechanically fastened and then glue the foam shape on top of the base layer.
Pre-drill a “core pocket” using a drill hole saw (the pocket being perpendicular to the substrate). The fastener washer is then fit into the hole and screwed into the substrate. Then a round “plug” of EPS is placed in the hole, and sanded to follow the contour of the foam shape. (See Drawing 1 that shows the pocket and fastener.)
Adjustments for Wall Flatness
Adhesives have the advantage that the thickness of the adhesive layer, about 1/8 inch, allows for taking into account minor irregularities in the substrate-such as a wavy substrate. This allows the front edges of the foam pieces to line up.Mechanical fasteners hold on to the wall by a clamping action. Thus, the washer must be screwed down tight for the fastener to properly hold the foam to the wall. This means that there is less control in adjusting the outside face of the foam than there is with adhesives.
The dotted vertical rectangles are the studs at
16 inches on center. The white and yellow rectangles are the foam boards, in
the typical “running bond” pattern. The large, red dotted rectangle is a
4-foot-by-8-foot piece of sheathing. Note how it is offset but also still lines
up (unfortunately) with the foam board edges. The black dots are the fastener
washers.
Fastener Patterns
There are a myriad of fastener patterns when using mechanical fasteners. This is especially true if the substrate is “screwable”-such as plywood or OSB; you can put them in wherever you want. But with gypsum board substrates, the fastener must go into the stud, which means the options for patterns are more limited. Generally six to nine fasteners per 2-feet-by-4-feet insulation board are used.One issue that comes up is when the fasteners are placed between the ends of foam boards and hold down two pieces of foam at once. The problem is that this approach makes the insulation board edges line up with the seams between the sheathing substrate pieces. This can induce cracking. Drawing 2 shows how this occurs.
Rasping
Making the outside surface of the EIFS insulation boards co-planar by sanding (aka rasping) is standard procedure when installing EIFS. It’s easy enough to do with adhesively attached insulation. With mechanically attached insulation there can be some issues, such as:The fastener washer is not flush with the outside face of the foam, so the rasping, at the fastener, can’t occur. Solution: reset the fastener slightly to get in below the surface.
Fasteners are sometimes used between two insulation boards, and hold down both boards at their edges. Compounding this is the fact that the board-to-board interface is one of the main areas where offsets can occur in the plane of the insulation’s outer face. Thus, this area needs to be rasped. It’s hard to do with the washer in the way. Solution: same as above-seat the fastener just below the insulation surface.
Deep-Seating the Fasteners
It’s a mistake to drive the fasteners deep into the foam. This creates a pocket, which means the basecoat is thicker at the pocket and this can induce cracking. The washer should be just below the surface of the foam and should be “spotted” with a skim coat of basecoat adhesive (no mesh), and after drying, the basecoat (adhesive plus mesh) is installed.Fastener Materials and Design
There are countless washers that you’d think could be used to attach EIFS foam boards, and there are. But most aren’t suitable. Metal ones corrode; plastic is good. Small diameter washers don’t get enough grip on the foam. The pocket for the screw needs to be recessed so the screw is not close to the surface, where it can rust. The surface of the fastener needs to be perforated (not smooth) so the basecoat adhesive can “key” into the fastener surface. In a nutshell, use one of the many fasteners specifically designed for EIFS.Fasteners Through the Reinforcing Mesh
Occasionally, someone has the bright idea of running the mechanical fasteners through the reinforcing mesh of the basecoat and then applying the basecoat adhesive. True, it provides much more of a secure attachment but you’ll also get cracks at the fastener head. Also, the basecoat always needs to be applied to the foam first-to get a good bond-in lieu of pushing the basecoat adhesive through the mesh.EIFS with Drainage
Some EIFS with drainage systems use mechanical fasteners. If you do so, you will pierce the water resistive barrier behind the foam. This is equivalent to drilling holes in the wall of a swimming pool. Seriously, the WRB does tend to seal around the screw, and the amount of water that will likely ever get into the drainage cavity borders on being zero. So, it’s not much of a real concern. But adhesively-attached EIFS with drainage, that are bonded to continuous, wet-applied WRB films, do not have this problem.Thermal Bridging
When an object, such as a fastener, penetrates an insulation material, it creates a separate path for heat flow, bypassing the insulation layer. This results in the outside surface of the insulation being at a different temperature than the surrounding insulation. This in turn makes the coating turn a slightly different color, due to the pickup of ambient moisture (humidity). This is called thermal bridging. This aesthetic problem generally does no physical harm to the wall (cracks, etc.); it is usually temporary but can look bad. There’s not much that can be done about this and adhesively attached systems do not have this problem.Cost
EIFS contractors tell me that they generally prefer to attach the foam using adhesives. It’s less expensive (about 15 percent on average) and faster.Use Adhesive or Fasteners?
As you can see, there are a number of factors governing what type of attachment method to use. In some cases, you have no choice-like with a substrate surface that can’t be bonded to. And then there are people that don’t trust adhesives and insist on using mechanical fasteners because they see them as being more predictable. Finally, there are paranoid designers who use both at the same time. The trouble with this “two-method” approach is that the adhesive provides a stronger, more rigid attachment, and thus takes virtually all the wind-load before the fasteners can contribute their strength. Once the adhesive lets go, the fasteners can’t withstand the load either, and let go. This two-method approach does have some uses, though. For instance, if the quality of the adhesive bond to a substrate is questionable, then the mechanical fasteners can provide a backup system.Looking for a reprint of this article?
From high-res PDFs to custom plaques, order your copy today!


