How-to Set up a Traditional Plaster Shop


There are many plasterers out there who do a variety of what is called “flatwork” or “solid plaster-working,” such as stucco, traditional lime or gypsum plaster, veneer work or various decorative plasters. Many are intrigued by plaster mouldings but might be intimidated by the work itself, visually looking so different or by the thought of setting up a plaster shop, not knowing what it entails or how much it might cost. My experience has been that plasterers take to fibrous moldings work; both shop production and field installation, very quickly. Regarding setting up a plaster shop and getting tooled up for the field, plaster is really one of the most inexpensive trades to get started in.
For about $10,000 and a little sweat equity any plasterer can be up and running. Compared to other trades, such as smith or millwork, that’s a bargain, a fraction of the cost easily covered by one or two projects. The really good news is that plaster has been steadily making a comeback in contemporary architectural specification. The market demand is there, the work is profitable and enjoyable. At this point we just need more individual plaster shops servicing local communities. I’ll pull back the veil of secrecy and show at least how I’ve set up a plaster shop for myself and others.
Tables
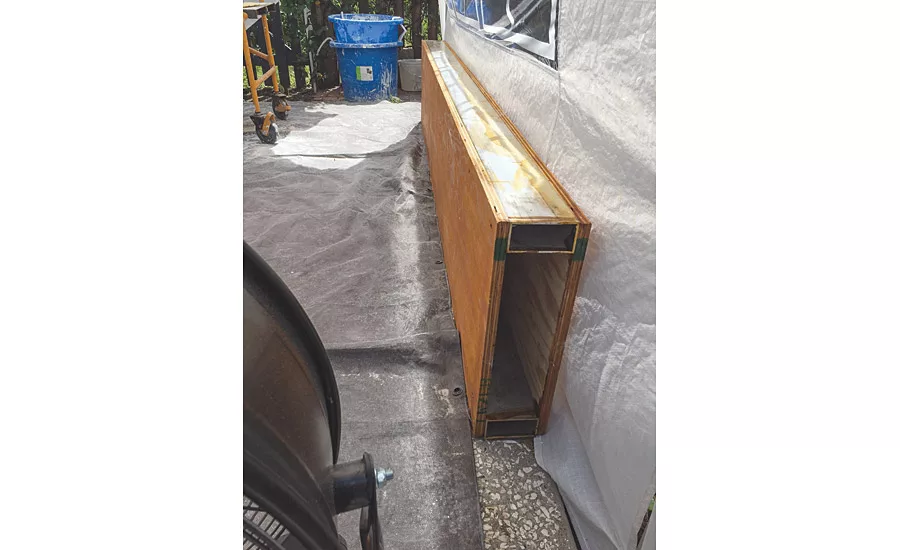
This is where the sweat equity comes in. Build your own tables from off the shelf lumber from the local stockist. Your main table will be for straight runs. I like a thin, long table that’s about 2-feet by 10-feet—if you have the space. It should be between 37- and 39-inches high depending on your height. High production shops might invest in a granite top. I’ve found that with a bit of maintenance a high quality, smooth surface 3/4-inch plywood doubled up and sealed with several coats of shellac performs admirably. This running table is your bread and butter; the important thing is that it is dead flat. Don’t shy away from using 2X4s to create a solid frame underneath. I always like to incorporate a shelf into all my tables down below for quick access to supplies used for repeated work on that table. For my running rail I use extruded storefront aluminum, 1-inch by 4-inch. It’s dead straight and won’t wear out or warp, exactly what you’ll depend on to keep your run mouldings straight.
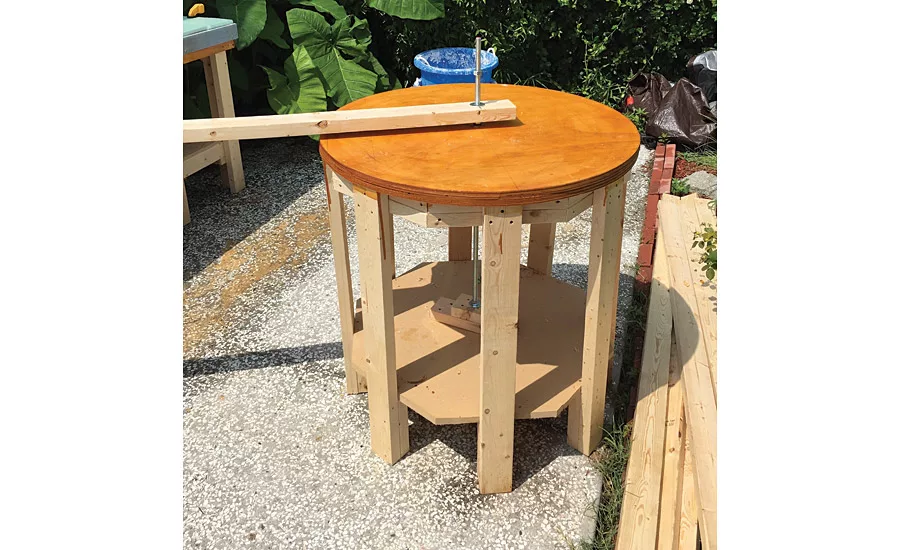
The next important table is your circular for radial work. I’ve found an 18-inch radius top works well for most things. Build it to the same exact height as your running table (actually build all your tables to the same height). This will allow you to attach an arm to it when you have large radial runs. The circular table acts as the pivot point, the running table is the surface. You don’t want the table moving when you’re running a large radius, so build it sturdy with a heavy duty shelf below that can hold some sand if you need the extra weight to keep it steady. I like to use a 5/8-inch or 3/4-inch threaded rod right down the middle secured to the table with nuts and washers in three places. Again, you don’t want either your table to shift or your pivot point to deflect when you’re in the middle of running your radial piece. Depending on the size of the piece, I’ll use either 2-by-4-inch or 3/4-inch plywood for my radial arm securing it between combinations of nuts and washers above and below.
The last table you’ll need is really just a workbench that I use for quick sketches and to mount equipment such as a scroll saw and vise. It doesn’t need to be nearly as sturdy. I’ll suggest a couple of additional items to construct. First, build a fence as you’ll need a flat vertical surface to run against for certain pieces such as cornices. Again, you want this surface dead flat and straight. I attach 3/4-inch plywood to two pieces of 2-by-4-inch extruded storefront aluminum the length of my running table. Height can change based on your needs, I find 18-inches will service most needs. Finally, use a large mitre box for trimming your mouldings with one 90 degree slot and two 45 degree slots going in both directions.
Shop Tools, Equipment and Supplies
Yes, you’ll need eye, ear, hand safety equipment and basic tools like tape measures, screwdrivers, wrenches etc. However, rather than exhaustively going through every possible tool or supply you’ll need, I’ll focus on ones more particular to plaster shop work.
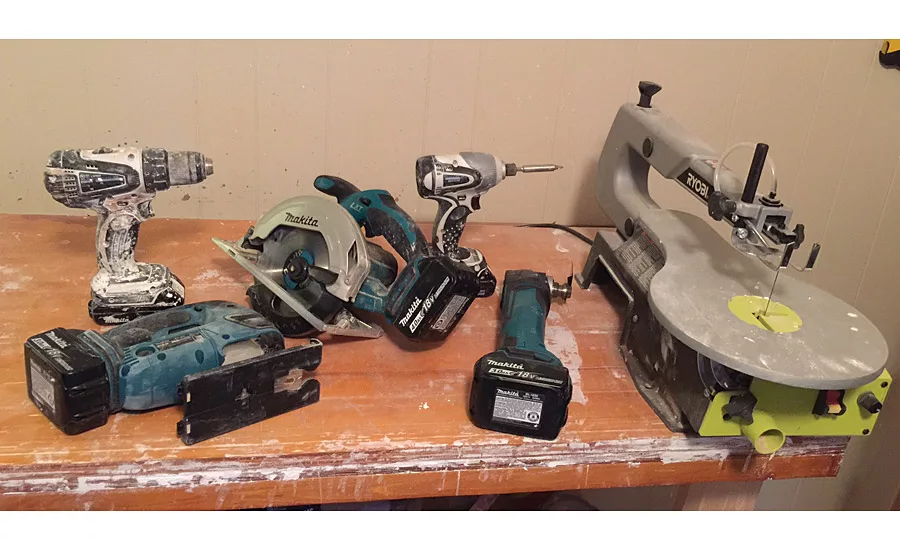
There is a bit of carpentry work involved in plaster mouldings. I have the following cordless power tools from Makita: circular saw, drill and impact driver set, multi-tool and jigsaw. The impact driver is very important for working with plaster, especially for affixing in the field. Same goes for the variable speed multi-tool, it makes delicate cuts in plaster, slicing through like butter without risk of fracture. Add to these enough batteries to go around and a variety of clamps in various sizes.
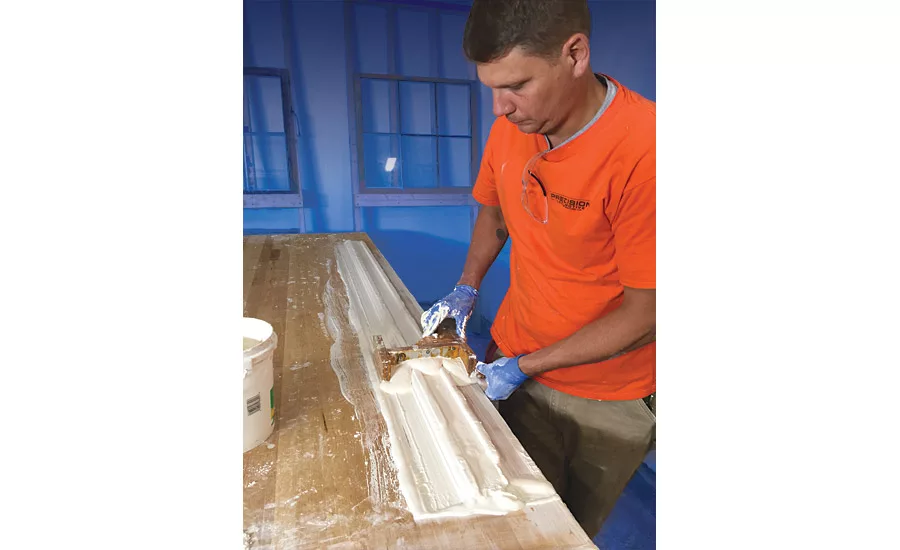
For constructing my running molds, I use smooth quality 3/4-inch plywood. For the actual knife a traditional method is to use zinc, layout the pattern with a scribe and punch, bending till breaking with pliers and cutting with aviation snips respectively. I quickly switched to thin sheet aluminum. I find it still cuts and files easily but it is more damage resistant and won’t bend under pressure when running. I get the .032 thickness online from Metals Depot.
To cut, I use the inexpensive Ryobi scroll saw available at Home Depot. I tried a couple of other more expensive scroll saws and went back. It uses 5-inch pin blades and can rotate up to 45 degrees for kerfing the plywood stock backing up your profile.
A good supply of coarse blades for kerfing the plywood come with the saw and is available from Home Depot and other stockists. For the finer blades for delicate cutting of the aluminum I buy online from Olson. Their 25 TPI regular is recommended and I’ll admit it will turn on a dime. The 18.5 TPI skip blade is a bit sturdier and is my workhorse unless the profile has a lot of detail. A word of advice when cutting sheet aluminum is to reduce vibration by backing the aluminum up with some 1/4-inch MDF. Finally, you want a set of files and a vise to hold the aluminum for cleaning up your knife.
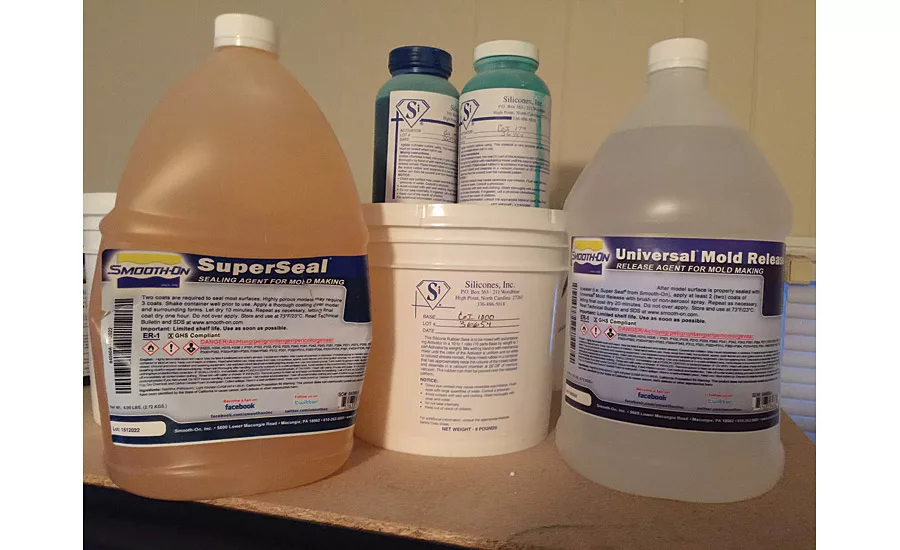
For tables, plaster cores and other utilitarian uses I use shellac as a sealer and oil soap for a release agent. For plaster models I use Superseal and Universal Mould Release available from Reynolds. I’ll use urethane rubbers, particularly if I have a mold that needs to be very rigid, having a shore hardness of 50 or higher also available from Reynolds, distributors of Smooth-On. However, I prefer the slightly more expensive silicone rubbers working in Charleston, S.C., as urethanes have some issues in humid environments. They can go up to a shore hardness of about 40, which is firm enough for most applications before they start to lose tear strength. I get mine from Silicones Inc. Added expense but nice options to have eventually for removing bubbles from rubber are an adjustable speed, 120 volt vibrating unit available from Vibco that can be mounted to the underside of your running table (this is also great for plaster castings) and a vacuum setup for silicone rubbers (Smooth-On has good specifications). You’ll also want to have clean translucent measuring buckets and paddles set aside exclusively for mixing rubbers.
Some additional miscellaneous materials for the shop:
- Burlap
- Half-inch mixing drill
- Drywall screws; assorted sizes 1- to 3-inch
- Half-inch foam for crating
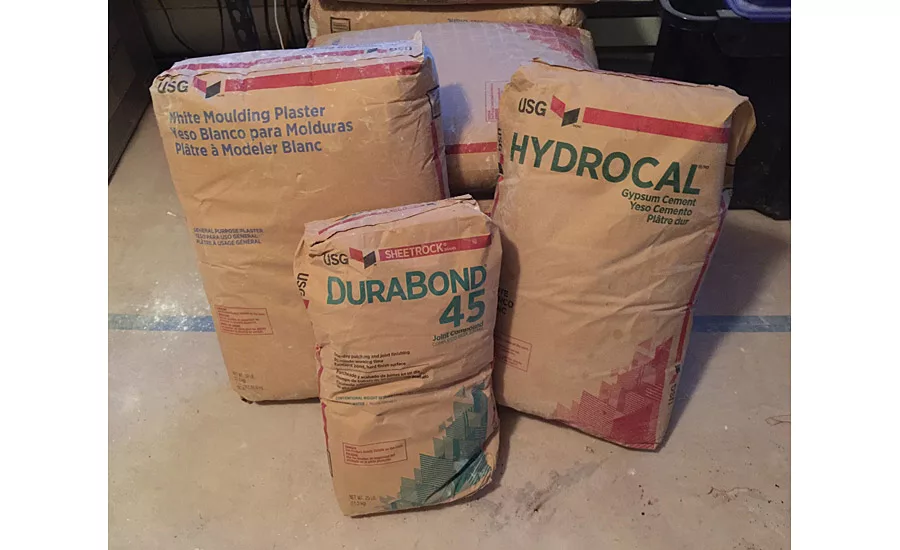
Last but not least, I should mention plaster. I prefer USG No. 1 Moulding Plaster for running and will combine it with or exclusively use USG Hydrocal for casting. Georgia Pacific and National Gypsum are the other molding plaster producers.
Field Tools, Equipment and Supplies
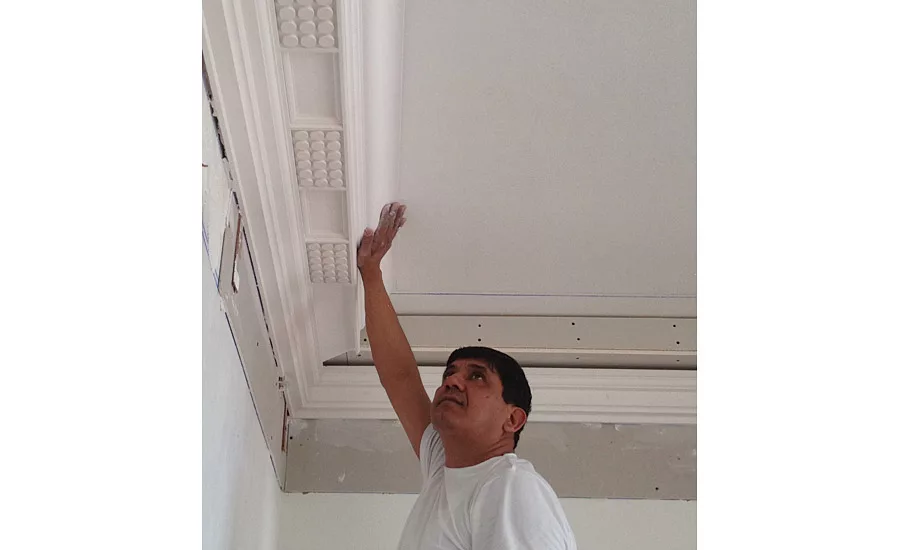
Some of the tools of course carry over from the shop, particularly the drill and impact driver and your mitre box. For layout, you’ll want a good quality 6-foot mason’s level, a chalk line and eventually a quality self-leveling rotary laser. Let the contractor provide you with a centerline for the room and a vertical benchmark and plan on installing your mouldings straight and level unless otherwise directed in writing. Ceilings may have dips and walls may have bows that will force your mouldings to depart from the specified face of finish. It is the architect’s, and ultimately the contractor’s, responsibility to give you direction in writing as to how they want the mouldings installed. Just because you’re a plasterer, flanking is not your automatic responsibility any more than it would be for a millwork installer.
Usually precast mouldings are first dry fit; a minimum nominal 1/8-inch off the wall and 1/4-inch separation between mouldings is sufficient for a good bond. Cut plywood scrap can be used for temporary support underneath and a variety of shims to get the piece situated just right. I use both the typical wedge shaped cedar and pine shims as well as the flat drywall paper shims. Keep a number of countersinks on hand, using the drill to pre-drill for attaching the molding with drywall screws of appropriate length using the impact driver. For permanent affixing of the mouldings with plaster you’ll want to have a trough or large tub onsite so you can thoroughly hydrate the mouldings. I use a blend of molding plaster and USG Durabond 90 to affix the mouldings. Durabond (please note USG Easy Sand is not an appropriate substitute) is already formulated to adhere to drywall without bonding agent and contains retarder giving you time to work.
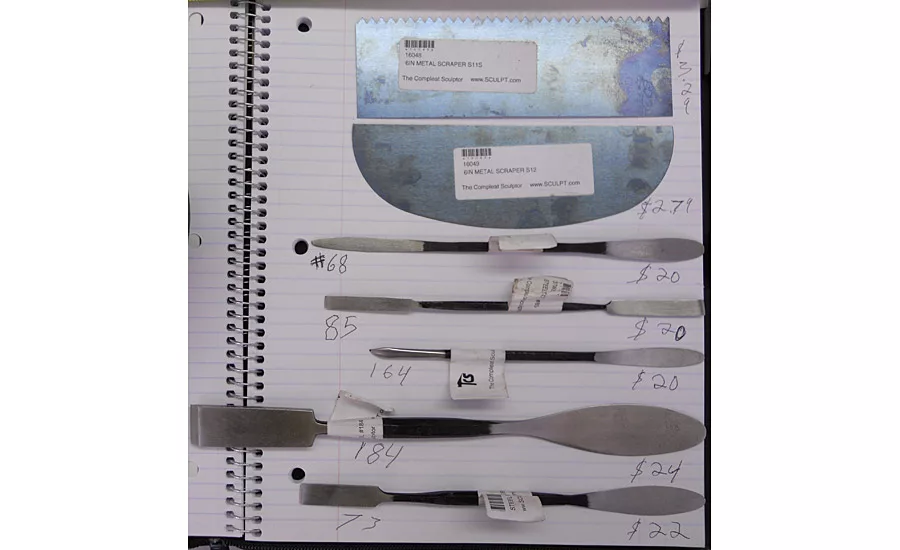
For pointing, filling the joints, edges and any dings in plaster, you’ll want to have a spray bottle for repeatedly hydrating the surface and a set of ornamental tools, available from The Compleat Sculptor. I usually will use my molding plaster and Durabond mix for the initial pointing and finish up with just molding plaster. The addition of plaster retarder will give your pure molding plaster mix more time. The Compleat Sculptor also carries USG Plaster Retarder.
Finally, I’ll mention a word about painting. The plaster installer is primarily responsible for providing good geometry and a finish ready for flat paint. Plaster is no different than millwork in this regard. For higher sheens the painter has the same responsibility and essentially the same process for surface preparation.
Looking for a reprint of this article?
From high-res PDFs to custom plaques, order your copy today!


