Plaster Man
Seal and Deal
I wanted to talk this time around about two different topics.

Delamination station
Sealing: The first topic is about sealing a wall or ceiling. I've gotten quite a few questions about staining that has occurred with surfaces, as well as delamination that has occurred in some instances. Let's talk about how these problems can be avoided or at least lessened. I included a few pictures to help illustrate the points made here. If you look at photo #1, this is a typical ceiling with three-coat plaster applied. It was damaged by water and some plaster has fallen off, exposing the wood lath.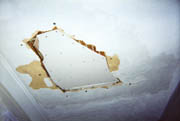
Staining: Of course when a ceiling has a stain, a homeowner will usually use a stain blocking primer/sealer over the area to solve the problem. But when doing the initial plaster repair, often this problem of stains seeping through and showing in the repaired area can be addressed when setting up the area for the repair. To accomplish this, I use a combination of two products: A sealer and a bonder.
With older homes, there is a lot that can be sitting above the plaster, including dust and dirt. When water damage occurs, this dirt and debris comes seeping down through the ceiling area along with the water. This water can also soak the wood lath and cause it to give off elements that can potentially cause staining. The water may dry up but the minerals from all this gunk remain on or close to the surface. If plaster is applied straight over it, the obvious is going to happen-staining. So a sealer helps to do just that: Seal the areas in question. Now, when the plaster is put over it, the chances of staining showing through the new repaired area are lessened. And there is a bigger benefit that can come from this, which I'll mention in a minute. However, the sealer is only the first step for prepping the area.
Chemical testing
Bonder: Latex-based bonders have hit the market in the past 20 years or so and they have helped big time. Plaster, unlike joint compound and spackles, will not stick to painted surfaces and it also is not designed to stick over a sealer. So, something must be put over the sealer and that is the bonding agent. This gives it something to bond to. This may seem like ground we've covered before but judging from the letters and frantic e-mails I get from time to time about delaminating, I thought we should bring it up again.Nothing is worse than plastering and coming back and finding that the materials put on an area are peeling or falling off in sheets; not a good situation at all. And that is what will happen if a sealer is used but not followed by a bonder. This is the case even when the surface is rough, such as a sand finished or textured wall or ceiling (the only exception would be where the surface had not been painted and it's raw plaster). The physical grab it gets on such a surface that is painted is not enough-it needs the chemical bond, as well as to really stick.
Dealing: As professionals working in peoples' homes, it's important to stay on good terms throughout the project if at all possible. This matter of sealers and bonders is quite important of course to keep people happy. And it's good to keep communication open with the customer. This is especially the case when doing repair work. When it comes to water damage or where you are going to resurface over an old surface, it's vital to mention often and early the fact that staining could occur.
Imagine for a moment being in the shoes of the homeowner. He may know nothing about what I have mentioned in this article. Suddenly, the next morning the area that was brand new and pure white the night before now is yellow all around the edges of where you repaired, or worse yet, entirely covered with brown stain marks. If you haven't prepared them for this real possibility, making things good again can take everything you ever learned in the sales department. And this is where the bigger benefit comes in. You are setting yourself up for success by letting the homeowner in on what may happen.
A simple mention that the moisture from the plaster can cause staining on an older surface will do and that using a primer/sealer about a week after the repair is done will do the trick. Dealing openly with them will go a long way and save you headaches later on. Callbacks to do a painting job are not what you want to deal with.
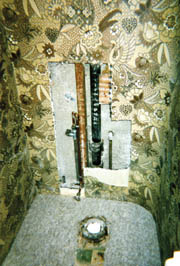
This point on dealing openly with clients also has to do with a subject that can be touchy if not handled well right from the get go. This has to do with wallpaper.
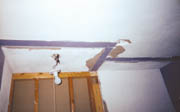
Photos #4 and #5 show the before and after shots of a repaired area. What you'll notice especially is that the wallpaper has to be cut back considerably. And sometimes when removing it there is the chance of damaging the adjoining walls wallpaper, as well. Thinking the homeowner won't mind is something that can't be taken for granted. Let them know the approximate amount of paper that may have to be removed in the area to be repaired and make sure it's straight who is going to be removing it. This may seem a small point but I've run into paper that was so hard to remove it took five times longer to get it off the wall then it did to do the repair.

The winner of the Walls & Ceilings/Plaster Man T-shirt is Dean Kasten. (Look for an upcoming interview with this long-time plasterer who has a rich history in the trade.) To enter the T-shirt contest, just write me in care of this magazine or e-mail your name to robin@plasterzone.com. Until next time, Plaster On!
Looking for a reprint of this article?
From high-res PDFs to custom plaques, order your copy today!


