Plaster Man
Basecoat Basics (Part 1)

I thought it was worthwhile to review and expand our discussion of this subject. It just so happens I was recently involved with a new construction project, so this works out well.
Let's talk about the types of finishes that have been used and are used today. In photo 1 you'll see what I would call true full-coat plastering! I was visiting a home of a friend in Pennsylvania a few months back and was impressed with the thickness of these walls! Both exterior and interior walls were about 2 feet thick and were limestone with plaster over them. The outside was a stucco finish and the interior walls were more a two-coat, very rough wood-float finish. It appeared they used one coat to fill in over the stone wall and then fill it out further with a thick brown coat, which was then finished with a wood float. There was an intersection right outside this house with heavy traffic all day. You would have thought it was a library inside, as the sounds from outside were totally blocked out. This is just an example of how many homes, especially those on the East Coast, were plastered in the 1700s and 1800s.
For most homes during the 1800s, wood lath was covered with three coats of plaster. It ranged from 3/8 inch thick to more than an inch thick. This is what most refer to as true full-coat plaster. Later 3/8-inch board was used that measured 16 inches by 48 inches. This gypsum-based board was covered with 3/8 inch of plaster. Again, this is considered full-coat plaster.
This type of plaster has now been replaced with veneer coat plaster. This is done over 5/8-inch plaster board on the ceilings, and 1/2-inch board on the walls. Veneer coat is usually about 1/8 inch thick. It covers the entire sheet, adding sound deadening qualities, and also makes the surface more abuse--and wear--resistant than ordinary drywall finishes. The corner beads that are used are also a higher quality than those used with drywall applications and tend to bond with the plaster much better, rendering a more solid outside corner. Another great feature is that plaster requires no sanding. Most room applications can be done in quick succession (basecoat followed by a textured or smooth finish), with a room or several rooms being completed in one day.
Set up
Let's look at some pictures now. In photo 2 we're looking at a room that is about ready to plaster. Outside corners around the fireplace have heavy plaster beads installed, as well as around the perimeter of the tray ceiling. Windows and the fireplace are covered in plastic. This particular house was knockdown textured throughout, including ceilings. With this in mind, and to keep the workplace neat and clean, plastics were put down on the floor. It makes quite an impression on the contractor when they are pulled up at the end of the job, leaving a clean floor for those who follow (much time has been spent scraping particle board floors, getting the big chunks off, but still leaving behind some irritating crumbs and pieces).You'll also notice that self-adhesive mesh tape has been put on the side walls and in the corners. All seams are covered with this mesh. One rule of thumb on installing this mesh is to apply the vertical (up and down) strips first on all wall areas. The horizontal (pieces going across) strips are then applied. These help hold down the ends of the vertical strips as you begin plastering. Where the wall meets the ceiling, this mesh is applied all the way around the room. The last pieces to be applied are the strips in the inside corners. These pieces hold down all ends meeting in the inside corners.
Once the mesh tape and all beads are applied it's time for plastering. Depending on the type of finish and quality level of the job, the plaster can be applied in a one-coat or two-coat system. In our example here, we are looking at a two-coat system being used. I chose USG's Diamond, as I find it to be a nice spreading basecoat. My father-in-law is a Kal-Kote man, by National Gypsum, so you make the choice on what type you want to use. All are combinations of gypsum and sand, and make a nice hard base over which to finish. It's also what's comfortable and familiar to you when it comes to what you want to mix in.
Mixing
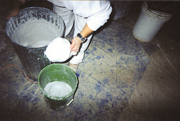
Photo 3 shows a fellow plasterer's preference, a 20-gallon trash can. Recently, I have found 10.5- and 12-gallon buckets that are great for mixing one 79.9 pound bag of basecoat. (I'm planning on putting a link to U.S. Can on my Web site, www.Plasterzone.com, so that you can get one or more of these cool buckets.)Some contractors like to work out of a 5-gallon bucket, so it's whatever works for you. Just make sure that it is a solid, non-leaking container that is strong enough to handle the weight of the material and also the mixing motion, as this creates quite a bit of pressure on the container.
When it comes to basecoat, the mix consistency is pretty much up to what each plasterer likes. The bags of material come in a pre-mix and, as I mentioned, are in a 79.9-pound bag. I recently came in on a project to work with a crew and the laborer had a piece of PVC pipe that had markings on it for each size batch. He'd fill the barrel to one particular water line for a one-, two-, or three-bag mix. I thought that was a good idea. It not only took away guess work, but ensured a consistent mix each time.
Dipping
I like the top of a bleach bottle or vinegar bottle for a scoop. It's flexible and works very well. Depending on the amount of plasterers on the job, the laborer may dip directly to the crew or he may have a board and stand. We frequently use 15-pound tar paper on a piece of 3-foot-by-3-foot-by-1/2-inch-thick plywood. There are two types of stands that can be used--one for the ground crew and one that is for the workers on stilts.Tools
Using a pan and knife to do basecoat would be labor intensive. That's why I encourage anyone who is a drywall finisher to take the leap and learn how to use a hawk and trowel. It's a bit awkward at first, but that's how I felt about typing when I first learned. Now I thank my typing teacher every time I sit down to write this column! I have tried many types of hawks, but when it comes to trowels, I can't say enough good things about the Marshalltown "Broken-in" trowels. I prefer the stainless steel type. They come in several widths so again it would be up to the type of feel you like and how much material you put on at a time. The nicest thing about this trowel is that it doesn't leave lines in the mud that you have to go back and smooth out. As far as angle trowels, I recommend a "butterfly" as some call it, that's again picked to your liking. There is one on the market that I like that is adjustable so it fits inside angles and also splayed angles. It's good to have a scrub brush for cleaning off your tools. Another important tool that you will see demonstrated in the pictures in next months column is a well-worn cedar shingle.So many homes today are a combination of different finishes--the older section is usually plaster and the newer section is drywall. When they are damaged, homeowners and insurance companies want to put them back as original, as I've mentioned in past articles. And one other factor: the efforts of many to educate the public about plastering are having an effect. Homeowners are learning that there is more available now in the way of finishes for homes. So to keep up to date and on the cutting edge, it's good to think of adding veneer coat plastering to what your company can offer.
In the next column, we'll discuss the actual techniques of running on the basecoat. Keep your letters and questions coming! They're appreciated. See you back here next month!
Looking for a reprint of this article?
From high-res PDFs to custom plaques, order your copy today!


