Walls & Ceilings logo
search
cart
facebook twitter linkedin youtube youtube Spotify Podcasts Apple Podcasts Spotify Podcasts Apple Podcasts
  • Sign In
  • Create Account
  • Sign Out
  • My Account
Walls & Ceilings logo
  • NEWS
  • TOPICS
    • Drywall
    • Stucco/EIFS
    • Ceilings
    • Steel Framing
    • Fireproofing
    • Interior Plaster
    • Building Envelope
    • Insulation
    • Technology
    • Interior
    • Exterior
    • Women In Construction
  • COLUMNS
    • Up Front
    • All Things Gypsum
    • Art & Craft of Plastering
    • Stucco Stop
    • Steel Deal
    • Industry Voices
  • PRODUCTS
    • Buzz Guide
  • EVENTS
    • Industry Events
    • Webinars
    • BUILD Expo
  • MEDIA
    • Videos
    • Podcasts
    • Photo Galleries
    • BUILD26 Videos
    • Take our Quiz!
    • Infographics
  • EXCLUSIVE
    • Newsletters
    • Top 50 Contractors
    • Contractor of the Year
    • State of the Industry
    • W&C Store
    • Market Research
    • CEUs
    • Sponsor Insights
    • Custom Content & Marketing Services
  • DIRECTORY
  • EMAGAZINE
    • eMagazine
    • Advertise
    • Archive Issues
  • SIGN UP!
Columns

Plaster Man
Basecoat Basics (Part 2)

By Robin Raymer
March 4, 2002
Robin's second part in the series.

First, the mesh tape is covered with a coat of basecoat and second pre-filling the corner bead.


Stan Shaw cutting back the basecoat on the upper bead work.
Last month, we covered some of the basics of setting up a home to get ready for veneer coat plastering. Let's talk about some of the techniques in applying the first coat, the basecoat.

One method of filling in the bottom of the wall.

Top and bottom

One very effective way of tackling a new home with veneer coat plaster is with a three-person crew--one laborer and two plasterers.

When two plasterers are working together in a room that has 8-foot ceilings, the work is usually divided between the top and bottom sections. The top person does the ceiling and down to the top of the windows all the way around the room, with the bottom person doing from there down to the floor. Some crews work together, all in one room and knock the whole thing out at once. Others have the top person running on in one room, with the bottom person doing bottoms in an adjoining room. When they get their work done, they simply switch rooms, thus completing two rooms at a time. Some top persons work on stilts, others use rolling scaffolds or ladders.

The real question is how good is the top person? If he loses a lot of basecoat while he plasters, there are going to be a lot of splatter on the wall areas below as it hits the floor. If this is the case, it's best to have the bottom person follow up after the top person is done. This way he covers over any splatters as he completes the bottom area. If the top person is skilled, both workers can complete a room together or the bottom person can complete the bottoms ahead of them and move on to the next area.

How plaster can be used to fill in those less than perfect areas.

Plastering steps

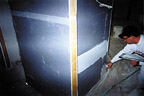
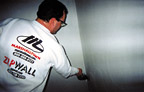
Let's look at some pictures to see some tips on actual application. In photo #1 you'll notice two techniques that prove helpful as a wall area is plastered. First, the mesh tape is covered with a coat of basecoat. This holds the mesh in place and also ensures that enough plaster is covering the tapes so that they do not telegraph through and become visible later because of a lack of material over them (this is a vital point). I've seen homes where plasterers, to save a few bucks, "burn" the basecoat on in a very thin layer. This action raises the seams and all of them show through the finished product. The second thing you'll notice is I am pre-filling the corner bead. I do this because it often requires a thicker fill of basecoat, and when the bead is filled the first time, it has a tendency to shrink slightly as the board absorbs some of the moisture out of it. So I run my beads ahead of time, then complete the wall, ending up at the bead again and putting another coat over the area I had pre-filled.


Stan using a rubber angle float for the angles in the tray area.
Last month, I mentioned that a cedar shingle is used, and in photo #2 you'll see Stan Shaw (owner of Stan Shaw Plastering--29 years in the business) using it to cut back the basecoat on the upper bead work. If used right after a bead is filled out, this works really well. Keep the shingle wet and clean and hold it almost parallel with the bead, using a sliding motion in the direction of the bead. When doing corner beads, start at the bottom and work your way to the top.

This cleans the beads and creates a space for the finish coat to fill. This type of technique is used where the plaster will be painted or where the beads will show when all work is complete. I have seen some styles where the beads are overfilled and the texture is actually used to cover the beads. The only problem with this is that plaster left on the beads will easily pop off if hit with any force. That's why I prefer to clean the beads back and leave the covering of them to the painters!


Plaster Man using a corner trowel.
Photo #3 shows one method of filling in the bottom of the wall. You can go back and forth, or if you prefer (and this is the way my father-in-law would insist you do it, since he doesn't believe in plasterers getting down on their knees to do the bottom), load up your trowel and start at the bottom of the wall, bending at your waist, and bring the stroke straight up the wall.


One way of doing the top section of a room.
In photo #4, see how plaster can be used to fill in those less than perfect areas (a homeowner who hung his own home recently came to me and asked if I could fill in 2-inch gaps!). Hammer holes, space between sheets (not 2 inches), splayed angles that are not going to be trowel cut but that will be rounded, all are areas that can be pre-filled ahead.

Keeping the area neat and square where joining on with the next batch.
Photo #5 shows Stan using a rubber angle float for the angles in the tray area. Photo #6 shows me using a corner trowel. Some plasterers like to run each angle as they go. Others use a complete batch of basecoat, then run their angles at the end. The only hazard to this method is that if the basecoat starts setting up unexpectedly, it can be a challenge to get back and run all the angles. I've seen many a corner that has a wicky-doodle in it because someone didn't have time to smooth it out with the corner trowel. Always double check all corners before the batch has set up, especially when working a room and several closets or small rooms at once. It's easy to miss one!

And one more tip: Remember that if a batch does start setting, there is a certain order of priority that should be followed. Getting the wall or ceiling smoothed out and complete as possible is number one, including running all corners. For the laborer, getting the barrel cleaned out is of utmost concern. Some race around looking for bags to put the basecoat into. Sometimes, there's just enough time to dip it out onto the floor (another good reason to cover the area with plastic). Tools can be cleaned after everything is said and done. For tools, the mixing paddle and the barrel for that matter, WD-40 works great. It makes cleaning much easier. At the end of the day it is good to spray everything down with it.


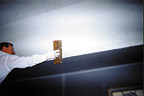
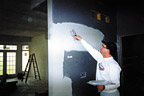
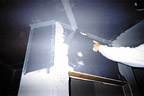
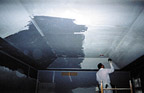
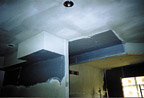
In photo #7 you can see one way of doing the top section of a room. Stan is working off of a rolling scaffold. He pre-filled the mesh tape, bead and also the angles in the tray, then went back and filled these out again when he covered the entire area with base. He completed a section as he went, to ensures everything was ready to finish when he was done with that area. Photo #8 shows an area that we were working on and it brings up a question that some have asked: What do you do if you run out of basecoat? Good question! Sometimes you plan on doing one room or an entire area and there is not enough material.

The simple answer is: mix more! The real question is how do you blend in one batch to another? There are two methods I've found work well. First, if the basecoat you've run on has not set up, you can join on to it pretty easy without any build-up between old and new. If the basecoat is set up, you'll have to watch overlaps as you finish the area.


Notice in photo #8 that we tried to keep the area neat and square where we would join on with the next batch. One tip is to use a wet sponge to blend the new basecoat in where it joins the areas that are set up. This is important if these areas are going to be sand swirled. It's difficult to hide these overlap lines if sand finishing the same day.

This raises another question that's been asked: How much area should be basecoated at a time? The answer again depends on the style and methods each plaster crew uses.

Some like to brown coat until 10 a.m. or noon, then double back and finish that area the same day. Some brown coat the entire house and then do the finish coat. The advantage of finishing the same day is that you use the moisture that's in the wall or ceiling to good effect. Since the surface is somewhat wet, the finish spreads easier and therefore less material is needed. Those who basecoat a house straight through will often fog down the walls they plan on finishing to put moisture back. This works pretty well if the fogging is done consistently over the area.

I realize this doesn't cover everything about veneer basecoat but I hope it helped you see that this could very well be a system you could learn pretty quickly and do a good job on. If you have any questions, let me know. There was such a large amount of interest in this subject that we have putting together a new video called "Basecoat Basics." I haven?t seen anything like it on the market, so I thought it would be good to have a video that actually showed these techniques being done. Check out my Web site for more information (www.Plasterzone.com).

Next time we?ll talk about veneer coat finishing systems and how to profit from them. Thanks again for your letters and keep in touch!

Share This Story

Looking for a reprint of this article?
From high-res PDFs to custom plaques, order your copy today!

Robin Raymer, the "Plaster Man," is a veteran repair specialist, consultant and speaker on all aspects of the plaster trade. Robin is a 20-year veteran of the plastering trade and has produced a series of videos on the subject. Write to the Plaster Man c/o Walls & Ceilings, 2401 W. Big Beaver, Suite 700, Troy, Mich. 48084.

Recommended Content

JOIN TODAY
To unlock your recommendations.

Already have an account? Sign In

  • Abercrombie & Fitch

    EIFS in 2026: How Specialty Finishes Are Redefining Exterior Wall Systems

    As building codes, owner expectations, and design demands...
    Stucco/EIFS
    By: Regi Mendoza
  • proper air and vapor control

    From Energy Efficiency to Moisture Management: Why Air and Vapor Control Matter

    How proper air and vapor control within building...
    Building Envelope
    By: Benjamin Meyer AIA, LEED AP
  • Linear Metal Ceiling Beam Baffles

    Top 25 Ceiling Contractors of 2026

    Suspended ceilings demand precision, code compliance and...
    Ceilings
    By: John Wyatt and Tanja Kern
You must login or register in order to post a comment.

Report Abusive Comment

Manage My Account
  • eMagazine Subscription
  • Newsletters
  • Online Registration
  • Manage My Preferences
  • Subscription Customer Service

More Videos

Sponsored Content

Sponsored Content is a special paid section where industry companies provide high quality, objective, non-commercial content around topics of interest to the Walls & Ceilings audience. All Sponsored Content is supplied by the advertising company and any opinions expressed in this article are those of the author and not necessarily reflect the views of Walls & Ceilings or its parent company, BNP Media. Interested in participating in our Sponsored Content section? Contact your local rep!

close
  • medical professionals moving a patient on a stretcher through the halls of a medical building
    Sponsored byNational Gypsum Company

    What Does High Performance Mean When It Comes To Gypsum Boards?

Popular Stories

Linear Metal Ceiling Beam Baffles

Top 25 Ceiling Contractors of 2026

Wichita Biomedical Campus

Wichita Drywall Worker Dies After Scaffolding Fall

QXO Just Changed the Game-Here's What Contractors Are Asking

QXO Just Changed the Game-Here's What Contractors Are Asking

Less compound

Joint Compound Market to Reach $9.7B by 2033

Events

June 24, 2026

The Bright Side & Benefits of Designing with Integrated Lighting

Credits 1 AIA LU/HSW; 0.1 ICC CEU

This course will explore the pivotal role architects and lighting design play in creating safer, more sustainable spaces. Learn how to avoid common lighting mistakes and make informed decisions that create the best visual environment for occupants. 

January 1, 2030

Webinar Sponsorship Information

For webinar sponsorship information, visit www.bnpevents.com/webinars or email webinars@bnpmedia.com.

See our full library of webinars

View All Submit An Event

Products

2026 National Painting Cost Estimator

2026 National Painting Cost Estimator

See More Products

Related Articles

  • Plaster Man
    Basecoat Basics (Part 1)

    See More
  • The Plaster Man: The Trip Out West, Part 2

    See More
  • Plaster Man: Estimating (Part 2)

    See More

Related Products

See More Products
  • plaster and drywall

    Plaster and Drywall Assemblies Manual

  • Builder's Guide to Stucco, Lath & Plaster

See More Products

Events

View AllSubmit An Event
  • June 8, 2026

    Texas Lathing and Plastering Contractors Association (TLPCA) Annual Convention and Trade Show

    The TLPCA Annual Convention and Trade Show will be held at the Horseshoe Bay Resort. As in year’s past, the Annual Convention & Trade Show will offer meetings, receptions, a golf tournament, an exhibitor’s trade show, an educational program, an Annual Design Awards Competition, spouses program, awards banquet, dinners and entertainment.
View AllSubmit An Event
×

Connect with the industry’s leading resource for unparalleled insights and education.

Join thousands of industry professionals today. Shouldn’t you know what they know?

JOIN NOW
  • RESOURCES
    • Advertise
    • Contact Us
    • Directories
    • Store
    • Want More
  • SIGN UP TODAY
    • Create Account
    • eMagazine
    • Newsletters
    • Customer Service
    • Manage Preferences
  • SERVICES
    • Marketing Services
    • Reprints
    • Market Research
    • List Rental
    • Survey/Respondent Access
  • STAY CONNECTED
    • LinkedIn
    • Facebook
    • Instagram
    • YouTube
    • X
  • PRIVACY
    • PRIVACY POLICY
    • TERMS & CONDITIONS
    • DO NOT SELL MY PERSONAL INFORMATION
    • PRIVACY REQUEST
    • ACCESSIBILITY

Copyright ©2026. All Rights Reserved BNP Media, Inc. and BNP Media II, LLC.

Design, CMS, Hosting & Web Development :: ePublishing