Walls & Ceilings logo
search
cart
facebook twitter linkedin youtube youtube Spotify Podcasts Apple Podcasts Spotify Podcasts Apple Podcasts
  • Sign In
  • Create Account
  • Sign Out
  • My Account
Walls & Ceilings logo
  • NEWS
  • TOPICS
    • Drywall
    • Stucco/EIFS
    • Ceilings
    • Steel Framing
    • Fireproofing
    • Interior Plaster
    • Building Envelope
    • Insulation
    • Technology
    • Interior
    • Exterior
    • Women In Construction
  • COLUMNS
    • Up Front
    • All Things Gypsum
    • Art & Craft of Plastering
    • Stucco Stop
    • Steel Deal
    • Industry Voices
  • PRODUCTS
    • Buzz Guide
  • EVENTS
    • Industry Events
    • Webinars
    • BUILD Expo
  • MEDIA
    • Videos
    • Podcasts
    • Photo Galleries
    • BUILD26 Videos
    • Take our Quiz!
    • Infographics
  • EXCLUSIVE
    • Newsletters
    • Top 50 Contractors
    • Contractor of the Year
    • State of the Industry
    • W&C Store
    • Market Research
    • CEUs
    • Sponsor Insights
    • Custom Content & Marketing Services
  • DIRECTORY
  • EMAGAZINE
    • eMagazine
    • Advertise
    • Archive Issues
  • SIGN UP!
Columns

Plaster Man
Finishes (Part 3): Take 10

By Robin Raymer
June 4, 2002
Part 3 in Robin's series on Finishes

Photo 1


Photo 2
I think of all we've been covering lately, this topic is by far my personal favorite: what type of texture to put on a wall. One of the reasons I like plastering so much is the tremendous amount of variety it offers. After putting a wall or ceiling back together-getting it to the basecoat stage-there are seemingly endless ways one can go about putting the final finish on the surface. This time around we're going to look at 10 different samples, from traditional to more modern styles. Let's look at them one at a time.

Photo 3

Back in the old days

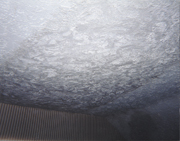
Photo #1 is from a home built around 1940. The homeowner was there when the last plasterer did the texturing. This wall is made up of wood lath and three-coat plaster. She told me that the plasterer worked off of planks and used a large natural sponge that was shaped like a horseshoe. As the plaster set, he went back over the surface with a trowel and knocked down the surface flat. It seems that there are a lot of people who take great pride in their plastered walls, while some can't wait to have them resurfaced to a smooth finish. It seems as much a matter of personal taste as when picking out which color the room is going to be.

Photo 4
Photo #2 is an example of what I call "primitive" plastering. This texture is created in a number of ways, depending on whom you talk to. I've been in homes where a broom was used to blob on the plaster and then kind of jiggled around to create a moonscape type of texture. Of course this type of texture is great for covering up major boo-boos. One way to experiment with matching this in (which is exactly what I had to do here, about an area 6-feet-by-6 feet) is to apply a finish coat of lime, sand and Keene's cement over the area being repaired, spreading some out several inches onto the existing plaster surrounding the repaired area. To make sure a proper blending takes place, the next step is to rub down the outer edge all the way around where it is being matched in.

Photo 5
Next, using a rough roller (a plastic-type roller cover that creates a textured pattern), roll over the plaster finish you've applied. This will give a nice textured background (as was the case with this texture). From here there are a lot of choices as to how to end up with a rough surface. You can use a plastic scrub brush used for washing tools and simply dab plaster onto the surface. Another method is to apply more material over a few square feet. Then take the trowel and push it down into the plaster until you feel it begin to get stuck. Now you can pull it straight out away from the surface. If this is too thick, pull it at an angle to the right or to the left slightly.

Further touch ups to the surface can be done with the use of a small trim brush or one similar to those used for water troweling smooth coat plaster. The main thing to keep in mind with many textures is that the effect you are trying to create and imitate does not necessarily have to be done in one step. Look at the surface and study the different layers that are there. Then try to simulate each layer a step at a time. This can help you match the toughest of textures.

A simple plan

Photo #3 shows a simple way to decorate a surface using a round texture style. This is often done with joint compound and I've seen a lot of it used with plaster as well. I've used two methods myself in matching repairs to such a ceiling and also in creating new ceilings where people have wanted this texture. The first method is using a sponge. If it's a rectangle-shaped sponge, use the short end and use a twisting motion to create the circles. The second way is to use a brush similar to those used by wallpaper hangers to smooth down paper. A stiff-bristled brush is what you want, fairly even across. This works well where you have to do a large area. Believe me when I say you will feel this in your neck and shoulders very quickly!

Photo 6
Photo #4 is a ceiling where a skip troweled look is desired. The first coat can be run on and left with imperfections in it. The second coat, either with the same batch or done with another batch, is applied with a trowel held nearly parallel with the surface of the ceiling. Short strokes are used with a sliding motion either to the right or to the left, and on the walls, either up or down or sideways. As you may have noticed, I am not stating anywhere my personal opinion as to which texture I like or which one I would avoid like the plague. (The last time I expressed my opinion was when I laughed at my Uncle Bob's Lime Green living room and canary yellow kitchen. I learned that when it comes to the color and/or texture of a wall or ceiling in someone else's home-well, let's just say it's best not to go there!)

Photo 7
Photos #5 and #6 are examples of sand finish swirl. This is a popular finish that is found in homes that have a two-coat veneer coat plaster applied. Photo #5 shows an up close of a random float finish. If you can picture this, the swirling begins at the edge of the ceiling. The one floating the ceiling chooses the size of the swirls and I've seen a wide variety of sizes and patterns. One tip: If you choose to try this type of texture, is to use a figure 8, leaving the top of the loop behind and then stepping slightly away from the ceiling edge-and adding another loop over the last one you created.

Photo 8
To keep a sense of direction, keep your lead elbow (the one attached to the arm you are swirling with!) pointed in the direction you want the swirls to go. If you are going around a room, bringing the swirls all to the center of the room, say to a ceiling fan, then you would keep your elbow pointed at the fan at all times, slowly working your way closer and closer to the middle of the room, moving in a counter-clockwise direction (for right handers-clockwise for lefties).

Photo 9
In photo #6, a lined swirl texture is shown. To create this pattern, a small stick can be used that's just about the measurement of the sponge being used to create the swirls. Using this stick, a mark can be made on the wall on each side of the ceiling. After spreading the sand finish coat on the ceiling and pre-floating a section, a starter row of swirls can be completed. In our example, the swirls were started on the left side of ceiling and swirled at an angle, one covering the next until they reach the other side of the ceiling. Next, a string can be strung across the ceiling. This is accomplished by tapping two nails in parallel from each other on the first two lines that were marked on the wall. Tie the string to one nail firmly but leave the other one loose so it can be loosened or tightened easily. Use the same figure 8 method, only this time make the top of the loop even with the string. When you have that row done, move the strings and continue across the entire ceiling. You'll also notice that around the light fixture a flower pattern was put on after the ceiling was swirled. This was created by gathering a line of sand finish on one side of a sponge.

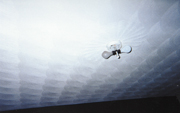
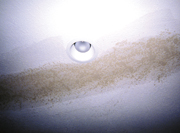
Holding the sponge firmly in place to create a starting edge, and with the base of the sponge against the fixture, a short, quick stroke to the left releases the finish which creates a petal, smaller next to the light fixture, wider at the top of the petal. This is repeated around the entire light fixture until a complete flower is made. This is best experimented with on a sample board until you get the hang of it. (Don't feel badly if it doesn't come easy. I know many people who never have gotten the hang of doing this. And then there's some who never want to.)

Photo 10
Photos #7 and #8 are examples of machine sprayed-on finishes. Photo #7 is an acoustical type popcorn texture and photo #8 shows a splatter type texture. I always approach a repair to the finish coat in two steps: First, to get the area smooth and even with the surface and, second, texturing it to match what is existing. I've worked with products that come in a can that simulate this machined-on texture. Homax products spray out of the can very quickly. However, I was impressed by the popcorn-acoustical-type spray texture. It was the best for looking like a true machine-sprayed finish. Spraytex has an excellent orange peel texture and its popcorn type acoustical also did well in blending in. Spraytex has a nice line of water-based products that don't have that heavy chemical smell that some spray textures have.

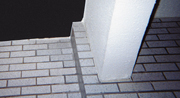
Photo #9 is an example of how brick can be simulated using plaster. In some bathrooms of older homes plaster was scored with lines to make it look like small tile. This "brick" wall pictured was done using a veneer-coat plaster system. First, a basecoat was applied to the wall. Over this the joint color was applied, a charcoal gray. Over this a heavier sand finish was applied and then textured. Using a straight edge, lines were cut through the top textured coat down to the joint color, making the brick effect. Not the most popular style around, but used in a creative way, this can render some neat designs and textured looks.

Photo #10 is an example of waterfall texture. It is a bumpy type of texture that is applied in islands of finish coat and then knocked down. The final technique is to rub down the edges so that a weathered, aged look is obtained. This can be heavy, or can be done as one homeowner put it, "I want it to look like a bad smooth coat job!" To each his own!

On another note, I had a great visit to Boston in March. I have started to use an overhead for my presentations, using a string of case studies to explain plaster to the historical and preservation groups. The sequence pictures really bring the topic of plaster to life. Plans are underway to head West in August to work with some home associations and hopefully with some contractors in that area as well, right around Pasadena, Calif. If you're interested in attending a workshop out there, just drop me a line. It looks like the next Restoration and Renovation show is going to be Cleveland in October if things go as planned.

I've had a huge amount of letters and questions that I've answered and replied to, but I feel it's time to share some of them through this column. So that's what the next column or two will be devoted to your questions and letters. Keep them coming and stay in touch. Your thoughts are always appreciated and it's nice to know that there is a strong group of you out there who are just as impressed and interested in plaster as I am.

Share This Story

Looking for a reprint of this article?
From high-res PDFs to custom plaques, order your copy today!

Robin Raymer, the "Plaster Man," is a veteran repair specialist, consultant and speaker on all aspects of the plaster trade. Robin is a 20-year veteran of the plastering trade and has produced a series of videos on the subject. Write to the Plaster Man c/o Walls & Ceilings, 2401 W. Big Beaver, Suite 700, Troy, Mich. 48084.

Recommended Content

JOIN TODAY
To unlock your recommendations.

Already have an account? Sign In

  • Abercrombie & Fitch

    EIFS in 2026: How Specialty Finishes Are Redefining Exterior Wall Systems

    As building codes, owner expectations, and design demands...
    Stucco/EIFS
    By: Regi Mendoza
  • proper air and vapor control

    From Energy Efficiency to Moisture Management: Why Air and Vapor Control Matter

    How proper air and vapor control within building...
    Building Envelope
    By: Benjamin Meyer AIA, LEED AP
  • Linear Metal Ceiling Beam Baffles

    Top 25 Ceiling Contractors of 2026

    Suspended ceilings demand precision, code compliance and...
    Ceilings
    By: John Wyatt and Tanja Kern
You must login or register in order to post a comment.

Report Abusive Comment

Manage My Account
  • eMagazine Subscription
  • Newsletters
  • Online Registration
  • Manage My Preferences
  • Subscription Customer Service

More Videos

Sponsored Content

Sponsored Content is a special paid section where industry companies provide high quality, objective, non-commercial content around topics of interest to the Walls & Ceilings audience. All Sponsored Content is supplied by the advertising company and any opinions expressed in this article are those of the author and not necessarily reflect the views of Walls & Ceilings or its parent company, BNP Media. Interested in participating in our Sponsored Content section? Contact your local rep!

close
  • medical professionals moving a patient on a stretcher through the halls of a medical building
    Sponsored byNational Gypsum Company

    What Does High Performance Mean When It Comes To Gypsum Boards?

Popular Stories

Linear Metal Ceiling Beam Baffles

Top 25 Ceiling Contractors of 2026

Wichita Biomedical Campus

Wichita Drywall Worker Dies After Scaffolding Fall

QXO Just Changed the Game-Here's What Contractors Are Asking

QXO Just Changed the Game-Here's What Contractors Are Asking

Less compound

Joint Compound Market to Reach $9.7B by 2033

Events

June 24, 2026

The Bright Side & Benefits of Designing with Integrated Lighting

Credits 1 AIA LU/HSW; 0.1 ICC CEU

This course will explore the pivotal role architects and lighting design play in creating safer, more sustainable spaces. Learn how to avoid common lighting mistakes and make informed decisions that create the best visual environment for occupants. 

January 1, 2030

Webinar Sponsorship Information

For webinar sponsorship information, visit www.bnpevents.com/webinars or email webinars@bnpmedia.com.

See our full library of webinars

View All Submit An Event

Products

2026 National Painting Cost Estimator

2026 National Painting Cost Estimator

See More Products

Related Articles

  • Plaster Man
    Finishes (Part 2): Sand Finish and Texture

    See More
  • Plaster Man
    Finishes (Part 1): Smooth on Old and New

    See More
  • Plaster Man: Plaster Man's Q&A

    See More

Related Products

See More Products
  • plaster and drywall

    Plaster and Drywall Assemblies Manual

  • Builder's Guide to Stucco, Lath & Plaster

See More Products

Events

View AllSubmit An Event
  • June 8, 2026

    Texas Lathing and Plastering Contractors Association (TLPCA) Annual Convention and Trade Show

    The TLPCA Annual Convention and Trade Show will be held at the Horseshoe Bay Resort. As in year’s past, the Annual Convention & Trade Show will offer meetings, receptions, a golf tournament, an exhibitor’s trade show, an educational program, an Annual Design Awards Competition, spouses program, awards banquet, dinners and entertainment.
  • December 10, 2025

    Next-Level Drywall Corners: Live Demo of Precision Grooving Techniques

    On-Demand This webinar will feature a live demonstration that showcases an innovative approach to creating clean, accurate drywall corners using portable grooving technology.
View AllSubmit An Event
×

Connect with the industry’s leading resource for unparalleled insights and education.

Join thousands of industry professionals today. Shouldn’t you know what they know?

JOIN NOW
  • RESOURCES
    • Advertise
    • Contact Us
    • Directories
    • Store
    • Want More
  • SIGN UP TODAY
    • Create Account
    • eMagazine
    • Newsletters
    • Customer Service
    • Manage Preferences
  • SERVICES
    • Marketing Services
    • Reprints
    • Market Research
    • List Rental
    • Survey/Respondent Access
  • STAY CONNECTED
    • LinkedIn
    • Facebook
    • Instagram
    • YouTube
    • X
  • PRIVACY
    • PRIVACY POLICY
    • TERMS & CONDITIONS
    • DO NOT SELL MY PERSONAL INFORMATION
    • PRIVACY REQUEST
    • ACCESSIBILITY

Copyright ©2026. All Rights Reserved BNP Media, Inc. and BNP Media II, LLC.

Design, CMS, Hosting & Web Development :: ePublishing