Drywall Art: Creative Layers and Textures
Craftsman Cory Merryman creates unique drywall designs

At a recent trade show in Tampa, Fla., W&C spoke to several of its readers. One of the plastering contractors said that he was not an artist but that he was a craftsman and contended that people in the trade (hand trowelled in particular) shouldn't be seen as anything but.
"It's not art, it's a science," he said.
Cory Merryman, of Merryman Drywall, in Morley, Mich., believes he has found his niche in what he calls "drywall art," fusing his finishing skills and aesthetic sensibilities to create dimensional landscapes. Whether this is art is individual opinion but what most would agree on is a good level of vision and detail have been put into his final product. Merryman creates his own patterns, illustrating them on notebook paper and projecting these designs onto the wall using standard drywall and accessories. His experimentation began in his own house.
Each corner of the house is bullnose cornerbead. Working for Kohler Drywall, of Grand Rapids, Mich., introduced Merryman to Trim-Tex and he has experimented with a portion of the company's line. For the interior windows, he wrapped the corners instead of using trim, instead making all wraps bullnose.
The texture issue
Merryman seems to have contempt for popcorn textures and wants to market different, more customized applications."I've never been a big fan (of that texture)," Merryman says. "I've never had a request to do this but several to remove it. Around here you see it still in manufactured homes or some apartments. It's quickly sprayed on and covers a lot. Luckily, it's usually not painted which makes it easy to scrape off."
In place of this finish, he suggests something hand applied, which to him represents something more original and unique but still can be as subtle as desired.
"A skip trowel texture is finished by hand and is pretty much individual to the person applying it," he says. "There are a lot of different variations of this texture. The thickness of the mud changes the appearance, as well as the finisher's taste. Kind of a general rule I like to practice: If there's more than one person applying this texture to a larger home, no one else should apply it in the same room because everyone's (stroke) is just a little different.
"First, I'll thin down my mud (topping or all purpose)," he says. "The more it's thinned, the easier it is to skip, unless it is so thin that it runs off the knife. Flattening the blade out and applying light pressure is what ‘skips' the mud off the knife as you go. Running your knife in random directions prevents the texture from looking like it all runs in the same direction. Going back over a spot lightly can flatten out globs or spots that appear a little too thick. Heavy chunks could also be scraped off after it's dry."
Another creative idea is taking a material and incorporating that into the texture. Fallen leaves are one that Merryman likes, as it utilizes his love of nature into an embroidery that replaces the restrictions some may find in standard floral wallpaper. Instead of picking dried leaves, he chooses a replica of a more durable material.
"I suppose the first and most important step in doing this type of texture would be finding the appropriate wall or ceiling to do this sort of thing," he warns.
"I once solved this problem on a large ceiling by applying the layer of mud by hand instead of with a roller," he says, referring to applying this type of texture. "I would do a section at a time, only I wouldn't do an area that was say 10-foot square. Instead, I'd do an area that looked more like a piece of a jigsaw puzzle. By doing this, in the end the overlapped edges made sense and looked to be a part of the texture.
Thinking in a creative way about his drywall art, Merryman has incorporated additional objects in his creations. "In my last house, I used real leaves and vines I picked myself but found they were too rigid and they proved difficult to apply. I learned from this and the next time I went to Wal Mart and bought some inexpensive bouquets of leaves from their crafts section. In picking my leaves I was pretty much just looking for something flimsy that I knew would hold well in the mud. I snipped the leaves from the bouquet with my tin snips and was ready for texture.
"I use USG's all-purpose mud for this texture," he continues. "I figure it's the same principle as taping as far as you want the leaves to hold as you would while taping. For taping, all-purpose is always recommended. I like to roll the mud on because I can apply it quickly and consistently this way.
"I'll use a 9-inch roller with a thick nap cover. It's important to get the mud thick enough to apply the leaves later but not so thick that while curing the mud will shrink back and crackle. I'm going to give an educated guess and say one can safely apply the mud to around 1/4-inch thick. When the mud covers the area, use a knife (personally, I prefer a 12-inch knife) to either smooth the rolled mud out or give it some sort of design by dragging the blade over the mud. To someone who has never done this, it may be wise to experiment on a piece of scrap drywall before committing to a finished product and wishing you had done it differently. I want the thickness and the design to look consistent throughout. I wouldn't want all of the drag marks from my knife running in the same direction or all the leaves facing the same way or bunched in one area while spread thin over another. This is pretty much the case for any hand-applied texture."
Once the mud is applied, it's time to apply the leaves. In a bouquet of leaves there are different sizes. Begin pushing in the leaves with your fingers. Mud should be behind them because that is what holds the leaves in place. Pushing them in forces the mud out from behind and leaves an impression. Be careful only to touch the leaf and not the mud. Once the leaves are all in place, they should not be removed. An extra coat of paint may be necessary to cover the leaves. Or in the case of real leaves, a stain blocker, such as Kilz, is used to prevent the color from bleeding through. Semi-gloss is suggested over this texture or one could wash in a little bit of color with a sponge or rag.
Layer upon layer
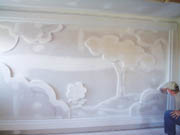
What really is an interesting take on drywall is how Merryman layers the product to resemble a mural. He stacks layers of precut board that fit together like a puzzle. The work resembles an artistic painting more than gypsum, hence the term, drywall art."The layers are applied over an already hung wall," he says. "For someone with minimal drywall experience, this could be done over an existing wall in a home but the layers would be limited by the dimensions of a sheet of drywall. Of course, with basic knowledge of finishing a seam and a little imagination, the possibilities are endless."
After deciding where the project can go and with a design in mind, the first step is to take some measurements and figure out its layout. Once these details are in place, arrange the drywall art design on the floor. For something approximately 7 feet by 14 feet, place two 14-foot sheets in the work area. Begin drawing the design out onto the sheets on the floor. Merryman's sketch of what it would look like gives him a good idea of proportions.
"The basement wall has up to five layers," says Merryman. "The frame was done just cutting rips of 1/2-inch drywall. I believe the entire frame was 8 inches wide; 5 inches wide for the black outside and 3 (inches) for the inside white. The inner-frame is four layers. The bushes and flower are three layers. The clouds, tree foliage, flower stem and lower ground are two layers. The sun, tree trunk and upper ground are one layer. The background is the original wall hung directly to the framing.
"This part was a lot of fun and exciting to see it all come together-kind of like putting a giant puzzle together," he says. "I do one layer at a time. I use a generous amount of drywall glue on the backside of the layer, running a bead within an inch or so of every curve and angle. After putting the layer in place, I fasten it to the wall with screws where possible; longer screws for additional layers.
"At this point, use a razor knife to carefully trim off any imperfections on the edges that are left behind after cutting out. A rasp would also work well.
"Arch beads don't arch to the degree of angle I was using here," he says. "One of these projects would have to be done on a very large wall for these beads to be effective. However, I did use bullnose on the frame of the mural. Three-quarter inch for the perimeter and a bullnose L-bead for the rest of the frame. I used a combination of 3M drywall vinyl bead spray adhesive and staples to apply these beads."
Because he cannot use bead on these projects, he in-place skims all edges of the layers with all-purpose mud.
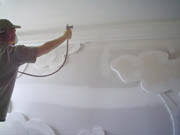
Next came a finish coat of mud. Merryman uses the USG "blue lid" topping and says it is a little easier to sand than all purpose and generally used with finish coats. The final coat is on the bead and seams and for this, he lightly sands skimmed edges with a sanding sponge to ensure they would come out smooth and once again cleaned with a Shop Vac.
"Next came a whole bunch of sanding and some caulking," he says. "I like to use an angled sanding sponge for these detailed works, as well as a work lamp with a soft white light bulb. After cleaning up you can use caulk to fill any hairline cracks where the layers meet the wall. I run a very fine bead down the angle and carefully run back down it with my finger.
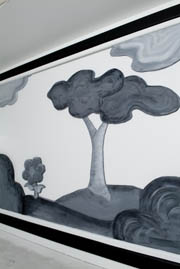
"This looks great when I first spray-prime it white," he continues. "With the right lighting, the layers really stand out. Originally, I was going to do this on a gray scale, different solid shades for different layers of white to gray to black. I started experimenting on the tree with what eventually became somewhat realistic but also in the colors I originally intended to use."
He hopes that as he builds his client base further, that more renovators and builders will find interest in applying textures and ultilizing drywall art in creative and unusual ways.
Looking for a reprint of this article?
From high-res PDFs to custom plaques, order your copy today!


