The Finish Line: Solutions for Odd Substrates
If you are determined to use EIFS as the new cladding on an existing building, you may have a real challenge trying to find a way to get the new EIFS properly attached to the wall. Here are some solutions to attaching EIFS to unusual surfaces.

Over the years I’ve seen EIFS applied to some pretty odd wall surfaces (“substrates”). If you are determined to use EIFS as the new cladding on an existing building, you may have a real challenge trying to find a way to get the new EIFS properly attached to the wall. The good news is that it is possible to attach the EIFS to unusual surfaces, although sometimes it takes some real ingenuity and doing so may be expensive. Here are some solutions:
new EIFS properly attached to the wall. The good news is that it is possible to attach the EIFS to unusual surfaces, although sometimes it takes some real ingenuity and doing so may be expensive. Here are some solutions:
One way to get a good grip on the substrate surface is to use a specialty adhesive instead of a traditional EIFS adhesive. There are various types available that will bond to glass, such as silicone or urethane marine adhesives. The trick is to find one that does not attack the foam, as many of these are solvent-based and will dissolve EPS foam used in most EIFS. 3M and Sika make adhesives that work.
The thin mortar joints between the blocks will often bond well to EIFS adhesives. Although the bonded area is small (the blocks are often about a square foot), if you put adhesive on all the joints, it’s enough to get adequate attachment strength. An easy way to apply the adhesive is to use a bulk caulking gun and apply the adhesive to the mortar joints, not to the foam. Then you stick the foam onto the adhesive beads.
You can also use masonry anchors to attach lightweight metal lath via the block’s mortar joints. Then you apply the EIFS attachment adhesive to the backside of the foam as usual, and stick the foam onto the lath. The above technique can also be used with various types of masonry units that have impervious surfaces, such as tile or brick with a glazed surface.
Removing the coating down to a normal, virgin substrate (such as concrete that had waterproofing on it) is clearly the best way to go, but sometimes the coating does not want to come off, or the removal process is noisy, messy or destructive. Applying a thin layer of lath over the coated area gives a strong bond, and then the foam is installed onto the lath in the normal way.
Using mechanical fasteners is an easy solution and works especially well at the edge of the EIFS, to hold the last foot or so of the foam to substrate. A common example of the situation is the bottom of a wall where the EIFS laps over onto a waterproofed foundation wall.

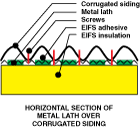
Mechanical anchors can sometimes be used to attach the new substrate with self-drilling screws directly into the metal. The shape of the metal affects whether or not mechanical anchors will work. For example, a widely spaced standing seam profile would not give the foam enough support, but a “box rib” corrugated profile will work. You can also stretch metal lath across the high points of the metal if the ribs are spaced close enough, as illustrated below.
With lightweight sheet metal, be careful that the metal is not too “springy” (deflects too much), as this can cause overflexing of the EIFS due to wind loads, leading to cracks. Also, if using screws, check that you are getting a good grip on the metal. Thin aluminum, for instance, tends to have poor pull-out strength, thus the correct fastener diameter and thread style makes a big difference. Do a test first.
If the shape of the metal allows it, you can apply sheathing over the metal. This solution works for widely spaced attachment points. You can also stretch metal lath over the metal and fasten it with screws directly to the metal, as shown below. The foam would then be applied in the normal manner, using EIFS attachment adhesive, as illustrated below.
Often it is easier to just leave the window in place, and apply sheathing over the window frame. This works fine as long as the window does not project out past the main wall. You’ll need to be able to get the sheathing screws into the window frame and mullions, and this means that large windows with no mullions–such as a sliding glass door–do not work with this method.
If the windows or doors are deeply recessed, it’s possible to build up a light subframe of channels, angles and studs, and then apply sheathing onto the frame. This allows getting the whole wall-the main wall and the opening-in one plane.
However, this “change of substrate rule” can be taken to the extreme. For instance, in an existing solid brick wall, if a garage door opening is to be covered with EIFS on a retrofit project, and the opening is to be filled with new cinder block, does a “change of substrate” actually occur? In the sense that the objective is to avoid cracks where the EIFS cross from brick to block, a well-grouted transition from one rigid substrate to another really doesn’t behave like two truly different substrates, and you can probably get away without having a joint, which might look better and wouldn’t require maintenance.
Stretching lath across the shingles and fastening it with staples is one way to get a strong surface onto which the foam can be adhered. If the shingles have a shallow thickness, you can even fasten sheathing directly onto the surface using screws or nails that go into the main wall sheathing or framing that is located behind the shingles. The same approach–of using sheathing–can be used for clapboard siding.
The key is to use an adjustable clip system to support the grid framing. The clip, which is often an angle-shaped metal bracket, is anchored to the supporting wall and grid members are attached to the clip. Then sheathing is attached to the sub-girt framing. The “grid” can have sub-girts oriented vertically or horizontally, as long as the sheathing can span between them. By using a sliding connection between the grid and the clip, an adjustment range of several inches is possible, to make the substrate sheathing plumb and in a single plane, as shown in the illustration on this page.
Lastly, when dealing with an odd substrate, contact the EIFS producer to get their input. They see lots of unusual ways of using their products and may have dealt with your situation before. Doing a trial of a nonstandard attachment system, on the specific substrate, is a good idea to see what kinds of problems crop up, such as unexpected poor adhesion or excessive labor costs. Also, ask about warranties, as odd substrates may actually function OK, but technically might not qualify for a warranty, as they are not on the producer’s list of standard approved substrates.
Over the years I’ve seen EIFS applied to some pretty odd wall surfaces (“substrates”). If you are determined to use EIFS as the new cladding on an existing building, you may have a real challenge trying to find a way to get the new EIFS properly attached to the wall. The good news is that it is possible to attach the EIFS to unusual surfaces, although sometimes it takes some real ingenuity and doing so may be expensive. Here are some solutions:
new EIFS properly attached to the wall. The good news is that it is possible to attach the EIFS to unusual surfaces, although sometimes it takes some real ingenuity and doing so may be expensive. Here are some solutions:
Glass Block
Luckily, glass block is usually only used on a small portion of most walls. Because the surface of glass block is non-absorptive, the EIFS attachment adhesive can’t form a reliable bond. Mechanical fasteners tend to crack the block, so they are not a good idea with a brittle substrate like glass.One way to get a good grip on the substrate surface is to use a specialty adhesive instead of a traditional EIFS adhesive. There are various types available that will bond to glass, such as silicone or urethane marine adhesives. The trick is to find one that does not attack the foam, as many of these are solvent-based and will dissolve EPS foam used in most EIFS. 3M and Sika make adhesives that work.
The thin mortar joints between the blocks will often bond well to EIFS adhesives. Although the bonded area is small (the blocks are often about a square foot), if you put adhesive on all the joints, it’s enough to get adequate attachment strength. An easy way to apply the adhesive is to use a bulk caulking gun and apply the adhesive to the mortar joints, not to the foam. Then you stick the foam onto the adhesive beads.
You can also use masonry anchors to attach lightweight metal lath via the block’s mortar joints. Then you apply the EIFS attachment adhesive to the backside of the foam as usual, and stick the foam onto the lath. The above technique can also be used with various types of masonry units that have impervious surfaces, such as tile or brick with a glazed surface.
Fluted Block
Masonry units with flutes (ridges) can be handled in a similar manner as with glass block, but you need to be sure the foam board joints meet over solid supports (the flutes), otherwise the flexing of the foam can cause cracking of the EIFS lamina. If the flutes are closely spaced, this should not be a problem, but sometimes you’ll find flutes spaced several feet apart, and the foam, especially if it is thin, can not take that much flexing. In this wide-spaced situation there are “Plan B” approaches discussed here.Coated Surfaces
Coated surfaces are notorious for appearing to be OK–even test patches indicate a good bond–but then they come loose. Common coatings include paint (possibly several layers), foundation waterproofing, left-over chemicals used on concrete formwork to allow the forms to easily be removed, stained wood and waterproofing on horizontal surfaces that goes up the wall behind the EIFS.Removing the coating down to a normal, virgin substrate (such as concrete that had waterproofing on it) is clearly the best way to go, but sometimes the coating does not want to come off, or the removal process is noisy, messy or destructive. Applying a thin layer of lath over the coated area gives a strong bond, and then the foam is installed onto the lath in the normal way.
Using mechanical fasteners is an easy solution and works especially well at the edge of the EIFS, to hold the last foot or so of the foam to substrate. A common example of the situation is the bottom of a wall where the EIFS laps over onto a waterproofed foundation wall.
Sheet Metal
The problem with sheet metal is similar to that with glass block: The surface is non absorptive. If the sheet metal is flat or has flat spots, you can try using a specialty adhesive, as with glass block. Be careful, though, as sheet metal is often painted and some paints are highly hydrophobic (repels water and liquid) and not bondable with the adhesive.Mechanical anchors can sometimes be used to attach the new substrate with self-drilling screws directly into the metal. The shape of the metal affects whether or not mechanical anchors will work. For example, a widely spaced standing seam profile would not give the foam enough support, but a “box rib” corrugated profile will work. You can also stretch metal lath across the high points of the metal if the ribs are spaced close enough, as illustrated below.
With lightweight sheet metal, be careful that the metal is not too “springy” (deflects too much), as this can cause overflexing of the EIFS due to wind loads, leading to cracks. Also, if using screws, check that you are getting a good grip on the metal. Thin aluminum, for instance, tends to have poor pull-out strength, thus the correct fastener diameter and thread style makes a big difference. Do a test first.
If the shape of the metal allows it, you can apply sheathing over the metal. This solution works for widely spaced attachment points. You can also stretch metal lath over the metal and fasten it with screws directly to the metal, as shown below. The foam would then be applied in the normal manner, using EIFS attachment adhesive, as illustrated below.
Windows and Doors
On retrofit projects, sometimes an existing window or door opening will need to be closed off and covered with EIFS (along with the rest of the surrounding wall). Clearly, if you remove the window and fill in the opening with the same substrate, it becomes just an extension of the main wall.Often it is easier to just leave the window in place, and apply sheathing over the window frame. This works fine as long as the window does not project out past the main wall. You’ll need to be able to get the sheathing screws into the window frame and mullions, and this means that large windows with no mullions–such as a sliding glass door–do not work with this method.
If the windows or doors are deeply recessed, it’s possible to build up a light subframe of channels, angles and studs, and then apply sheathing onto the frame. This allows getting the whole wall-the main wall and the opening-in one plane.
Change of Substrate
The popular PB type of EIFS doesn’t need joints in it like stucco, but there are cases when joints are needed because of substrate movement, rather than due to the EIFS tending to want to crack on its own. One such condition where a joint is needed is where the substrate changes from one type to another. An example of this would be where a concrete substrate changes to wood framing in the middle of a long wall. The purpose of the joint is to allow the two EIFS areas to move independently as the two substrates move relative to each other, and for the joint to take up the movement by flexing easily. The movement can come from a number of sources, such as deflection due to wind pressure, thermal expansion/contraction, or dimensional changes due to moisture content change.However, this “change of substrate rule” can be taken to the extreme. For instance, in an existing solid brick wall, if a garage door opening is to be covered with EIFS on a retrofit project, and the opening is to be filled with new cinder block, does a “change of substrate” actually occur? In the sense that the objective is to avoid cracks where the EIFS cross from brick to block, a well-grouted transition from one rigid substrate to another really doesn’t behave like two truly different substrates, and you can probably get away without having a joint, which might look better and wouldn’t require maintenance.
Shingles and Shakes
Sometimes a homeowner will want to upgrade the energy efficiency of an old house by putting EIFS over the existing shingles. Since the shingles are often old, weathered and painted, using adhesives to attach the foam is risky. Mechanical fasteners can work, as long as the old shingles are not brittle and tend to crack.Stretching lath across the shingles and fastening it with staples is one way to get a strong surface onto which the foam can be adhered. If the shingles have a shallow thickness, you can even fasten sheathing directly onto the surface using screws or nails that go into the main wall sheathing or framing that is located behind the shingles. The same approach–of using sheathing–can be used for clapboard siding.
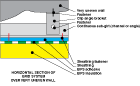
Uneven Substrates
Sometimes the wall to which the EIFS is to be attached is so uneven that even metal lath or parging out the wall will not make it flat enough. This is especially common on old stone or masonry structures. One way around this is to make a grid system of channels, and then apply sheathing to the grid framing.The key is to use an adjustable clip system to support the grid framing. The clip, which is often an angle-shaped metal bracket, is anchored to the supporting wall and grid members are attached to the clip. Then sheathing is attached to the sub-girt framing. The “grid” can have sub-girts oriented vertically or horizontally, as long as the sheathing can span between them. By using a sliding connection between the grid and the clip, an adjustment range of several inches is possible, to make the substrate sheathing plumb and in a single plane, as shown in the illustration on this page.
The Foam Finale
When dealing with odd substrates, the key item to consider is that the EIFS foam insulation is not intended to act like sheathing, and that it needs a really solid attachment system. In other words, the foam should not be used structurally; it is a cladding. This means that it needs continuous support from whatever it is attached to, and should not be unsupported for more than a few inches. It other words, it needs to be in contact with the substrate. Although there are EIFS-like insulated stucco-type systems that do use foam sheathing as the wall sheathing and the insulation, such systems are not EIFS in the normal sense.Lastly, when dealing with an odd substrate, contact the EIFS producer to get their input. They see lots of unusual ways of using their products and may have dealt with your situation before. Doing a trial of a nonstandard attachment system, on the specific substrate, is a good idea to see what kinds of problems crop up, such as unexpected poor adhesion or excessive labor costs. Also, ask about warranties, as odd substrates may actually function OK, but technically might not qualify for a warranty, as they are not on the producer’s list of standard approved substrates.
Looking for a reprint of this article?
From high-res PDFs to custom plaques, order your copy today!


