The Different Faces of Molds
It's now an era that has been hyperbolized to epic proportions. Nonetheless, fires exist everywhere and what to do with house dwellings in the aftermath continues to be a struggle in southeastern Michigan and throughout the country.
And to make matters worse, many of these buildings are petitioned to be demolished but sit idle for years. This is justifiable in many of the situations; these just aren't salvageable and need to be razed eventually. But the truth is many of these can be renovated and should be.
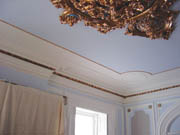
So, when W&C visited a home in Ann Arbor, Mich., that had been fire blazed two years earlier, not only was it refreshing to see a historically registered 6,000-square-foot-home being restored but also preserved, with traditional plastering and ornamental work.
Historically plastered
The Wells-Babcock House was built for and by then-mayor of Ann Arbor, Dr. Ebenezer Wells, in 1858. It was originally styled in Italianate architecture. From there, several owners made different renovations and remodeling projects to the house, changing its layout dramatically different from its original design; it was divided up into units for apartment space, each with its own kitchen and bathroom.Fast forward 144 years: In 2002, a worker that was removing an old fire escape accidentally set blaze to a bird's nest that was hidden, which then fell into a 30-inch tall space between the first and second floors. Flames spread between floors and the fire naturally dwelled throughout half the structure. The estimated damage to the Wells-Babcock was approximately $1.5 million.
Hoffman Plastering had done several projects for the house before, so the current owner Steve Welch, of Ann Arbor Realty, contracted the company to restore all the interior plaster and ornamentation.
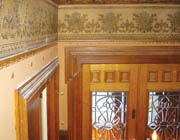
Doug and Rick Hoffman, operating out of Ann Arbor, have been proactive in different plastering techniques for quite some time (the family business began in 1931). Rick recently went to England and studied different textures while exploring London and Cambridge. The plastering detail they've shown attention to the Wells-Babcock Home, in Ann Arbor, is the result of working in the trades several years.
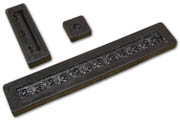
Many duplicates of trim, wainscoting, medallions, dentil and more were recreated to its original shape and size. But instead of ordering pre-manufactured pieces of 8-foot trim and molding and other decorative products, Rick makes his own. From existing pictures and what was salvageable material, Rick had to recreate leather-backed wallpaper, wood molding (as intricate as floral design) and several other designs.

After working on the project for a year, more or less, the Wells-Babcock house is now hosting an open house to the public. Presenters from the Old Fourth Ward Historical Association, the Preservation Ladies (and Gents), along with Ann Arbor Realty, will discuss the home's ornate features and remodeling in the summer months of 2004.
Sidebar
How to Replicate Original Molds: A Conceptual Take
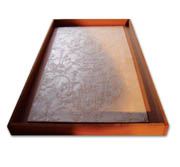
Step 1: Build a box that exceeds the perimeters of the piece by at least 2 to 3 inches on each side. Be sure to caulk all corners and base of frames that meet. Step 2: Install the model piece that is going to be replicated inside the box. For a piece of wood that is 2 inches wide by a 1 foot, adhere the piece to the box, with the design side up.
Step 3: Mix and prepare rubber mold. Mix the Part A and Part B material, which is the rubber to make the template. Once the rubber is mixed according to the specs, pour it inside the box (very slowly) to at least 2 inches above the piece, so it's flush with the top of the box.*
Step 4: Let the product cure (to ensure a safe setting period, let it set for 24 hours).
Step 5: Disassemble the box to better access the rubber mold.
Step 6: Gently pull the rubber mold from the bottom side out.
Step 7: The "positive mold" is ready to make. Using the rubber molding as the base, pour mixed plaster (depends on the type of mold, based on the moldings thickness). Hoffman uses mostly USG plaster but most plaster manufacturers will assist in recommended best-suited material for molding.
Step 8: Pour mixed plaster in at a liquid consistency, until the top of the rubber mold is completely flush. To work out air bubbles, tap the full length of the rubber molding, which will help work out air bubbles.
Step 9: Let that mix set at least several to 24 hours.
Step 10: Pull the plaster free from the rubber mold, bottom side out.
*If the original model isn't properly prepared, it may be permanently stuck inside of the rubber and the original will have been ruined and the rubber wasted. Different types of molding compounds require different preparation of the model.
Looking for a reprint of this article?
From high-res PDFs to custom plaques, order your copy today!


