Snap it Up

Architects love to push the limits of design. Fortunately, today's building materials are keeping up from a functional and aesthetic standpoint. In my 27 years as a union carpenter-four years in residential and the last 23 in commercial and high-end residential construction-I have witnessed products becoming incredibly better and faster. Today's ceiling products are designed to carry more, span more and curve more.
Of particular note are drywall suspension systems. Using these custom-curved main tees and straight tees create a fast, simple and affordable way to create architectural designs in the commercial environment.
THE HISTORY OF DRYWALL CEILINGS
Yet, it hasn't always been so simple. When I began working with McNulty Bros. Co., drywall ceilings were hung from drop-hangered black iron and tie-wired drywall furring channel suspension systems. It was a time-consuming and exhausting process, usually involving a lather.Lathers would install heavy, No. 9 hanger wires 4 feet on center. The process was lengthy because they had to drill, toggle or eyelet lag into the deck above, which was typically either concrete or, in the case of older buildings, clay tile. To do this, the lather had to have a scaffold at the ceiling to install the hangers. Once the hangers were installed, water levels (not lasers) were used to mark the location of the bend in the hanger wires where the load was to be located. The iron was then saddle-tied at each hanger drop and each end of the iron was coupled with a matching iron stiffening splice. Finally, metal hat-shaped drywall channel was tie wired to the iron. Intricate soffits, domes, lunets and vaults could be incorporated to complement flat and level drywall ceilings.
Early valleys and vaults had their own challenges. For these curved ceilings, the mechanic would swing or trace the radius on a bench or flat surface and then bend the support iron on a three-wheeled black iron bending piece of equipment or on their knee to achieve the desired curve in the iron. Naturally, whether the ceiling required an intricate design or a simple flat plane, the ceiling framing attachment to the deck proceeded in the same fashion.
Knowing this, imagine the intense labor and skill that went into creating the ornate ceilings and domes seen in many historical buildings. McNulty Bros.' history in Chicago includes Holy Name Cathedral, the Harold Washington Library and the Wrigley Building, to name just a few distinctive buildings. So, one can understand how drastically I have seen drywall ceiling products and installation practices change over the years.
MODERN CONVENIENCES
Fortunately, this time-consuming process has become a thing of the past. Creating drywall ceilings has evolved into a far less complicated process.I usually work with a USG drywall suspension system that enables me to design and install most types of drywall ceiling-from flat to curved to islands. A system like this is pre-engineered, which means all of its components are designed to reduce time spent measuring, bending, cutting and connecting flat and curved suspension system components.
Main tees snap together, greatly reducing wire tying and screw attachment. Cross tees then snap into the main tees, eliminating all wire tying associated with hat channel installations. And curved main tees allow the system to smoothly transition to flat ceilings, soffits or acoustical ceiling suspension systems.
The advantage of the system is the snap-lock connection in the tee. As an installer, one is able to install one side of the 4-foot tees and still allow the other side of the tee to hang with only one side stabbed without the tee falling out of the first connection. The 12-foot main tees are rigid enough and the connection strong and positive enough to allow it to be stabbed from a distance. The sound of the click of the connector lets one know that it is locked in. There's no need to physically be at the main tee connection. From my experience, the installation of the drywall suspension system is 40 to 50 percent faster than the older iron suspension system. That reflects a huge savings in installation time.
The evolution of tools and technology-rolling scaffolds, battery drills, powder-actuated tools, pole gun extensions and laser leveling-has also helped streamline the installation process. For instance, when installing a lighter, No. 12 hanger with a deck fastening pin and a hanger carrying clip assembly, one can use multishot powder-actuated tools with a pole gun to fasten hangers from the floor instead of setting up a working platform closer to the ceiling. In addition, laser leveling has made it easier and more accurate to install the perimeter wall angle, and locate and bend the hangers at the selected ceiling height for the grid system.
SET TENANTS APART
So, how can drywall ceilings set one apart from other contractors in the commercial arena? Once the flat drywall ceiling has been quickly installed, there are options as to which enhancements to add next-vaults, valleys, square light pockets, multiple steps, drywall clouds with a suspension trim edge or domes.
And one can transition from a drywall suspension system to an acoustical system. These enrichments may be used in building lobbies, exterior entrances, bathrooms, interior tenant spaces, as part of the window/diffuser details at the perimeter of buildings and in many, many more applications.
PLANNING AHEAD
The key to success is all in the planning and scheduling phases of the project. Remember, it generally takes four to six weeks for the manufacturer to produce one of these curved prefabricated systems for domes or vaults, so order all the parts early in the process. However, the flat tees used in traditional flat drywall ceilings or to create soffits or light coves, typically are in stock for immediate shipment.Additionally, these enriched ceiling systems require careful coordination with other trades and the integration of their products into the ceiling system. Through proper planning, both time and money will be saved by getting the job done on schedule and correctly.
Things to consider:
• HVAC: Know where all supply and returns are located, their sizes, types of dividers and whether square or linear diffusers will be used. The advantage of drywall grid is its flexibility to adapt to linear differences in diffuser sizing and location. Moving tees off center is easy as they can be moved 8 inches within the system or to the desired dimensions using grid clip accessories.
• Sprinklers: Know the location of all sprinkler drops, feeder runs and main runs so that one can work around them accordingly during the drywall grid framing phase.
• Electrical: It's also very important to know what types of light fixtures are going to be used-high hat can lights, linear recessed lighting or suspended lighting. Insist that the light laonet show all rough openings so that one is able to accommodate lighting needs. Did the architect specify a soffit to house can lights? Or will one need a pocket light?
The coordination meeting with the other trades mutually establishes a sequence of work for all involved parties. Once all of this information has been obtained, one is now able to lay out the drywall grid system by overlaying all of the main runners and tees to accommodate electrical, plumbing and HVAC systems. Finally, one can provide feedback to the architect on the ceiling height because the heights and dimensions of the items that need to fit within the system are known. Once the architect agrees on the height or has instructed an offending subcontractor and his equipment to relocate, installation can begin.
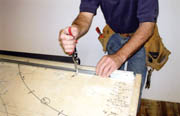
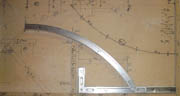
Set the laser to the ceiling height, attach the wall moldings to the perimeter of the room, fasten hangers into the overhead deck, establish the hanger bends with the use of the laser and start the grid. While wall molding and support hangers are being installed, focus on adding pre-engineered design details. To save time, have a ground bench man prefabricate the multiple or repetitious soffit enrichment shapes. As illustrated in the accompanying photos, a simple mockup for soffits can be constructed so that the bench man can mass-produce all of the straight tees that need to be cut on site for insertion into the framing system. While saving time, this also ensures that all pieces are cut to identical lengths.
Simply put, pre-engineered components, simple installation instructions and added speed and ease of installation add up to take the guesswork out of ceiling projects. See how easy it can all snap together?
Looking for a reprint of this article?
From high-res PDFs to custom plaques, order your copy today!


